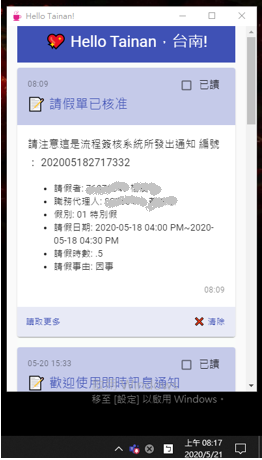
這是一個 Windows 作業系統下的 Desktop 應用程式,可以實際上線應用的即時訊息通知應用。這是在 Windows 10 下開發的,用到的軟體版本比較新,Windows 10 以下沒有測試過,也沒有壓力測試。這是 Windows 作業系統的 Desktop 應用程式,無法用在行動裝置下運作。
應用程式啟動後,會釘選在 Windows 右下角的托盤(Tray)上。
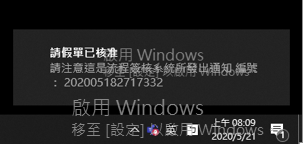
我的 Windows 還沒有合法版權,有個浮水印,有點模糊。當有通知 (Notification) 時,Windows 的右下角會馬上顯示通知。
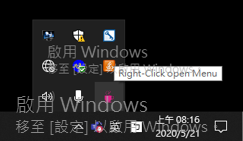
如果還沒打開應用程式的顯示畫面,可以按托盤上的圖示
安裝 應用程式放在 XXX000(\XXXXXFS01)Y:\INSTALL\Electron\Buzzer-win32-x64-v101.zip,複製到你的硬碟,然後解壓縮。
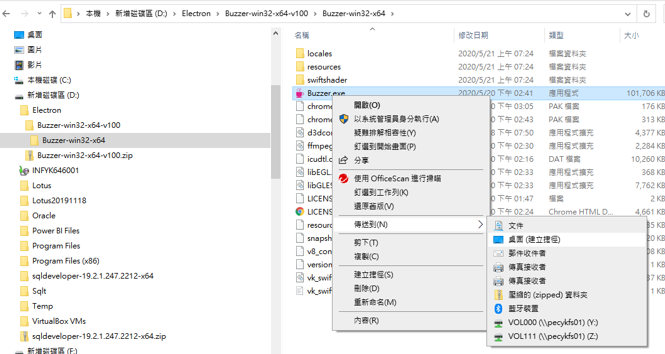
可以直接執行 Buzzer.exe。 這裡將建立一個桌面捷徑,可以從桌面啟動。
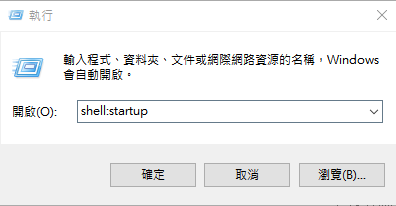
通常托盤上的應用程式都會在使用者登入時自動執行。 按 Windows 標誌鍵 + R 開啟執行視窗,輸入 shell:startup,然後選取 [確定]。
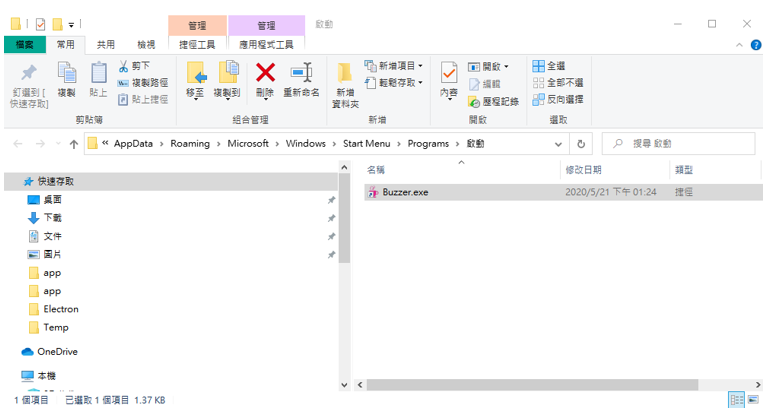
這會開啟 [啟動] 資料夾。
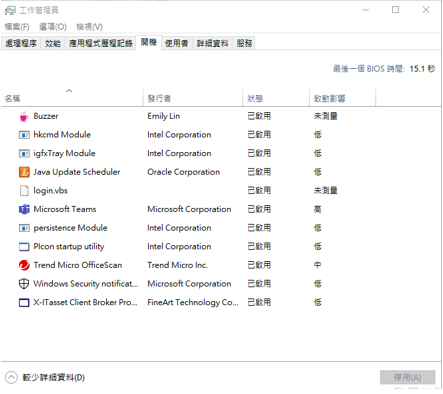
將剛剛產生的桌面捷徑拖拉到這個目錄中,下次你重新登入後,這個應用程式就會自動啟動。加入啟動目錄後,你可以從工作管理員中確認。
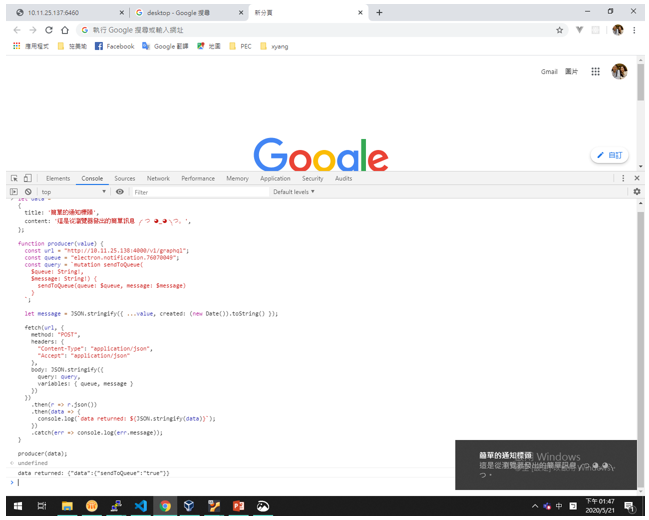
發送訊息 首先發送一個最簡單的訊息,先從瀏覽器開始。將下列程式碼複製到瀏覽器執行。
將第 9 行的 queue 改為你的登入帳號 ,不要通通送到我這裡,並確認你的 Buzzer 應用程式已啟動。
sendSimple.js 1 2 3 4 5 6 7 8 9 10 11 12 13 14 15 16 17 18 19 20 21 22 23 24 25 26 27 28 29 30 31 32 33 34 35 36 37 let data ={ title: '簡單的通知標頭' , content: '這是從瀏覽器發出的簡單訊息 ༼ つ ◕_◕ ༽つ。' , }; function producer (value ) const url = "http://10.11.xx.xxx:x000/v1/graphql" ; const queue = "electron.notification.7x0x0x4x" ; const query = `mutation sendToQueue( $queue: String!, $message: String!) { sendToQueue(queue: $queue, message: $message) } ` ; let message = JSON .stringify({ ...value, created : (new Date ()).toString() }); fetch(url, { method: "POST" , headers: { "Content-Type" : "application/json" , "Accept" : "application/json" }, body: JSON .stringify({ query: query, variables: { queue, message } }) }) .then(r => .then(data => console .log(`data returned: ${JSON .stringify(data)} ` ); }) .catch(err =>console .log(err.message)); } producer(data);
Windows 視窗右下角應該馬上會出現通知訊息。
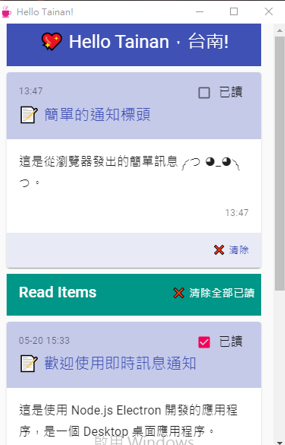
打開應用程式視窗,訊息也會同時儲存在客戶端。這裡客戶端使用的是 IndexDB。
應用程式架構 送出簡單的訊息,再看更多的範例之前,先來看看應用程式的架構。
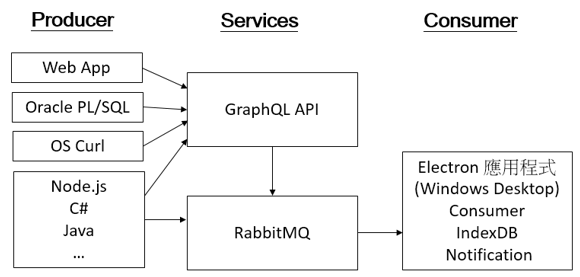
除了 Web App 可從瀏覽器透過 GraphQL API 發送訊息到 RabbitMQ,也可從 Oracle PL/SQL、任何有安裝 Curl 程式的裝置與任何的軟體語言,透過 GraphQL API 發送訊息到 RabbitMQ。也可以直接透過任何語言的 AMQP 程式庫連結 RabbitMQ 發送訊息。客戶端的 Electron 則直接透過 Node.js 的 amqplib 程式庫直接連結 RabbitMQ 消費訊息(Consume)。Electron 應用程式一啟動就回連結 RabbitMQ。架構不是很複雜,但可以創造無限的應用空間。
之前的文章 RabbitMQ with C# 有介紹過 RabbitMQ,可以參考一下它的基本的運作方式。
發送訊息範例 除了先前簡單的發送通知,以下則提供不同的發送範例。發出通知的基本訊息資料結構可以如下。
data.js 1 2 3 4 5 6 7 8 9 10 11 12 13 14 15 16 17 18 19 { title: '歡迎使用即時訊息通知' , content: '這是使用 Node.js Electron 開發的應用程序,是一個 Desktop 桌面應用程序。' , link: { text: '瞭解更多 Electron ...' , url: 'https://www.electronjs.org/' }, description: [ '使用 Node.js、Electron 與 React 開發。' , '使用 RabbitMQ 即時訊息代理。' , '可以從瀏覽器透過 GraphQL API 發送訊息。' , '可以使用 Oracle PL/SQL 發送訊息。' , '可以從作業系統使用 Node.js 或 Curl 發送訊息。' , '訊息使用 IndexDB 儲存在使用者端。' ], created: (new Date ()).toString(), from : 'Hello Tainan' , type: 'info' }
除了 title 與 content 是必須的,其他都是可選的。
link 可以設定對外的連結,將會開啟預設的瀏覽器。
description 是陣列,可以是一些條列式的訊息。
type 則只有 ‘urgent’ 會有不同的標頭圖示。
透過 GraphQL API 這是專門為 RabbitMQ 發送訊息的 GraphQL API,所有管道都可以透過此 API 發送訊息,首先是 Web App 從瀏覽器發送範例,APEX 就是此類型。
記得修改第 24 行的 queue 改為接收者的 AD 登入帳號。第 28 行直接發送到 RabbitMQ 的 Queue,也就是特定的消費者。
sendToQueueApi.js 1 2 3 4 5 6 7 8 9 10 11 12 13 14 15 16 17 18 19 20 21 22 23 24 25 26 27 28 29 30 31 32 33 34 35 36 37 38 39 40 41 42 43 44 45 46 47 48 49 50 const fetch = (typeof window === 'undefined' ) ? require ('node-fetch' ) : window .fetch;let data ={ title: 'React 函式庫 宣告式' , content: 'React 讓實作互動式的使用者界面變得一點也不痛苦。你只要在你的應用程式中為每個情境設計一個簡單的 view,React 就會在資料變更時有效率的自動更新並 render 有異動的元件。' , link: { text: '讀取更多 React 函式庫細節' , url: 'https://zh-hant.reactjs.org/' }, description: [ '宣告式的 view 讓你更容易預測你的程式的行為,同時也較為容易除錯。' , '首先實作一個擁有 state 的獨立 component,然後組合他們建立複雜的使用者介面。' , '這是透過 GraphQL API 傳送的' ], created: (new Date ()).toString(), from : 'GraphQL API' }; producer(data); function producer (value ) const url = "http://10.11.xx.xxx:x000/v1/graphql" ; const queue = "electron.notification.7x0x0x4x" ; const query = `mutation sendToQueue( $queue: String!, $message: String!) { sendToQueue(queue: $queue, message: $message) } ` ; let message = JSON .stringify({ ...value, created : (new Date ()).toString() }); fetch(url, { method: "POST" , headers: { "Content-Type" : "application/json" , "Accept" : "application/json" }, body: JSON .stringify({ query: query, variables: { queue, message } }) }) .then(r => .then(data => console .log(`data returned: ${JSON .stringify(data)} ` ); }) .catch(err =>console .log(err.message)); }
第 26 行直接發送到 RabbitMQ 的 Exchange electron.notification , 則可以發送給所有的綁定這個 Exchange 的 Queue。預設上,這個 Electron 應用程式的所有 Queue 都會綁定到這個 Exchange electron.notification 。
sendToExchangeApi.js 1 2 3 4 5 6 7 8 9 10 11 12 13 14 15 16 17 18 19 20 21 22 23 24 25 26 27 28 29 30 31 32 33 34 35 36 37 38 39 40 41 42 43 44 45 46 47 48 49 50 51 52 const fetch = (typeof window === 'undefined' ) ? require ('node-fetch' ) : window .fetch;let data ={ title: 'React 函式庫 宣告式' , content: 'React 讓實作互動式的使用者界面變得一點也不痛苦。你只要在你的應用程式中為每個情境設計一個簡單的 view,React 就會在資料變更時有效率的自動更新並 render 有異動的元件。' , link: { text: '讀取更多 React 函式庫細節' , url: 'https://zh-hant.reactjs.org/' }, description: [ '宣告式的 view 讓你更容易預測你的程式的行為,同時也較為容易除錯。' , '首先實作一個擁有 state 的獨立 component,然後組合他們建立複雜的使用者介面。' , '這是透過 GraphQL API 傳送的' ], created: (new Date ()).toString(), from : 'GraphQL API' }; producer(data); function producer (value ) const url = "http://10.11.xx.xxx:x000/v1/graphql" ; const exchange = "electron.notification" ; const routingKey = "" ; const query = `mutation sendToExchange( $exchange: String!, $routingKey: String, $message: String!) { sendToExchange(exchange: $exchange, routingKey: $routingKey, message: $message) } ` ; let message = JSON .stringify({ ...value, created : (new Date ()).toString() }); fetch(url, { method: "POST" , headers: { "Content-Type" : "application/json" , "Accept" : "application/json" }, body: JSON .stringify({ query: query, variables: { exchange, routingKey, message } }) }) .then(r => .then(data => console .log(`data returned: ${JSON .stringify(data)} ` ); }) .catch(err =>console .log(err.message)); }
以上兩個範例也可以從 Node.js 發送。首先安裝 npm node-fetch 程式庫,程式碼則不需更改。程式碼的第一行會自動判斷不同的環境使用不同的 fetch 程式庫。JavaScript 與 Node.js 可共用程式碼。
sendToQueueApi.js 1 2 const fetch = (typeof window === 'undefined' ) ? require ('node-fetch' ) : window .fetch;...
sendToQueueApi.js $ node sendToQueueApi data returned: {"data" :{"sendToQueue" :"true" }}
從 Oracle 發送訊息最麻煩的就是 JSON 的組合,如何將資料組合成 JSON 格式,常常讓我非常沮喪,盡快將 Oracle 資料庫升級是解決的方法。這裡則是範例,希望能有些幫助。
首先送到單一的消費者 。你需要修改的主要在 32 ~ 49 行之間,當然也不要忘了第 9 行的 l_queue。
oracle_pls_sendtoqueue 1 2 3 4 5 6 7 8 9 10 11 12 13 14 15 16 17 18 19 20 21 22 23 24 25 26 27 28 29 30 31 32 33 34 35 36 37 38 39 40 41 42 43 44 45 46 47 48 49 50 51 52 53 54 55 56 57 58 59 60 61 62 63 64 65 66 67 68 69 70 71 72 73 74 75 76 77 78 79 80 81 82 83 84 85 86 87 88 89 90 91 92 93 94 95 96 97 98 99 100 101 102 declare l_http_request Utl_Http.req; l_http_response Utl_Http.resp; l_url varchar2(255) := 'http://10.11.xx.xxx:x000/v1/graphql'; l_buffer varchar2(32767); l_item varchar2(1024); l_queue varchar2(32) := 'electron.notification.7x0x0x4x'; l_messages varchar2(32767); l_query varchar2(32767); function message(empno_in in number) return varchar2 is rec emp%rowtype; l_title varchar2(100); l_content varchar2(1024); l_description varchar2(1024); l_link varchar2(1024); l_link_text varchar2(100); l_link_url varchar2(100); l_type varchar2(10) := 'urgent'; l_from varchar2(20) := 'Oracle Lx00 Demo'; l_message varchar2(1024); begin select * into rec from emp where empno = empno_in; l_title := '這是員工 ' || rec.ename || ' 資料'; l_content := '員工: ' || rec.empno || ' Name: ' || rec.ename || ' Job: ' || rec.job || ' Hiredate: ' || to_char(sysdate,'yyyy-mm-dd"T"hh24:mi:ss') || ' Salary: ' || rec.sal || ' Comm: ' || rec.comm || ' Department: ' || rec.deptno; l_description := '['|| '\"員工: ' ||rec.empno||' '||rec.ename||' '||rec.job||'\",'|| '\"薪資: ' ||(rec.sal + nvl(rec.comm,0))||'\",'|| '\"到職日: ' ||to_char(rec.hiredate,'yyyy-mm-dd"T"hh24:mi:ss')||'\"'|| ']'; l_link_text := '讀取更多'; l_link_url := 'http://10.11.26.201:8080/ords/demo/employee/' || rec.empno; l_link := '{'|| '\"text\":' ||'\"'||l_link_text||'\",'|| '\"url\":' ||'\"'||l_link_url||'\"'|| '}'; l_message := '"{'|| '\"title\":' ||'\"'||l_title||'\",'|| '\"content\":' ||'\"'||l_content||'\",'|| '\"description\":' ||l_description||','|| '\"link\":' ||l_link||','|| '\"created\":'||'\"'||to_char(sysdate,'yyyy-mm-dd"T"hh24:mi:ss')||'\",'|| '\"from\":' ||'\"'||l_from||'\",'|| '\"type\":' ||'\"'||l_type||'\"'|| '}"'; return l_message; exception when no_data_found then return '"{}"'; end ; begin for rec in (select rownum , empno from emp where empno = 7788 ) loop l_item := message(rec.empno); l_messages := l_messages||case rec.rownum when 1 then '' else ',' end ||l_item; end loop ; l_query := '{"query":"mutation sendToQueue($queue: String!, $message: String!)' || ' {\n sendToQueue(queue: $queue, message: $message)\n}",' || '"variables":{"queue":"' || l_queue || '","message":' || l_messages ||'}}'; dbms_output.put_line(l_query); l_http_request := utl_http.begin_request(l_url, 'POST','HTTP/1.1'); utl_http.set_header(l_http_request, 'user-agent', 'mozilla/4.0'); utl_http.set_header(l_http_request, 'content-type', 'application/json; charset=utf-8'); utl_http.set_header(l_http_request, 'Content-Length', lengthb(l_query)); utl_http.set_body_charset(l_http_request, charset => 'utf-8'); utl_http.write_text(l_http_request, l_query); l_http_response := utl_http.get_response(l_http_request); begin loop utl_http.read_line(l_http_response, l_buffer); dbms_output.put_line(l_buffer); end loop ; utl_http.end_response(l_http_response); exception when utl_http.end_of_body then utl_http.end_response(l_http_response); end ; end ;/
以下則是送到 RabbitMQ Exchange,這可以發送到多個消費者。
oracle_pls_sendtoexchange 1 2 3 4 5 6 7 8 9 10 11 12 13 14 15 16 17 18 19 20 21 22 23 24 25 26 27 28 29 30 31 32 33 34 35 36 37 38 39 40 41 42 43 44 45 46 47 48 49 50 51 52 53 54 55 56 57 58 59 60 61 62 63 64 65 66 67 68 69 70 71 72 73 74 75 76 77 78 79 80 81 82 83 84 85 86 87 88 89 90 91 92 93 94 95 96 97 98 99 100 101 102 declare l_http_request Utl_Http.req; l_http_response Utl_Http.resp; l_url varchar2(255) := 'http://10.11.xx.xxx:x000/v1/graphql'; l_buffer varchar2(32767); l_item varchar2(1024); l_exchange varchar2(32) := 'electron.notification'; l_routing_key varchar2(32) := ''; l_messages varchar2(32767); l_query varchar2(32767); function message(empno_in in number) return varchar2 is rec emp%rowtype; l_title varchar2(100); l_content varchar2(1024); l_description varchar2(1024); l_link varchar2(1024); l_link_text varchar2(100); l_link_url varchar2(100); l_type varchar2(10) := 'info'; l_from varchar2(20) := 'Oracle Lx00 Demo'; l_message varchar2(1024); begin select * into rec from emp where empno = empno_in; l_title := '這是員工 ' || rec.ename || ' 資料'; l_content := '員工: ' || rec.empno || ' Name: ' || rec.ename || ' Job: ' || rec.job || ' Hiredate: ' || to_char(sysdate,'yyyy-mm-dd"T"hh24:mi:ss') || ' Salary: ' || rec.sal || ' Comm: ' || rec.comm || ' Department: ' || rec.deptno; l_description := '['|| '\"員工: ' ||rec.empno||' '||rec.ename||' '||rec.job||'\",'|| '\"薪資: ' ||(rec.sal + nvl(rec.comm,0))||'\",'|| '\"到職日: ' ||to_char(rec.hiredate,'yyyy-mm-dd"T"hh24:mi:ss')||'\"'|| ']'; l_link_text := '讀取更多'; l_link_url := 'http://10.11.xx.xxx:x0x0/ords/demo/employee/' || rec.empno; l_link := '{'|| '\"text\":' ||'\"'||l_link_text||'\",'|| '\"url\":' ||'\"'||l_link_url||'\"'|| '}'; l_message := '"{'|| '\"title\":' ||'\"'||l_title||'\",'|| '\"content\":' ||'\"'||l_content||'\",'|| '\"description\":' ||l_description||','|| '\"link\":' ||l_link||','|| '\"created\":'||'\"'||to_char(sysdate,'yyyy-mm-dd"T"hh24:mi:ss')||'\",'|| '\"from\":' ||'\"'||l_from||'\",'|| '\"type\":' ||'\"'||l_type||'\"'|| '}"'; return l_message; exception when no_data_found then return '"{}"'; end ; begin for rec in (select rownum , empno from emp where empno = 7788 ) loop l_item := message(rec.empno); l_messages := l_messages||case rec.rownum when 1 then '' else ',' end ||l_item; end loop ; l_query := '{"query":"mutation sendToExchange($exchange: String!, $routingKey: String, $message: String!)'|| ' {\n sendToExchange(exchange: $exchange, routingKey: $routingKey, message: $message)\n}",'|| '"variables":{"exchange":"'||l_exchange||'","routingKey":"'||l_routing_key||'","message":'|| l_messages||'}}'; l_http_request := utl_http.begin_request(l_url, 'POST','HTTP/1.1'); utl_http.set_header(l_http_request, 'user-agent', 'mozilla/4.0'); utl_http.set_header(l_http_request, 'content-type', 'application/json; charset=utf-8'); utl_http.set_header(l_http_request, 'Content-Length', lengthb(l_query)); utl_http.set_body_charset(l_http_request, charset => 'utf-8'); utl_http.write_text(l_http_request, l_query); l_http_response := utl_http.get_response(l_http_request); begin loop utl_http.read_line(l_http_response, l_buffer); dbms_output.put_line(l_buffer); end loop ; utl_http.end_response(l_http_response); exception when utl_http.end_of_body then utl_http.end_response(l_http_response); end ; end ;/
curl 1 2 3 curl 'http://10.11.xx.xxx:x000/v1/graphql' \ -H 'Content-Type: application/json' \ --data '{"query":"mutation sendToQueue($queue: String!, $message: String!) {sendToQueue(queue: $queue, message: $message)}","variables":{"queue":"electron.notification.7x0x0x4x","message":"{\"title\":\"歡迎使用即時訊息通知\",\"content\":\"這是使用 Node.js Electron 開發的應用程序,是一個 Desktop 桌面應用程序。\",\"created\":\"Fri May 22 2020 11:26:13 GMT+0800 (GMT+08:00)\"}"}}'
透過 GraphQL API 幾乎可以包含所有的發送。也可使用各程式語言的 AMQP 程式庫直接連結 RabbitMQ Server。
直接使用程式語言 AMQP 程式庫 以下是 Node.js 的範例,C# 則請參考 RabbitMQ with C# 。
使用 Node.js amqplib 程式庫 首先我將一些基礎的工作抽象化,這包含了 RabbitMQ 開始的 Connection 等初始化工作,這個抽象化物件包含了,訊息的製造(Producer)與訊息的消費(Consumer)方法。其餘的就比較簡單了。
這裡會用到兩個 npm Node.js 程式包,amqplib 與 node-uuid。amqplib 是 RabbitMQ 的驅動程式,node-uuid 則會用來將每個送來的訊息設定一個唯一的編號,這可以用來追蹤訊息的流動。
shell $ yarn add amqplib $ yarn add node-uuid
以下是抽象層程式碼。
rabbitmq.js 1 2 3 4 5 6 7 8 9 10 11 12 13 14 15 16 17 18 19 20 21 22 23 24 25 26 27 28 29 30 31 32 33 34 35 36 37 38 39 40 41 42 43 44 45 46 47 48 49 50 51 52 53 54 55 56 57 58 59 60 61 62 63 64 65 66 67 68 69 70 71 72 73 74 75 76 77 78 79 80 81 82 83 84 85 86 87 88 89 90 91 92 93 94 95 96 97 98 99 const EventEmitter = require ('events' ).EventEmitter;const amqp = require ("amqplib" );const uuid = require ('node-uuid' );class RabbitMQ extends EventEmitter constructor () { super (); this .url = "10.11.xx.xxx" ; this .channel = null ; this .exchange = "electron.notification" ; this .sendToQueue = this .sendToQueue.bind(this ); this .publish = this .publish.bind(this ); this .receive = this .receive.bind(this ); this .initialize = this .initialize.bind(this ); this .initialize().then(() =>this .emit('ready' , { publish: this .publish, sendToQueue: this .sendToQueue, receive: this .receive })); } initialize() { return amqp .connect(`amqp://${this .url} ` ) .then(conn => process.once('SIGINT' , function ( console .log('amqp connection close.' ); conn.close(); }); return conn.createChannel() }) .then(channel => this .channel = channel; }) .catch(console .warn) }; sendToQueue(queue, content) { return this .channel.sendToQueue( queue, new Buffer.from(content), { persistent: true , headers: { messageId: uuid.v4(), api: "Electron-sendToQueue-v1" , firstPublish: Date .now() } } ); } publish(exchange, routingKey, content) { return this .channel.publish( exchange, routingKey, new Buffer.from(content), { persistent: true , headers: { messageId: uuid(), api: "Electron-publish-v1" , firstPublish: Date .now() } } ); } receive(queue, routingKey, callback) { return this .channel.assertQueue(queue) .then(q => return this .channel.bindQueue(queue, this .exchange, routingKey) }) .then(() => return this .channel.consume(queue, msg => { let data; if (msg) { try { data = msg.content.toString(); callback(null , data); } catch (err) { console .log(msg.content.toString()); callback(err); } this .channel.ack(msg); } else { callback(new Error ('amqp consume error.' )); } }); }) .catch(console .warn); } } module .exports = new RabbitMQ();
這個抽象層使用了 EventEmitter,所產生的實例會是一個可觀察物件 (Observable),第 44 行除了送出訊息本身外,還加了一個訊息標頭,可用來追蹤訊息的流程 (45 ~ 52)。
要注意的是第 72 行 receive 方法,這是一個消費者(Consume),第 73 行如果 queue 已存在,則返回 queue, 如果不存在則會新建一個 RabbitMQ 的 queue。
第 75 行預設會將這個 queue 綁定到 electron.notification Exchange。所以如果第一次使用這個 Electron 應用程式,就會以登入的 AD 帳號產生一個 RabbitMQ 的 queue,例如,electron.notification.7x0x0x4x,預設綁定到 RabbitMQ electron.notification Exchange。這也就是說每個 electron.notification.xxxxxxxx queue 都會是 electron.notification Exchange 的成員,送到 Exchange electron.notification 的訊息都會轉發送到每個成員。
註解的第 81 行,則是額外加入的訊息標頭。
其他的就簡單了。 送給特定的人:
sendToQueue.js 1 2 3 4 5 6 7 8 9 10 11 12 13 14 15 16 17 18 19 20 21 22 23 24 25 26 const rabbit = require ('./rabbitmq' );let message = JSON .stringify( { title: '請假單已核准' , content: '請注意這是流程簽核系統所發出通知 編號 : 202005182717332' , description: [ '請假者: 7x0x0x4x 林小明' , '職務代理人: 8x0x0x1x 陳大華' , '假別: 01 特別假' , '請假日期: 2020-05-18 04:00 PM~2020-05-18 04:30 PM' , '請假時數: .5' , '請假事由: 因事' ], created: (new Date ()).toString(), from : 'Send To Queue' , link: { text: '讀取更多' , url: 'http://xxxxxf3n06.xxx.com.tw:7x8x/pls/yx2x/f?p=109:2' }, } ); rabbit.on('ready' , ({ sendToQueue }) => { sendToQueue('electron.notification.7x0x0x4x' , message); });
送給所有人:
publish.js 1 2 3 4 5 6 7 8 9 10 11 12 13 14 15 16 17 18 19 20 21 22 23 24 25 26 27 const rabbit = require ('./rabbitmq' );let message = JSON .stringify( { title: '歡迎使用即時訊息通知' , content: '這是使用 Node.js Electron 開發的應用程序,是一個 Desktop 桌面應用程序。' , link: { text: '瞭解更多 Electron ...' , url: 'https://www.electronjs.org/' }, description: [ '使用 Node.js、Electron 與 React 開發。' , '使用 RabbitMQ 即時訊息代理。' , '可以從瀏覽器透過 GraphQL API 發送訊息。' , '可以使用 Oracle PL/SQL 發送訊息。' , '可以從作業系統使用 Node.js 或 Curl 發送訊息。' , '訊息使用 IndexDB 儲存在使用者端。' ], created: (new Date ()).toString(), from : 'Hello Tainan' , type: 'info' } ); rabbit.on('ready' , ({ publish }) => { publish('electron.notification' , '' , message); });
其他的程式語言可參考 RabbitMQ Tutorials 。
群組 我沒有在這個 Electron 應用程式中設定群組,我不想讓應用程式架構太複雜。但這並不表示我們不能在這個訊息通知有群組的功能。
這可用 RabbitMQ 來達成,甚至群組還可以細分子群組。
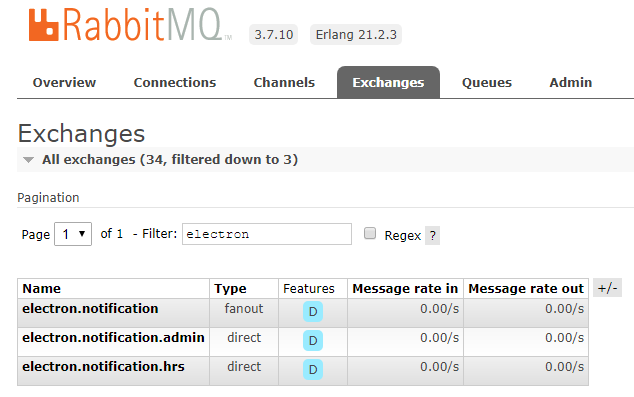
建立 electron.notification.hrs Exchange。注意這個 Exchange type 是 direct。
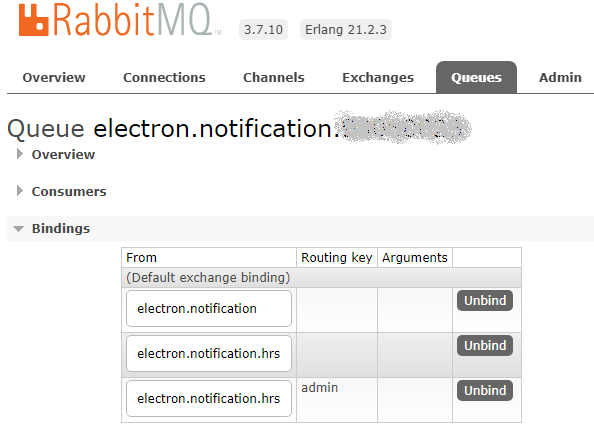
這個 electron.notification.9x0x0x2x 則有 3 個 Exchange Bindings,下列送出的訊息這個 Queue 都會收到:
直接送給 Queue electron.notification.9x0x0x2x。
送給 Exchange electron.notification,Routing Key 是 ‘’。
送給 Exchange election.notification.hrs, Routing Key 是 ‘’。
送給 Exchange election.notification.hrs, Routing Key 是 ‘admin’。
publish.js 1 2 3 4 ... rabbit.on('ready' , ({ publish }) => { publish('electron.notification.hrs' , 'admin' , message); });
所以上面送出的訊息意思就是,只有群組 hrs 下的子群組 admin 才會收到訊息。
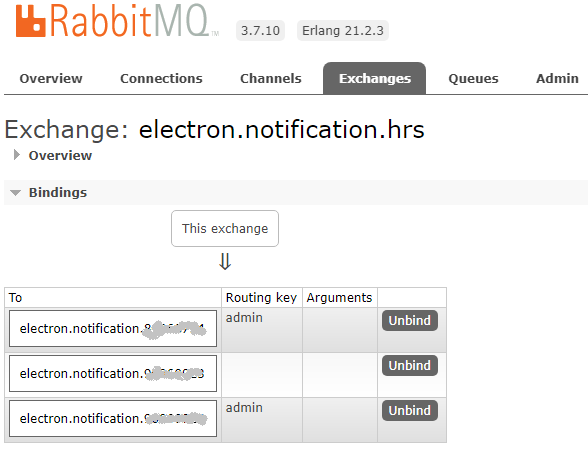
群組成員可以用 RabbitMQ 管理介面查到。
RabbitMQ 功能強大,又提供友善的管理介面,有銀行業的加持,可以善加利用。希望這個 Electron 應用程式能引起各位的應用思考,常常聽到同仁有分散式資料整合的困擾, GraphQL API 與 RabbitMQ 創造了無限的空間。
使用 APEX 建立一個使用者發送訊息的 UI 介面,你就可以利用這個 Electron 應用程式,創造一個對談應用程式。
原始程式碼 這裡是程式碼,有興趣的可以看看,我使用的編輯器是 Visual Studio Code。Visual Studio Code 也是用 Electron 開發的。
source $ git clone z:\dba\git\depot\electron-react-rabbit.git your_directory $ cd your-directory $ yarn install $ yarn start
開發環境是 Node.js + Election + React + Babel.js + Webpack。
開發完打包:
source 它會產生 out 目錄,裡面就是最後上線的程式碼。也就是我們之前解壓縮後的目錄。
祝 健康快樂, Coding 愉快。
通知訊息會儲存在客戶端的 IndexDB 資料庫,你可以查看,也可以清除不再需要的訊息。操作很簡單,不須多做描述。
