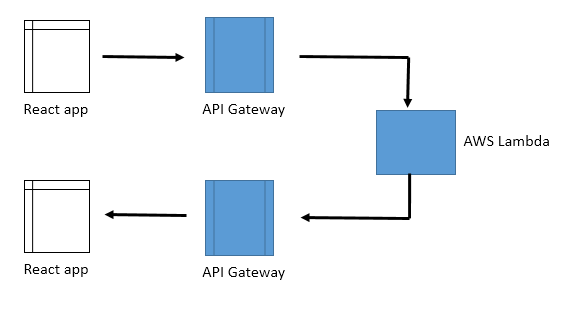
大多數應用程序的核心是 data/API 層。該層包含很多東西,在無伺服器世界中,這通常由 API 端點和無伺服器函式的組合而成。 這些無伺服器函式可能執行某些邏輯並返回數據、與某種資料庫進行互動,甚至與另一個 API 端點進行互動。
使用 Amplify 創建 API 有兩種主要方法:
- Amazon API Gateway 和 Lambda 函式的組合。
- 連接到某種類型的數據源(資料庫、Lambda 函式或 HTTP 端點)的 GraphQL API。
API Gateway 是一項 AWS 服務,可讓您創建 API 終端節點,並將它們透過 Lambda 函式路由到不同的服務。 當進行 API 調用時,它將透過 API Gateway 路由,調用 Lambda 函式,然後返迴結果。 使用 Amplify CLI,您可以創建 API Gateway 端點和 Lambda 函式,CLI 會自動將 API 配置為能夠透過 HTTP 請求調用 Lambda 函式。
創建 API 後,您需要一種與之互動的方法。 使用 Amplify client,您將能夠使用 Amplify API class 從客戶端將請求發送到 API Gateway 端點。 API class 允許你與 GraphQL API 以及 API Gateway 端點進行互動。

在這個範例中,您將創建第一個簡單的全棧無伺服器應用程序,這個應用程序將透過 API Gateway 端點與無伺服器函式進行互動。 你將會使用 CLI 創建 API 端點以及無伺服器函式,然後使用 Amplify 客戶端程式庫與 API 進行互動。 從這個範例我們將可以學習到無伺服器應用程序的基本運作。
創建和部署無伺服器函式
無伺服器函式(serverless functions)是許多無伺服器應用程序的核心。無伺服器函式在無狀態計算容器(stateless compute containers)中運行代碼,這些容器是事件驅動(event-driven)的、短暫的(short-lived,可能只持續一次調用),並由雲提供商完全管理。 這些函式可以動態的擴展,不需要擴增額外的伺服器。
大多數人認為無伺服器函式是透過 API 的調用而觸發的,但這些函式也可以由各種不同的事件觸發。 除 HTTP 請求外,一些無伺服器函式常會用在例如將圖像上傳存儲服務、資料庫的新增、更新、或刪除資料,甚至來自其他無伺務器函式。
無伺服器函式會自動擴展,因此,如果流量激增,則無需擔心你的應用程序效能。 第一次調用函式時,服務提供者將創建該函式的實例並運行其處理程序方法(handler method)以處理事件。 函式完成並返迴結果後,它將會被保留並繼續處理其他事件(如果有)。如果在第一個事件仍在處理過程中發生其他調用,則服務將創建另一個實例。
無伺服器函式還具有不同於傳統基礎架構的支付模型。 像 AWS Lambda 之類的服務,您只需對根據函式的請求數量以及代碼執行所耗的時間付費。 這與其他基礎架構之類的服務(無論是否正在使用它們)不同。
現在了解了無伺服器函式的運作概念,我們要來創建一個無伺服器函式,並將其掛接到 HTTP API。
創建 React 應用程序及安裝所需的程式庫
首先需要創建客戶端 React 應用程序:
yarn create react-app amplify-react-api-app |
接下來,需要安裝依賴項。對於此應用程序,只需要 AWS Amplify 程式庫:
yarn add aws-amplify |
安裝依賴項後,現在可以在 React 應用程序的根目錄中初始化一個新的 Amplify 專案:
amplify init |
? Enter a name for the project cryptoapp |
現在,已經創建了 Amplify 專案和 React 應用程序,可以開始添加新功能。
創建新的無伺服器函式
下一步,我們將創建將用於此應用程序的無伺服器函式。 在本範例中我們要構建一個加密貨幣應用程序。 首先,將在函式中使用一組硬編碼的加密貨幣的陣列資料,然後將其返回給客戶端。 稍後,我們將更新此函式以調用實際的 API(CoinLore),以異步方式獲取即時的加密貨幣現值。
要創建無伺服器函式,執行以下命令:
amplify add function |
? Select which capability you want to add: Lambda function (serverless function) |
現在在專案的根目錄下會產生一個新的子文件夾 amplify,在 amplify 目錄中會看到一個新的子文件夾: amplify/backend/function/cryptofunction
無伺服器函式代碼
創建此資源時,會在 amplify/backend 中創建了一個 function 的新文件夾。 CLI 創建的所有函式都將存儲在此文件夾中。 目前,您只有一個函式,cryptofunction 。 在crytpofunction 文件夾中,您將看到幾個配置文件以及主要功能代碼所在的 src 目錄。
無伺服器函式本質上僅是獨立運行的封裝應用程序。 由於您創建的函式是使用 JavaScript 編寫的,因此你會看到在所有 JavaScript 應用程序中通常都會看到的所有內容,包括 package.json 和 index.js。
接下來,看一下位於 cryptofunction 文件夾中 src/index.js 的函式入口點。
1 | const awsServerlessExpress = require('aws-serverless-express'); |
在此文件中,您將看到一個名為 exports.handler 的函式。 這是無伺服器函式調用的入口點。 調用該無伺服器函式時,這就是運行的代碼。
您可以根據需要直接在此函式中處理事件,但是由於這裡將使用 API,因此更好的方式是透過代理使用 Express 的路由。 這樣做可以在一個函式中提供多個路由,每個路由提供不同的 HTTP 請求方法,例如 get、put、post 、和 delete。 無伺服器框架提供了一種簡便的方法,並且已為您在 src/app.js 文件中內置了函式樣板。
在 index.js 中,你看到的代碼:
awsServerlessExpress.proxy(server, event, context, 'PROMISE').promise; |
此代碼就是將事件,上下文和路徑代理到在 app.js 中運行的 Express 伺務器的地方。
然後,在 app.js 中,你將能夠針對為 API 創建任何的 HTTP 請求路由。
創建 /coins 路由
現在了解了應用程序的結構,讓我們在 app.js 中創建一個新的路由,並返回一些數據。 將創建的路由是 /coins 路由。 此路由將返回包含 coins 陣列的物件。
開啟 amplify/backend/function/cryptofunction/src/app.js,在第一個 app.get(‘/items’) 路由之前,添加以下代碼:
1 | app.get('/coins', function(req, res) { |
這裡暫時使用一組硬編碼的加密貨幣信息陣列。 使用此路由調用該函式時,它將以一個物件方式作為回應,該物件包含一個名為 coins 的屬性。
創建一個新的 API
創建並配置了函式後,現在要在其前端放置一個 API,以便你可以透過 HTTP 請求來觸發它。
為此,我們將使用 Amazon API Gateway。 API Gateway 是一項完全託管的服務,使開發人員能夠創建、發佈、維護、監控、和保護 REST 與 WebSocket API。 Amplify CLI 和 Amplify client 程式庫都有支援 API Gateway。
在這裡,我們會將創建一個新的 API Gateway 端點並將其配置為調用之前所創建的 Lambda 函式。
要創建 API,可以從專案的根目錄使用 Amplify add 命令:
amplify add api |
? Please select from one of the below mentioned services: REST |
部署 API 和 Lambda 函式
現在已經創建了函式和 API,現在需要將它們部署到你的帳戶中。 為此,要執行 Amplify push 命令:
amplify push |
√ Successfully pulled backend environment local from the cloud. |
您可以隨時使用 Amplify CLI status 命令來查看專案的當前狀態。status 命令將列出專案中所有當前配置的服務並為您提供每個服務的狀態:
amplify status |
Current Environment: local |
在此狀態輸出中要注意的主要是 Operation。 Operation 告訴你下次在專案中執行 push 時將發生什麼。 Operation 屬性會設置為 Create、Update、Delete、或 No Change。
這裡也顯示了我們創建的 REST API 端點,你可以測試一下我們創建的 /coins 路由:
https://k1zvup7xx7.execute-api.ap-southeast-1.amazonaws.com/local/coins
與 API 互動
現在伺服端已經部署了資源,可以開始從客戶端 React 應用程序與 API 進行互動。
要在任何應用程序中使用 Amplify client 客戶端程式庫,通常需要在應用程序最上層 root 層級進行基本配置。
在創建資源時,CLI 會將有關的資源信息記錄在 aws-exports.js 文件中。 我們將使用此文件來配置客戶端應用程序以便能與 Amplify 架構一起使用。
要配置該應用,請打開專案根目錄下的 src/index.js,並將以下內容添加到最後一個 import 後面:
1 | import Amplify from 'aws-amplify'; |
Amplify Client API 類別
在配置客戶端應用程序之後,您可以開始與資源進行互動了。
Amplify client 客戶端程式庫具有各種 API 類別,可以將其導入並用於各種類型的函式中,包括用於身份驗證的 Auth,用於 S3 中存儲項目的 Storage 以及用於與 REST 和 GraphQL API 進行互動的 API。
在這裡,您將使用 API 類別。 API 有多種可用方法,包括用於與 REST API 互動的 API.get、API.post、API.put、與 API.del。以及用於與 GraphQL API 互動的 API.graphql。
使用 REST API 時,API 包含三個參數:
API.get(apiName: String, path: String, data?: Object) |
- apiName
從創建 API 時提供的名稱。 在我們的範例中,將是 cryptoapi。 - path
要與之互動的路徑。 在我們的範例中,將是 /coins。 - data
這是一個可選的物件,其中包含你要傳遞給 API 的所有屬性,包括 headers、query 字符串參數、或 body。
在我們的範例中,API 調用將如下所示:
API.get('cryptoapi', '/coins') |
API 返回一個 promise,這意味著您可以使用 promise 或 async 函式處理所有內容。
API.get('cryptoapi', '/coins') |
或
const data = await API.get('cryptoapi', '/coins') |
接下來,讓我們從客戶端調用 API 並渲染數據。 修改專案根目錄下的 src/App.js:
1 | import React, { useState, useEffect } from 'react' |
然後,啟動 app:
yarn start |
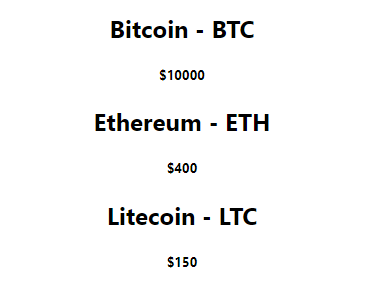
現在你可以從瀏覽器看到:

調用另一個 API
接下來,我們將更新 AWS Lambda 函式以調用另一個 API,即 CoinLore API,它將從 CoinLore 服務返回動態的數據。使用者也將能夠設置過濾器,例如 limit 與 start,限制從 API 返回的項目數量。
首先,你需要一種可以在 Lambda 函式中與 HTTP 端點進行互動的方法。 在本範例中要使用的是 Axios 程式庫。 Axios 是可用於瀏覽器和 Node.js 且是基於 Promise 的 HTTP 客戶端程式庫。
您需要做的第一件事是在 function 文件夾中安裝 Axios 程式庫,以便從 Lambda 函式發送 HTTP 請求。 切換到 amplify/backend/function/cryptofunction/src 目錄,安裝 Axios,然後切換回應用程序的根目錄:
cd amplify/backend/function/cryptofunction/src |
接下來,更新 amplify/backend/function/cryptofunction/src/app.js 中的 /coins 路由:
1 | const axios = require('axios') |
在前面的函式中,我們導入了 Axios 程式庫,然後對 CoinLore API 進行了 API 調用。 在 API 調用中,你可以將 start 和 limit 參數傳遞給請求,以定義要返回的項目數量以及起始點。
在 req 參數中,有一個 apiGateway 屬性,用於保存事件(event)和上下文(context)變數。 在函式中,檢查該事件是否存在以及該事件的 queryStringParameters 屬性。 如果 queryStringParameters 屬性存在,我們將使用這些值來更新基本的 URL。 使用 queryStringParameters,用戶可以在查詢 CoinLore API 時指定起始值和極限值。
要注意,這裡修改的是伺服器端的函式,使用的是 Node.js 環境,導入程式庫用的是 require 函式。
函式更新後,在終端中執行 push 命令來部署更新:
amplify push |
√ Successfully pulled backend environment local from the cloud. |
更新客戶端
現在,我們要更新客戶端的 React 應用程序,為用戶提供指定 limit 和 start 參數的選項。
為此,您需要添加用於用戶輸入的字段(field),並為用戶提供一個按鈕以觸發新的 API 請求。
更改專案根目錄下的 src/App.js:
function App() { |
然後,啟動 app:
yarn start |
恭喜,你已經部署了第一個無伺務器 API!
這裡要牢記以下幾點:
- Lambda 函式可以從各種事件中觸發。 在此範例中,我們使用來自 API Gateway 的 API 調用觸發了該函式。
- 可以使用 Amplify CLI 的指令 amplify add function 創建 Lambda 函式,並且可以使用 amplify add api 創建 API。
- 可以將單個 API Gateway 端點配置為與多個 Lambda 函式一起使用。 在此範例中,我們僅將其連接到單個函式。
- Lambda 函式本質上是獨立的 Node.js 應用程序。 在此範例中,我們選擇 Express 應用程序來處理諸如 get、post、和 delete 之類的 REST 方法。在這個範例中我們僅使用了 get 調用。
- Amplify client 客戶端程式庫中的 API 類別可同時用於 GraphQL 以及 REST API。