之前的範例中,我們結合使用 API Gateway 和無伺服器函式創建了一個基本的 API 層。 這種組合非常強大,但是我們尚未與真實的資料庫進行互動。
在本範例中,我們將創建一個與 DynamoDB NoSQL 資料庫互動以執行 CRUD + L (create,read,update,delete 和 list) 操作的 GraphQL API。 你將了解什麼是 GraphQL,為什麼開發人員採用它,以及它是如何工作的。
我們將構建一個便箋應用程序 (notes app),該應用程序將允許用戶創建,更新和刪除便箋。 它還將啟用 GraphQL 訂閱,以便能即時取得更新,如果有用戶正在使用該應用程序,並且新增了便箋,則其他的用戶將會即時看到新增的便箋。
有關 GraphQL,你可以參考之前的文章,什麼是 GraphQL ? 。
儘管有多種方法可以實現 GraphQL 伺服器,但在本範例中,我們將使用 AWS AppSync。 AppSync 是一項託管服務,使我們能夠使用 Amplify CLI 快速輕鬆地部署 GraphQL API,解析器 (resolvers) 和數據源。
創建 GraphQL API 現在,我們要使用 GraphQL API 來構建 Notes 應用程序。
首先要創建一個新的 React 應用程序並安裝必要的依賴項。 該應用程序將使用 AWS Amplify client 程式庫與 API 互動,使用 uuid 用於創建唯一的 ID 和用於樣式設置的 Ant Design 程式庫。
yarn create react-app notesapp

cd notesapp

yarn add aws-amplify antd uuid
現在,在新應用程序的根目錄下,創建 Amplify 專案:
? Enter a name for the project: notesapp
? Enter a name for the environment: dev
? Choose your default editor: Visual Studio Code
? Choose the type of app that you're building: javascript
Please tell us about your project
? What javascript framework are you using: react
? Source Directory Path: src
? Distribution Directory Path: build
? Build Command:  npm.cmd run-script build
? Start Command: npm.cmd run-script start
? Do you want to use an AWS profile? Yes
? Please choose the profile you want to use default
初始化 Amplify 專案後,我們可以添加 GraphQL API:
? Please select from one of the below mentioned services: GraphQL
? Provide API name: notesapi
? Choose the default authorization type for the API: API key
? Enter a description for the API key: public
? After how many days from now the API key should expire (1-365): 365
? Do you want to configure advanced settings for the GraphQL API: No, I am done.
? Do you have an annotated GraphQL schema? No
? Choose a schema template: Single object with fields (e.g., “Todo” with ID, name, description)
? Do you want to edit the schema now? (y/N) Y
接下來,在你的編輯器中打開位於 notesapp/amplify/backend/api/notesapi/schema.graphql 的基本 GraphQL schema (由 CLI 生成)。 將 schema 更新為以下內容:
1
2
3
4
5
6
7
type Note @model { id: ID! clientId: ID name: String ! description: String completed: Boolean }
這個 schema 具有一個主要的 Note 類型,其中包含五個字段。字段可以為可為 nullable (不是必需)或 non-nullable (必需)。 用 ! 指定 non-nullable 字段。
此架構中的 Note 類型以 @model 指令註釋。 該指令不是 GraphQL SDL 的一部分; 它是 AWS Amplify GraphQL Transform 程式庫的一部分。
GraphQL Transform 程式庫允許你使用 @model、@connection、@auth 等不同的指令註釋GraphQL schema。
我們在此架構中使用的 @model 指令會將基本 Note 類型轉換為擴展的 AWS AppSync GraphQL API,並具有:
附加的 schema queries 和 mutations 的其他架構定義 (Create、Read、Update、Delete、和 List 操作)。
附加的 GraphQL schema subscriptions 的架構定義。
DynamoDB 資料庫。
映射到 DynamoDB 資料庫的所有 GraphQL 操作的解析器代碼(resolver code)。
只需定義好 GraphQL schema Note 類型,現在,執行 push 命令部署 API:
? Are you sure you want to continue? Yes
? Do you want to generate code for your newly created GraphQL API: Yes
? Choose the code generation language target: javascript
? Enter the file name pattern of graphql queries, mutations and subscriptions: src\graphql\**\*.js
? Do you want to generate/update all possible GraphQL operations - queries, mutations and subscriptions: Yes
? Enter maximum statement depth [increase from default if your schema is deeply nested]: 2
部署完成後,將在你的帳戶中成功創建 API 和資料庫。 接下來,讓我們在 AWS 控制台中打開新創建的 AppSync API,並測試一些 GraphQL 操作。
AWS AppSync 控制台 你隨時可以打開 AWS AppSync 控制台:
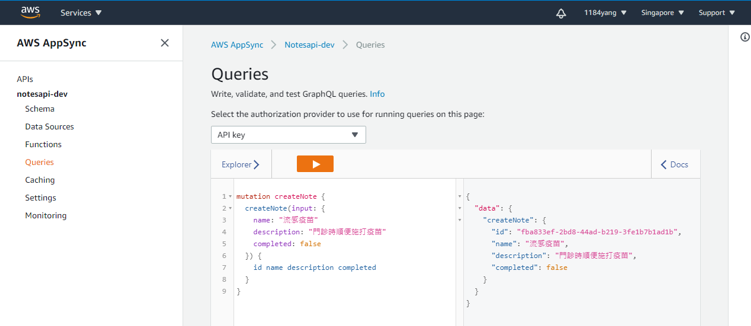
這會在瀏覽器打開 AppSync 控制台,單擊左側菜單中的 Queries 以打開查詢編輯器。在這裡,你可以使用 API 測試 GraphQL queries、mutations、和 subscriptions。
首先,我們要用 mutation 新增一筆便箋資料。 在查詢編輯器中,執行以下的 mutation:
1
2
3
4
5
6
7
8
9
mutation createNote { createNote(input: { name: "流感疫苗" description: "門診時順便施打疫苗" completed: false }) { id name description completed } }
現在,您已經建立了一個項目,你可以嘗試查詢它。 讓我們查詢應用程序中的所有便箋:
1
2
3
4
5
6
7
8
9
10
query listNotes { listNotes { items { id name description completed } } }
你也可以用 ID 查詢單筆便箋:
1
2
3
4
5
6
7
8
query getNote { getNote(id: "<NOTE_ID>") { id name description completed } }
使用 AWS Serverless GraphQL API,定義好 GraphQL schema 後,我們沒有寫任何一行 GraphQL 代碼。現在 GraphQL API 已部署並且可以正常運行,讓我們開始編寫一些前端代碼。
構建前端 React 應用程序 我們需要做的第一件事是配置 React 應用程序以識別位於 src/aws-exports.js 的 Amplify 資源。 為此,請打開 src/index.js 並在最後一個 import 下面添加以下內容:
1
2
3
import Amplify from 'aws-amplify' import config from './aws-exports' Amplify.configure(config)
Listing Notes (GraphQL Query) 現在已經配置了應用程序,可以開始對 GraphQL API 進行調用。 我們將要執行的第一個操作將是 GraphQL query 以列出所有便箋。
這個查詢將返回一個陣列,我們將使用陣列的 map 映射所有項目,顯示便箋的 name,description 以及是否已經 completed。
在 src/App.js 中,首先將以下內容加入文件頂部:
1
2
3
4
5
import React, { useEffect, useReducer } from 'react' import { API } from 'aws-amplify' import { List } from 'antd' import 'antd/dist/antd.css' import { listNotes } from './graphql/queries'
useEffect and useReducer這裡 。
API
ListAnt Design 程式庫中的 UI 組件 以渲染呈現列表。
listNotes
接下來,我們將需要創建一個變數來保存我們的初始應用程序狀態。 因為我們的應用程序將保存並使用多個狀態變數,所以我們將使用 React 的 useReducer 掛鉤 來管理狀態。
useReducer 具有以下 API:
const [state, dispatch] = useReducer(reducer <function >, initialState <any >)
useReducer 接受兩個參數,
類型為 (state, action) => newState 的 reducer 函式。
initialState 初始值。
基本的用法如下:
1 2 3 4 5 6 7 8 9 10 11 12 13 14 15 16 17 18 19 20 21 22 23 24 const initialState = { notes : [] }function reducer (state, action ) switch (action.type) { case 'SET_NOTES' : return { ...state, notes : action.notes } default : return state } } const [state, dispatch] = useReducer(reducer: <function>, initialState: <any>)/* Sending an update to the reducer */ const notes = [{ name: 'Hello Tainan' }] dispatch({ type: 'SET_NOTES', notes: notes }) /* Using the state in your app */ { state.notes.map(note => <p>{note.name}</p>) }
調用時,useReducer 掛鉤會返回一個包含兩個項目的陣列:
state: 應用程序 state 變數並賦予初始狀態值。
dispatch: 這是一個函式,此函式會調用 reducer 函式更新應用程序 state 變數值。
這裡的 Notes 應用程序的初始狀態將包含一個用於便箋的 notes,form values 表單值,error 錯誤和 loading 加載狀態的陣列。
在 src/App.js 中,在最後一個 import 之後添加 initialState 物件:
1
2
3
4
5
6
const initialState = { notes: [], loading: true , error: false , form: { name : '' , description : '' } }
然後創建 reducer。 目前,reducer 只具有設置 notes 陣列或設置錯誤狀態兩種事例:
1
2
3
4
5
6
7
8
9
10
function reducer (state, action ) switch (action.type) { case 'SET_NOTES' : return { ...state, notes : action.notes, loading : false }; case 'ERROR' : return { ...state, loading : false , error : true } default : return state } }
接下來,我們要更新 App 主函式。最後整個 src/App.js 會如下:
1
2
3
4
5
6
7
8
9
10
11
12
13
14
15
16
17
18
19
20
21
22
23
24
25
26
27
28
29
30
31
32
33
34
35
36
37
38
39
40
41
42
43
44
45
46
47
48
49
50
51
52
53
54
55
56
57
58
59
60
61
62
63
64
65
66
67
68
69
70
71
72
73
import React, { useEffect, useReducer } from 'react' import { API } from 'aws-amplify' import { List } from 'antd' import 'antd/dist/antd.css' import { listNotes } from './graphql/queries' const initialState = { notes: [], loading: true , error: false , form: { name : '' , description : '' } } function reducer (state, action ) switch (action.type) { case 'SET_NOTES' : return { ...state, notes : action.notes, loading : false }; case 'ERROR' : return { ...state, loading : false , error : true } default : return state } } function App ( const [state, dispatch] = useReducer(reducer, initialState) useEffect(() => fetchNotes() }, []) async function fetchNotes ( try { const notesData = await API.graphql({ query: listNotes }) dispatch({ type : 'SET_NOTES' , notes : notesData.data.listNotes.items }) } catch (err) { console .log('error: ' , err) dispatch({ type : 'ERROR' }) } } function renderItem (item ) return ( <List.Item style={styles.item}> <List.Item.Meta title={item.name} description={item.description} /> </List.Item> ) } return ( <div style={styles.container}> <List loading={state.loading} dataSource={state.notes} renderItem={renderItem} / > </div> ); } const styles = { container: { padding: 20 }, input: { marginBottom: 10 }, item: {textAlign: 'left' }, p: { color: '#1890ff', cursor: 'pointer' } } export default App;
第 26 行,調用 useReducer 並傳入 reducer 和 initialState 以創建 state 和 dispatch 變數。
第 32 行,fetchNotes 函式將調用 AppSync API,並在 API 調用成功後於第 37 行以一個 action 物件當引數調用 dispatch 函式,用來重置 notes 陣列。
第 28 行,透過 useEffect 掛鉤來調用 fetchNotes 函式初始化 notes 陣列。
第 57 行,我們使用 Ant Design 的 List 組件。 該組件將映射到陣列(dataSource)上,並調用 renderItem 函式為陣列中的每個項目返回一個 UI 組件。
第 66 行,為我們將用於此應用程序的組件創建一些樣式。
現在我們可以啟動 app 了!
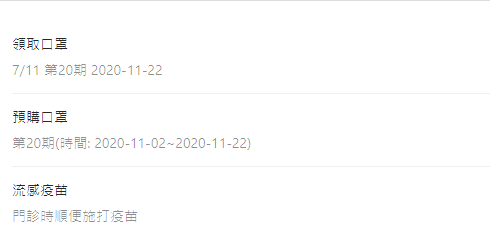
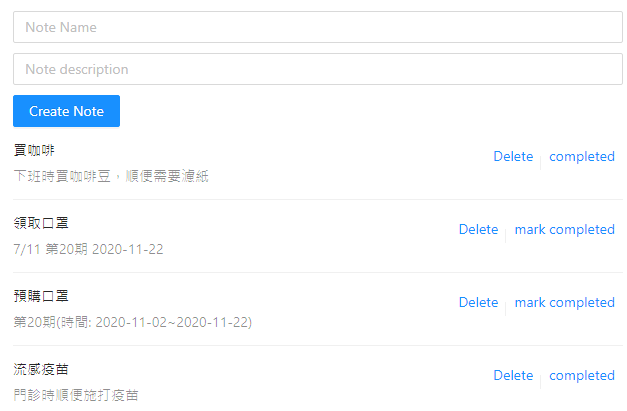
你應該會在瀏覽器上看到當前 notes 便箋列表。
Creating Notes (GraphQL Mutation) 現在你已經知道要如何查詢便箋列表,再來讓我們看一下如何新增便箋。我們需要:
用於建立新便箋的 HTML 表單。
當用戶輸入表單時更新狀態的函式。
將新便箋添加到 UI,並發送 API 調用 GraphQL API 以便將新便箋存入資料庫的函式。
首先,導入 UUID 程式庫,以便可以為客戶端創建唯一的標識符,以便稍後在實現訂閱時,我們可以識別創建便箋的客戶端。
我們還將從 Ant Design 導入 Input 和 Button 組件:
import { v4 as uuid } from 'uuid'
import { List, Input, Button } from 'antd'
接下來,您將需要導入 GraphQL createNote mutation 定義:
import { createNote as CreateNote } from './graphql/mutations'
然後在最後一個 import 下面創建一個新的 CLIENT_ID 變數:
const CLIENT_ID = uuid();
更新 reducer 函式中的 switch 語句以添加三個新案例。
向本地端的狀態添加新便箋
重置 HTML 表單狀態以清除表單
用戶輸入時更新表單狀態
case 'ADD_NOTE' : return { ...state, notes : [action.note, ...state.notes]} case 'RESET_FORM' : return { ...state, form : initialState.form } case 'SET_INPUT' : return { ...state, form : { ...state.form, [action.name]: action.value }}
接下來,在 App 主函式內創建 createNote 函式:
1
2
3
4
5
6
7
8
9
10
11
12
13
14
15
16
17
18
async function createNote ( const { form } = state if (!form.name || !form.description) { return alert('please enter a name and description' ) } const note = { ...form, clientId : CLIENT_ID, completed : false , id : uuid() } dispatch({ type : 'ADD_NOTE' , note }) dispatch({ type : 'RESET_FORM' }) try { await API.graphql({ query: CreateNote, variables: { input : note } }) console .log('successfully created note!' ) } catch (err ) { console .log('error: ' , err) } }
在此函式中,我們在第 10 行 API 調用成功之前先在第 7 行更新本地狀態。 這被稱為 optimistic response 。 這樣做是因為我們希望用戶在添加新便箋後立即更新用戶界面。 如果 API 調用失敗,則可以在 catch 區塊中實現某些功能並通知用戶錯誤訊息。
現在,在 App 主函式內創建一個 onChange 處理函式,以在用戶輸入即時更新表單狀態:
1
2
3
function onChange (e ) dispatch({ type : 'SET_INPUT' , name : e.target.name, value : e.target.value }) }
最後,我們將更新 UI 以添加表單組件。 在 List 組件之前,添加以下兩個輸入和按鈕:
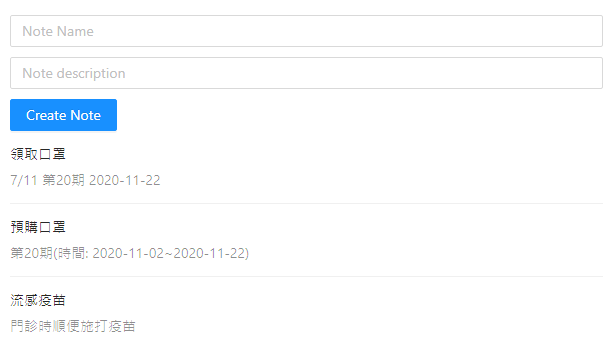
<Input onChange ={onChange} value ={state.form.name} placeholder ="Note Name" name ='name' style ={styles.input} /> <Input onChange ={onChange} value ={state.form.description} placeholder ="Note description" name ='description' style ={styles.input} /> <Button onClick ={createNote} type ="primary" > Create Note</Button >
現在,我們應該能夠使用該表單建立新的便箋。
Deleting Notes (GraphQL Mutation) 接下來,讓我們看一下如何刪除便箋。
首先,導入 deleteNote mutation。
import {
  createNote as CreateNote,
  deleteNote as DeleteNote
} from './graphql/mutations'
然後,在 App 主函式內創建一個 deleteNote 函式:
1
2
3
4
5
6
7
8
9
10
11
12
13
14
15
16
17
async function deleteNote ({ id } ) const index = state.notes.findIndex( n => const notes = [ ...state.notes.slice(0 , index), ...state.notes.slice(index + 1 ) ]; dispatch({ type : 'SET_NOTES' , notes }) try { await API.graphql({ query: DeleteNote, variables: { input : { id }} }) console .log('successfully deleted note!' ) } catch (err) { console .log({ err }) } }
現在,更新 renderItem 函式中的 List.Item 組件,以將將會調用 deleteNote 函式的刪除按鈕添加到 actions 屬性中,並傳入該要刪除的項目:
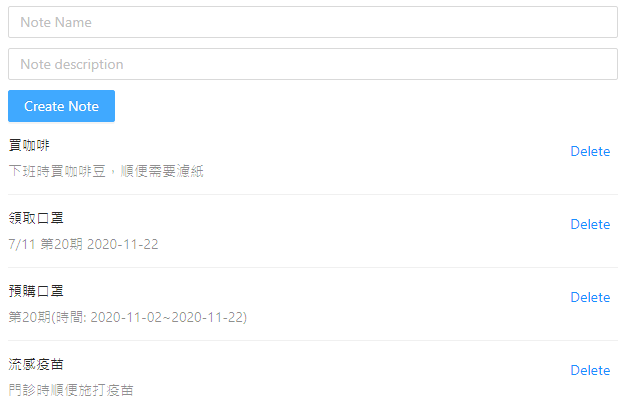
<List.Item style ={styles.item} actions ={[ <p style={styles.p} onClick={() => deleteNote(item)}>Delete</p> ]} > <List.Item.Meta title ={item.name} description ={item.description} /> </List.Item >
現在,我們應該可以刪除便箋。
Updating Notes (GraphQL Mutation) 再來我們要添加更新便箋的功能。
首先,導入 updateNote mutation。
import {
  createNote as CreateNote,
  deleteNote as DeleteNote,
  updateNote as UpdateNote
} from './graphql/mutations'
然後,在 App 主函式內創建一個 updateNote 函式:
1
2
3
4
5
6
7
8
9
10
11
12
13
14
15
async function updateNote (note ) const index = state.notes.findIndex( n => const notes = [...state.notes] notes[index].completed = !note.completed dispatch({ type : 'SET_NOTES' , notes }) try { await API.graphql({ query: UpdateNote, variables: { input : { id : note.id, completed : notes[index].completed }} }) console .log('note successfully updated!' ) } catch (err) { console .log('error: ' , err) } }
最後,在 renderItem 函式中的 List.Item 組件新增一個更新按鈕。
<List.Item style={styles.item} actions={[ <p style={styles.p} onClick={() => deleteNote(item)}>Delete</p>, <p style={styles.p} onClick={() => updateNote(item)}> {item.completed ? 'completed' : 'mark completed'} </ p> ]} >
現在,我們應該能夠將便箋更新為 completed 或 not completed 。
Real-Time Data (GraphQL Subscriptions) 最後,我們將實現的一個功能是 subscribe to updates in real time 即時訂閱。
我們要訂閱的是當有新便箋新增時,要讓我們的應用程序能夠即時接收到新便箋,更新 notes 陣列,然後將更新後的 notes 陣列呈現到螢幕上。
使用 GraphQL subscription,您可以訂閱不同的事件。 這些事件通常是某種類型的 mutation (on create、on update、on delete)。 當這些事件之一發生時,該事件的數據將發送到已初始化訂閱的客戶端,然後由你決定要如何處理送到客戶端的數據。
要讓訂閱可以運作,你僅需在 useEffect 掛鉤中初始化訂閱,並在觸發訂閱時將 ADD_NOTE 類型與便箋數據一起用 dispatch 發送出去。
首先,導入 onCreateNote subscription。
import { onCreateNote } from './graphql/subscriptions'
接下來,使用以下代碼更新 App 主函式內 useEffect 掛鉤:
1 2 3 4 5 6 7 8 9 10 11 12 13 useEffect(() => fetchNotes() const subscription = API.graphql({ query: onCreateNote }).subscribe({ next: noteData => const note = noteData.value.data.onCreateNote if (CLIENT_ID === note.clientId) return dispatch({ type : 'ADD_NOTE' , note }) } }) return () => }, [])
在此,我們訂閱了 onCreateNote 事件。 當有新便箋建立時,將觸發此事件,並用便箋數據作為引數調用 next 函式。
在 next 函式中我們獲取便箋數據,並檢查我們的客戶端是否是創建便箋的應用程序。 如果我們的客戶創建了便箋,我們將不做任何運作,避免同一筆資料重複加入 notes 陣列。如果我們不是創建便箋的客戶,則將調用 diapatch 執行 ADD_NOTE 操作,加入便箋數據。
現在你可以在瀏覽器開起兩個不同的客戶端,在一個客戶端新增一筆便箋數據,然後切換到另一個客戶端畫面,應該可以看到新增的便箋數據也顯示在螢幕上了。
恭喜,您已經建立了一個無伺服器 GraphQL 應用程序!
要記住以下幾點:
GraphQL queries 用於在 GraphQL API 中讀取數據。
GraphQL mutations 用於在 GraphQL API中 創建,更新或刪除數據。
GraphQL subscription 可以用來訂閱 GraphQL API 中的 API 即時事件。
使用 AWS Serverless GraphQL API 你可以只要定義 GraphQL schema,不用編寫任何一行的代碼,就可以有 CRUD + L (create,read,update,delete 和 list) 操作的 GraphQL API 與即時的訂閱事件。你只要專心在你客戶端應用程序的邏輯上,並且可以創造一個即時的現代化應用。
