0%

組件樹中的狀態

在每個組件中使用狀態不是一個好主意。 將狀態數據分佈在過多的組件中,將使追蹤錯誤和在應用程序中進行更改變得更加困難。發生這種情況,是因為很難追踪狀態值在組件樹中的位置。如果您統一從單一的位置進行狀態管理,將更容易理解應用程序的狀態。

在 React 有多種方法可達到此目的,這裡將分析的第一個方法是將狀態存儲在組件樹的根組件中,然後通過屬性(props)將其傳遞給子組件。

我們要構建一個 “顏色管理器”,用於保存顏色列表的小型應用程序,它將允許用戶管理顏色列表、自定義標題並使用先前建立的 StarRating 組件評定顏色等級。

首先,樣本數據如下所示。可以將它放在 APEX Page Properties 的 JavaScript > Function and Global Variable Declaration 中。

Demo module
1
2
3
4
5
6
7
8
9
10
11
12
13
14
15
16
17
18
19
20
21
22
23
24
25
26
27
28
29
var Demo = ((Demo) => {
const uuid = () => {
const s4 = () => Math.floor((1 + Math.random()) * 0x10000).toString(16).substring(1);
return s4() + s4() + '-' + s4() + '-' + s4() + '-' + s4() + '-' + s4() + s4() + s4()
};

const colorData = [
{
id: uuid(),
title: "ocean at dust",
color: "#00c4e2",
rating: 5
},
{
id: uuid(),
title: "lawn",
color: "#26ac56",
rating: 3
},
{
id: uuid(),
title: "bright red",
color: "#ff0000",
rating: 0
},
];

return { uuid, colorData, ...Demo };
})(Demo || {});

我們將創建一個由 React 組件組成的 UI,來顯示這些數據。也將允許用戶添加新顏色以及對顏色進行等級評定和刪除顏色。

由根組件向下發送狀態

我們將狀態存儲在 App 根組件中,並將顏色向下傳遞給子組件以處理渲染。App 組件將是我們應用程序中唯一擁有狀態的組件。我們將使用 useState 掛鉤將顏色列表添加到 App 中:

Color Organizer
1
2
3
4
5
6
7
8
9
10
11
12
13
14
15
16
17
18
19
20
21
22
23
24
25
26
27
28
29
30
31
32
33
34
35
36
37
<div id="react-container"></div>

<script type="text/babel">
const { useState } = React;
const { render } = ReactDOM;
const { colorData } = Demo;

const Color = ({ id, title, color, rating }) => {
return (
<section>
<h1>{title}</h1>
<div style={{ height: 50, backgroundColor: color }} />
</section>
);
};

const ColorList = ({ colors = [] }) => {
if(!colors.length) return <div>No Colors Listed.</div>;

return (
<div>
{
colors.map(color => <Color key={color.id} {...color} />)
}
</div>
);
};

const App = () => {
const [colors] = useState(colorData);

return <ColorList colors={colors} />
};


render(<App />, document.getElementById("react-container"));
</script>

App 組件位於樹的根部,第 30 行在該組件添加 useState 使其與 colors 的狀態管理掛鉤。在第 32 行並將顏色數據通過屬性傳遞給 ColorList 組件。並依序在第 23 行將每種顏色的詳細信息傳遞到樹的更遠端 Color 組件。

我們允許對顏色進行等級評定,所以要將先前建立的 StarRating 組件加到 Color 組件,這將允許每個 Color 組件擁有自己的 StarRating 子組件。並將顏色數據中的 rating 沿著樹向下傳遞到 StarRating 的子組件,以顯示評定的星星個數。

Color
1
2
3
4
5
6
7
8
9
const Color = ({ id, title, color, rating }) => {
return (
<section>
<h1>{title}</h1>
<div style={{ height: 50, backgroundColor: color}} />
<StarRating selectedStars={rating} />
</section>
);
};

先前的 StarRating 組件將選擇的星星個數 selectedStars 儲存在自己組件的狀態中,我們必須修改 StarRating 組件將其變成純組件(pure component)。純組件是不包含狀態(state)的函式組件(function component)。

我們將此組件設為純組件,因為顏色評級的數據 rating 將存儲在組件樹 App 根組件的 colors 數據中,而不再儲存在自己組件的狀態中。

以下是修改前原先的 StarRating 組件,是一個包含狀態的組件。

StarRating
1
2
3
4
5
6
7
8
9
10
11
12
13
14
15
16
const StarRating = ({ totalStars = 5 }) => {
const [selectedStars, setSelectedStars] = useState(0);

return (
<>
{createArray(totalStars).map((n, i) => (
<Star
key={i}
selected={selectedStars > i}
onSelect={() => setSelectedStars(i + 1)}
/>
))}
<p style={{fontSize: "1.5em", margin: "10px"}}>{selectedStars} of {totalStars} stars</p>
</>
);
};

我們將拿掉第 2 行使用 useState 狀態管理的 selectedStars 變數、setSelectedStars 函式,與第 10 行 setSelectedStars 的調用。

StarRating
1
2
3
4
5
6
7
8
9
10
11
12
13
const StarRating = ({ totalStars = 5, selectedStars = 0 }) => {    
return (
<>
{createArray(totalStars).map((n, i) => (
<Star
key={i}
selected={selectedStars > i}
/>
))}
<p style={{fontSize: "1.5em", margin: "10px"}}>{selectedStars} of {totalStars} stars</p>
</>
);
};

現在在第 1 行 selectedStars 直接由父組件 Color 通過屬性傳入,這將會是顏色數據中的 rating。 這裡也暫時拿掉 onSelect 屬性,稍後再來處理。

現在應用程序執行後看起來會像是:
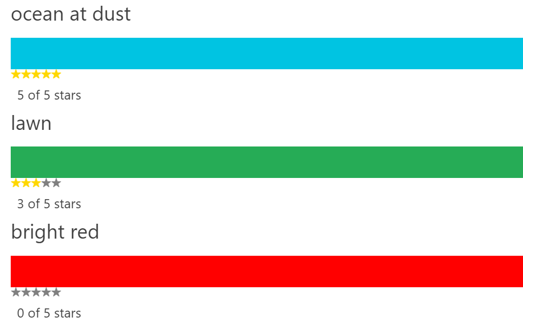
至此,我們已經完成了將狀態從 App 組件一直向下傳遞到 FaStar 組件的過程。

將互動由葉端向上傳送到根組件

到目前為止,我們透過 props 屬性將數據從父組件向下傳遞到子組件。現在,如果我們要從列表中刪除顏色或更改列表中的顏色評等等級,會發生什麼?

顏色數據以狀態存儲在樹的根組件 APP,但我們需要從子組件中收集使用者的互動,並將其沿著樹狀結構發送回根組件,以便在根組件中更改狀態。

Remove Color

例如,假設我們要在每種顏色的標題下端添加一個刪除按鈕,以允許用戶從狀態中刪除顏色。我們將該按鈕添加到 Color 組件中:

Color component
1
2
3
4
5
6
7
8
9
10
11
12
13
14
const FaRemove = () =>  <span className="fa fa-remove"></span>;

const Color = ({ id, title, color, rating, onRemove = f => f }) => {
return (
<section>
<h1>{title}</h1>
<button className="t-Button" onClick={() => onRemove(id)} >
<FaRemove />
</button>
<div style={{ height: 50, backgroundColor: color}} />
<StarRating selectedStars={rating} />
</section>
);
};

第 1 行使用 APEX icons fa-remove 新增一個 FaRemove 圖標組件。 接下來 7 ~ 9 行將 FaRemove 圖標包裝在一個按鈕中,並在此按鈕上添加 onClick 處理程序,這使我們可以調用 onRemove 函式。 當用戶單擊 “刪除” 按鈕時,通過第 3 行的 onRemove 函式屬性將事件往上傳送到根組件(CPS 延續傳遞風格),最終我們將在 App 根組件調用一個 onRemoveColor 函式將其想要刪除的顏色刪除。

這裡我們使 Color 組件保持純淨。它沒有狀態,可以很容易地在別的地方重複使用。Color 組件與用戶單擊 “刪除” 按鈕時發生甚麼事無關,它關心的只是通知父組件該事件已發生,並傳遞有關用戶希望刪除的顏色的資料,這裡傳遞的是顏色的 id。

現在,父組件有責任處理此事件:

ColorList
1
2
3
4
5
6
7
8
9
10
11
const ColorList = ({ colors = [], onRemoveColor = f => f }) => {
if(!colors.length) return <div>No Colors Listed.</div>;

return (
<div>
{
colors.map(color => <Color key={color.id} {...color} onRemove={onRemoveColor} />)
}
</div>
);
};

Color 組件的父級是 ColorList,該組件也無權訪問狀態。它只是將事件繼續傳遞給其父組件。它通過添加 onRemoveColor 函式屬性來實現此目的。如果 Color 組件調用 onRemove 屬性,則 ColorList 將延續調用其 onRemoveColor 屬性,並將刪除顏色的責任發送給其父組件 App。

ColorList 的父級是 App。 該組件是最終與狀態掛勾的組件,在這裡我們可以刪除狀態下的顏色。

App
1
2
3
4
5
6
7
8
9
10
11
12
13
const App = () => {
const [colors, setColors] = useState(colorData);

return (
<ColorList
colors={colors}
onRemoveColor={id => {
const newColors = colors.filter(color => color.id !== id);
setColors(newColors);
}}
/>
)
};

首先,我們在第 2 行添加一個 setColors 變數。請記住,useState 返回的陣列中的第二個參數是一個可以用來修改狀態的函式。當 ColorList 引發一個 onRemoveColor 事件時,我們使用參數中所要刪除的顏色的 id 來過濾,以排除使用者想要刪除的顏色。接下來,我們使用 setColors 函式更改狀態,將 colors 更改為新過濾的陣列。

更改 colors 陣列的狀態會使 App 組件重新呈現新的 colors。這些新的 colors 也將透過屬性傳遞到所有相關的子組件,進而引發整個樹狀結構的重新渲染。

Color Rating

如果要對存儲在 App 組件狀態中的顏色進行評分,則必須使用 onRate 事件重複上述刪除顏色的過程。

首先,我們將從被點擊的 FaStar 組件中觸發新的評分事件,並將事件往上傳送 Star 父組件,再經過 StarRating 組件,依序直到 App 根組件以修改顏色的評分 rating。

FaStar 與 Star 組件都是無狀態組件,可以被重複使用,無須變動。我們只需從 StarRating 組件開始新增 onRate 函式屬性。

onRate:StarRating
1
2
3
4
5
6
7
8
9
10
11
12
13
14
const StarRating = ({ totalStars = 5, selectedStars = 0, onRate = f => f }) => {    
return (
<>
{createArray(totalStars).map((n, i) => (
<Star
key={i}
selected={selectedStars > i}
onSelect={() => onRate(i + 1)}
/>
))}
<p style={{fontSize: "1.5em", margin: "10px"}}>{selectedStars} of {totalStars} stars</p>
</>
);
};

第 8 行我們重新將 onSelect 屬性加進 Star 組件,並透過第 1 行的 onRate 函式屬性將事件與 rating 評分等級 (i + 1) 往上傳送給 StarRating 的父組件 Color。

onRate:Color
1
2
3
4
5
6
7
8
9
10
11
12
13
14
15
const Color = ({ id, title, color, rating, onRemove = f => f, onRate = f => f }) => {
return (
<section>
<h1>{title}</h1>
<button className="t-Button" onClick={() => onRemove(id)} >
<FaRemove />
</button>
<div style={{ height: 50, backgroundColor: color}} />
<StarRating
selectedStars={rating}
onRate={rating => onRate(id, rating)}
/>
</section>
);
};

在 Color 組件第 11 行將新的評級 rating 以及將要評級的顏色 id 通過第 1 行的 onRate 函式屬性傳遞給 Color 組件的父項 ColorList 組件。

在 ColorList 組件中,我們必須從各個顏色 Color 組件中捕獲 onRate 事件,然後通過第 1 行的 onRateColor 函式屬性將它們傳遞給其父級 App 組件:

onRate:ColorList
1
2
3
4
5
6
7
8
9
10
11
12
13
14
15
16
17
18
const ColorList = ({ colors = [], onRemoveColor = f => f, onRateColor = f => f }) => {
if(!colors.length) return <div>No Colors Listed.</div>;

return (
<div>
{
colors.map(color => (
<Color
key={color.id}
{...color}
onRemove={onRemoveColor}
onRate={onRateColor}
/>
))
}
</div>
);
};

最後,在將事件依序經過些組件往上傳遞之後,我們將到達應用程序存儲狀態的根組件 App,可以更改 colors 數據保存新的評分。

onRate:App
1
2
3
4
5
6
7
8
9
10
11
12
13
14
15
16
17
const App = () => {
const [colors, setColors] = useState(colorData);

return (
<ColorList
colors={colors}
onRateColor={(id, rating) => {
const newColors = colors.map(color => color.id === id ? {...color, rating} : color);
setColors(newColors);
}}
onRemoveColor={id => {
const newColors = colors.filter(color => color.id !== id);
setColors(newColors);
}}
/>
)
};

一旦我們的顏色陣列 colors 的狀態發生變化,相關的 UI 組件樹就會使用新數據進行渲染,新的評級將反映給用戶。

就像我們通過 props 屬性將數據往下傳遞到整個組件樹一樣,使用者的互動也可以通過函式屬性與數據一起往上傳遞回樹根。

使用 Forms 新增數據

成為一名 Web 開發人員總是必須使用表單從使用者那裡收集大量的信息,那麼將會使用 React 構建許多表單組件。DOM 所有可用的 HTML 表單元素也都可以作為 React 元素使用,因此可以用 JSX 呈現表單。

當需要在 React 中構建表單組件時,可以使用幾種模式。 模式之一使用稱為 refs 的 React 功能直接訪問 DOM 節點。在 React 中,ref 是一個物件,它存儲組件生命週期內的值。React 為我們提供了一個 useRef 掛鉤(hook),我們可以使用它來創建一個 ref 物件。

直接通過將 DOM 節點的 value 屬性設定值,稱為不受控制的組件(uncontrolled component),因為它使用 DOM 來保存表單值。有時使用不受控制的組件可以使您解決一些麻煩。 例如,您可能想與 React 之外的代碼共享一個表單及其值。 但是,在 React 中使用受控制組件(controlled component)是比較好的方法。

在受控制組件中,表單值由 React 而不是 DOM 管理。它們不需要我們使用 ref 物件,也不需要我們編寫命令性代碼。當使用受控組件時,添加表單驗證之類的功能要容易得多。

這裡,我們不展示不受控制組件,直接使用受控制組件。

受控制組件使用 React 狀態(state)保存表單的值。我們將用 useState 掛鉤建立兩個變數 title 與 color。此外,我們將也將定義可用於更改狀態的函式:setTitle 和 setColor。

AddColorForm
1
2
3
4
5
6
7
8
9
10
11
12
13
14
15
16
17
18
19
20
21
22
23
24
25
26
27
28
29
30
const AddColorForm = ({ onNewColor = f => f }) => {
const [title, setTitle] = useState("");
const [color, setColor] = useState("#000000");

const submit = e => {
e.preventDefault();
onNewColor(title, color);
setTitle("");
setColor("#000000");
};

return (
<form onSubmit={submit} >
<input
value={title}
onChange={ event => setTitle(event.target.value)}
type="text"
placeholder="color title..."
required
/>
<input
value={color}
onChange={ event => setColor(event.target.value)}
type="color"
required
/>
<button className="t-Button t-Button--hot margin-left-sm">Add</button>
</form>
);
};

每當這些 input 元素引發 onChange 事件時,我們將調用 setTitle 或 setColor 來更改狀態中的值。更改該值將導致該組件重新渲染,會立即在 input 元素中顯示新的值。

提交表單時,我們只需在第 7 行直接將 title 和 color 的狀態值作為參數傳遞給 onNewColor 函式屬性即可。

知道受控組件會經常重新渲染,你將知道避免向該組件添加一些漫長且昂貴的處理過程。當您嘗試優化 React 組件時,這些知識將會派上用場。

現在將 AddColorForm 加入我們的根組件 App,並定義 onNewColor 函式屬性。記得也將 Demo 模組的 uuid 函式加進來。

AddColorForm:App
1
2
3
4
5
6
7
8
9
10
11
12
13
14
15
16
17
18
19
20
21
22
23
24
25
26
27
28
29
30
31
32
33
34
35
36
const { uuid, colorData } = Demo;
...

const App = () => {
const [colors, setColors] = useState(colorData);

return (
<>
<AddColorForm
onNewColor={(title, color) => {
const newColors = [
...colors,
{
id: uuid(),
rating: 0,
title,
color
}
];
setColors(newColors);
}}
/>
<ColorList
colors={colors}
onRateColor={(id, rating) => {
const newColors = colors.map(color => color.id === id ? {...color, rating} : color);
setColors(newColors);
}}
onRemoveColor={id => {
const newColors = colors.filter(color => color.id !== id);
setColors(newColors);
}}
/>
</>
)
};

AddColorForm 組件通過 onNewColor 函式將 title 和 color 的值傳遞給父組件 App。調用 onNewColor 屬性時,我們會將新顏色保存在狀態中。

將狀態統一存儲在樹狀結構的根的位置是一種重要的模式,這是早期版本 React 的重要模式。通過屬性上下傳遞狀態是任何 React 開發人員必須知道的概念,是我們所有人都應該知道的方法。 但是,隨著 React 的發展以及我們的組件樹越來越大,遵循此原理逐漸變得不切實際。對於復雜的應用程序來說,許多開發人員很難在組件樹根的單個位置維護狀態。通過數十個組件將狀態上下傳遞是繁瑣且容易出錯的。

多數的 UI 元素都很複雜,樹的根通常離葉子很遠,將數據置於離使用數據組件許多層的位置,每個組件都必須收到只能傳遞給子組件的屬性,這將使我們的代碼變的臃腫,並使我們的 UI 難以擴展。

將狀態數據作為屬性傳遞通過每個組件,直到到達需要使用的組件,就像乘火車從台南到台北。在火車上,您會經過每個站,但直到到達目的地,您都不會下車。

搭飛機從台南飛往台北顯然效率較佳。這樣,您不必通過每個中間站,你直接飛越它們。

下次我們將用比較有效率的方式,直接飛越它們: React Context

數據活化我們的 React 組件。 沒有數據,我們構建的使用者介面就沒有用。我們的使用者介面是創建用來生成數據內容的工具。 為了為我們的數據內容創建者構建最好的工具,我們需要知道如何有效地操作和更改數據。

之前,我們建構了一個組件樹(component tree):數據能夠作為屬性流經整個組件層次結構。 屬性(properties)是整體構圖的一半。另一半則是狀態(state)。 React 應用程序的狀態由具有更改能力的數據驅動。 應用程序有了狀態,讓我們可以創建、修改、刪除現有的數據。

狀態和屬性相互之間具有聯繫性。當我們使用 React 應用程序時,我們會根據狀態和屬性這種關係,將所有的組件組合在一起。當組件樹的狀態更改時,屬性也會更改。 新數據流過組件樹,導致特定的終端組件和分支重新渲染以呈現反映新的內容。

我們將使用狀態來活化應用程序,創建有狀態組件(stateful components),將狀態由根組件往下發送到整個組件樹,及如何將使用者使用表單收集的互動數據由組件樹的末端往上回溯。

Star Rating Component

這裡要建立一個星級評分組件,五星級評分,可以讓我們評論東西的好壞。也能讓使用者驅動我們對內容的改進。

我們要建立一個 StarRating 組件,StarRating 組件將允許使用者根據特定的星星數對內容進行評分。不好的內容獲得一顆星。高度推薦的內容獲得五顆星。用戶可以透過單擊特定的星號來設置內容的等級。

首先我們需要一個星星圖標。Oracle APEX - Universal Theme 內建有許多 icons 可以直接使用。

1
2
3
4
5
6
7
8
9
10
11
12
13
14
15
16
17
18
19
20
21
<div id="react-root"></div>

<script type="text/babel">
const { render } = ReactDOM;

const FaStar = ({ color }) => (
<span className="fa fa-star fa-2x" style={{color}}></span>
);

const StarRating = () => (
[
<FaStar color="gold" />,
<FaStar color="grey" />,
<FaStar color="grey" />
]
);

render(<StarRating />, document.getElementById("react-root"));
</script>

在這裡,我們創建了 FaStar 組件將 APEX Universal Theme 的圖標 fa-star 包裝起來。然後創建一個 StarRating 組件,該組件渲染了五個 FaStar 組件,產生五顆星星, 前三顆填滿了金色,後兩顆是灰色。

首先渲染了五顆星星,它們為我們提供了構建的基礎。 選定的星星填滿金色,未選擇的星星是灰色。

讓我們再創建一個 Star 組件,該組件會根據 selected 屬性自動填滿星星的顏色:

1
2
3
const Star = ({ selected = false }) => (
<FaStar color={selected ? "gold" : "grey"} />
);

Star 組件將渲染單個星星,並使用 selected 屬性為其填充適當的顏色。如果未將 selected 屬性傳遞給此組件,則假定該星星沒有被選,並且預設填充灰色。

5 星級評分很好,但 10 星級可以提供更詳細的評分。我們應該允許開發人員將組件添加到應用程序時,可以選擇希望使用的總星數。這可以透過在 StarRating 組件中添加 totalStars 屬性來實現。

1
2
3
4
5
const createArray = length => [...Array(length)];

const StarRating = ({ totalStars = 5 }) => (
createArray(totalStars).map((n, i) => <Star key={i} />)
);

我們添加了 createArray 函式。我們要做的就是提供要創建的陣列長度,然後用該長度取得一個新的陣列。 我們將此函式與 totalStars 屬性一起使用,就可以用陣列 map 渲染 Star 組件。 預設情況下,totalStars 等於 5,將渲染 5 個灰色星星。

useState Hook

現在要使星級評分組件可以單擊,這將允許使用者更改評分。

由於評分是一個會改變的值,因此我們將使用 React 狀態(state)來儲存和更改該值。我們要使用稱為 Hook 的 React 功能將狀態合併到組件中。 Hook 包含與組件樹分開的可重用代碼邏輯。它使我們能夠將所要處裡的功能連接到我們的組件。React 有幾個內建的 Hooks,我們可以直接使用它們。這裡,我們想向 React 組件添加狀態,因此我們要使用的第一個 Hook 是 React 的 useState。這個 Hook 已經包含在 react 程式包中,我們只需要將它加入我們的程式:

1
const { useState } = React;

使用者所選擇的星號代表等級。我們將創建一個名為 selectedStars 的狀態變數(state variable),它將保存用戶的評分。我們將透過將 useState Hook 直接添加到 StarRating 組件中來創建此狀態變數:

1
2
3
4
5
6
7
8
9
10
11
12
const StarRating = ({ totalStars = 5 }) => {
const [selectedStars] = useState(3);

return (
<>
{createArray(totalStars).map((n, i) => (
<Star key={i} selected={selectedStars > i} />
))}
<p style={{fontSize: "1.5em", margin: "10px"}}>{selectedStars} of {totalStars} stars</p>
</>
);
};

我們只是將該組件與狀態掛鉤。useState 掛鉤是一個函式,調用它會返回一個陣列。返回的陣列的第一個值是我們要使用的狀態變數。在這裡,該變數為 selectedStars,也就是 StarRating 組件將顏色變為金色的星數。useState 返回一個陣列,我們可以利用陣列解構賦值,這使我們可以隨意命名狀態變數。我們調用 useState 函式時給的引數值是狀態變數的初始預設值。在這裡,selectedStars 初始預設值將設置為 3。

為了從使用者那裡獲得不同的評分,我們需要允許他們點擊我們的任何一顆星星。 所以,我們需要透過向 FaStar 組件中的星形圖標 fa-star 添加 onClick 處理程序來使星星可點擊:

1
2
3
const FaStar = ({ color, onSelect =  f => f }) => ( 
<span className="fa fa-star fa-2x" style={{color}} onClick={onSelect} ></span>
);

這裡,我們修改了星形圖標 fa-star 以包含 onClick 事件,這個事件的處理程序是由父組件傳入的 onSelect 屬性。 注意,此屬性是一個函式。 當用戶單擊星形圖標時,我們將調用此函式,該函式可以通知其父組件已單擊星形圖標。該函式的預設值為 f => f。 這只是一個偽造的函式,什麼也不做。它只是返回發送給它的任何參數。但是,如果我們未設置預設函式並且未定義 onSelect 屬性,則在我們單擊星形圖標時會發生錯誤,因為 onSelect 的值必須是一個函式。 即使 f => f 什麼也不做,它還是一個函式,可以調用它而不會引起錯誤。如果沒有定義 onSelect 屬性,沒有問題,React 將簡單地調用偽函式,而不會發生任何事情。

現在我們的星形圖標 fa-star 是可單擊的,我們將使用它來更改 StarRating 的狀態。

1
2
3
4
5
6
7
8
9
10
11
12
13
14
15
16
const StarRating = ({ totalStars = 5 }) => {
const [selectedStars, setSelectedStars] = useState(0);

return (
<>
{createArray(totalStars).map((n, i) => (
<Star
key={i}
selected={selectedStars > i}
onSelect={() => setSelectedStars(i + 1)}
/>
))}
<p style={{fontSize: "1.5em", margin: "10px"}}>{selectedStars} of {totalStars} stars</p>
</>
);
};

為了更改 StarRating 組件的狀態,我們需要一個可以修改 selectedStars 值的函式。 useState 掛鉤返回的陣列中的第二項是可用於更改狀態值的函式。同樣,透過陣列解構賦值,我們可以隨心所欲地命名該函式。在這裡,我們稱其為 setSelectedStars,因為它就是用來設置 selectedStars 的值。

關於 Hooks,要記住的最重要的事情是,Hooks 可能導致掛鉤他們的組件重新渲染。每次我們調用 setSelectedStars 函式來更改 selectedStars 的值時,該掛鉤將重新調用 StarRating 函式組件,並且它將再次重新渲染。 這就是為什麼 Hooks 是殺手級功能的原因。當 Hook 中的數據發生更改時,他們會使用新數據重新渲染掛接它們的組件。

每次使用者單擊星形圖標 fa-star 時,將重新渲染 StarRating 組件。當使用者單擊星形圖標 fa-star 時,將調用該星星的 onSelect 屬性。 調用 onSelect 屬性時,我們將調用 setSelectedStars 函式並將剛選擇的星星編號當為函式的引數傳入。 我們使用 map 函數中的 i 變數來幫助我們計算該數字。當 map 函式渲染第一個 Star 時,i 的值為 0,我們需要在該值上加上 1 以獲取正確的 star 編號。 新的 selectedStars 的值發生變化會導致 StarRating 組件的重新渲染。

你如果現在單擊星形圖標,將不會發生任何作用,因為 FaStar 組件與 StarRating 組件並沒有直接關連,它是透過 Star 組件組成一個階層式組件樹,數據透過屬性流經整個組件層次結構。onSelect 屬性也必須透過 Star 組件流到 FaStar 組件,因為 FaStar 組件中的星形圖標 fa-star 才是使用者單擊的標的,onClick 事件是由此被觸發的。

1
2
3
const Star = ({ selected = false, onSelect = f => f }) => (
<FaStar color={selected ? "gold" : "grey"} onSelect={onSelect} />
);

整個程式碼現在如下:

1
2
3
4
5
6
7
8
9
10
11
12
13
14
15
16
17
18
19
20
21
22
23
24
25
26
27
28
29
30
31
32
33
34
35
<div id="react-root"></div>

<script type="text/babel">
const { useState } = React;
const { render } = ReactDOM;

const FaStar = ({ color, onSelect = f => f }) => (
<span className="fa fa-star fa-2x" style={{color}} onClick={onSelect} ></span>
);

const Star = ({ selected = false, onSelect = f => f }) => (
<FaStar color={selected ? "gold" : "grey"} onSelect={onSelect} />
);

const createArray = length => [...Array(length)];

const StarRating = ({ totalStars = 5 }) => {
const [selectedStars, setSelectedStars] = useState(0);

return (
<>
{createArray(totalStars).map((n, i) => (
<Star
key={i}
selected={selectedStars > i}
onSelect={() => setSelectedStars(i + 1)}
/>
))}
<p style={{fontSize: "1.5em", margin: "10px"}}>{selectedStars} of {totalStars} stars</p>
</>
);
};

render(<StarRating totalStars={5} />, document.getElementById("react-root"));
</script>

你可以將第 34 行的 totalStars 改為 10 就變成 10 星級評分了。

在 v16.8.0 之前的 React 早期版本中,向組件添加狀態的唯一方法是使用類組件(class component)。這不僅需要大量的代碼,而且還使得跨組件重用功能變得更加困難。Hooks 旨在透過將功能掛鉤到函式組件來解決類組件所帶來的問題。目前,類組件代碼仍然有效,但我們已不再需要它們,可能會有一天類組件會正式被棄用。

函式組件和 Hooks 是 React 的未來。

延續傳遞風格(CPS)

在這個星級評分組件中我們用到了 JavaScript 的一種很重要的概念,延續傳遞風格(Continuation-passing style),簡稱 CPS。

JavaScript 的回呼 (callback) 是作為參數傳遞給其他函式,並在操作完成時呼叫以傳遞結果。在函式化的程式設計風格,這種傳遞結果的方式稱為延續傳遞風格(Continuation-passing style),簡稱 CPS 。這是ㄧ個通用的概念,而不一定與非同步操作相關。事實上,它只是指出操作結果是以傳給另一個函式(回呼)的方式來傳遞,而不是直接傳給呼叫者。

程式碼的第 26 行的 onSelect 屬性是一個函式,這個函式我們是定義在 StarRating 組件上,以組件屬性的方式傳遞到 FaStar 組件中的星形圖標 fa-star,當使用者單擊星形圖標 fa-star 時將結果透過函式回傳 StarRating 根組件。每一個星形圖標 fa-star 的函式看起來都一樣,但它其實是一個閉包 (closure),函式 ( ) => setSelectedStars( i + 1 ) 中 i 變數的值都不同。

閉包與延續傳遞風格在 JavaScript 中是很重要的概念,需要花點時間熟悉它。

思考一下這一段 JavaScript:

1
2
3
const stars = [...Array(5)].map((n, i) => () => console.log(`Star => ${i}`));

stars[2]();

考慮下面這個變數宣告:

1
const element = <h1>Hello Tainan,台南!</h1>;

這個標籤語法不是一個字串也不是 HTML。

這個語法叫做 JSX。JSX 結合了 JavaScript 的 JS 和 XML 的 X,是一個 JavaScript 的語法擴充。允許我們直接在 Javascript 源代碼中使用基於標籤的語法來定義 React 元素。有時 JSX 會與 HTML 混淆,因為它們看起來很相似。JSX 也可能會讓你想到一些樣板語言(template language),但不一樣的地方是 JSX 允許你使用 JavaScript 所有的功能。

JSX 是創建 React 元素的另一種方式,執行 JSX 會產生 React 元素,因此您不必費力地在復雜的 React.createElement 調用中尋找缺少的逗號。

建議你在寫 React 的時候透過 JSX 語法來描述使用者介面的外觀。

將 React.createElement 改用 JSX:

const hello = React.createElement("h1", { id: "hello" }, "Hello Scott!");

const hello = <h1 id="hello">Hello Scott!</h1>;
1
2
3
4
5
6
7
<div id="react-root"></div>

<script type="text/babel">
const hello = <h1 id="hello">Hello Scott!</h1>;

ReactDOM.render(hello, document.getElementById("react-root"));
</script>

JavaScript 不認識 JSX 語法,必須先經過 Babel 的預處理(compiling)。

但我們通常不會使用變數的方式,而會使用函式組件的方式:

1
2
3
4
5
<script type="text/babel">
const Hello = () => <h1 id="hello">Hello Scott!</h1>;

ReactDOM.render(<Hello />, document.getElementById("react-root"));
</script>

這個模式是 React JSX 的基本使用方式: 函式組件 (function component)。組成的組件樹(component tree)構造整個 React 應用程序。

JSX Tips

JSX 可能看起來很熟悉,並且大多數規則導致的語法類似於 HTML。但是,使用 JSX 時應注意一些事項。

Nested components

JSX 允許我們將組件添加為其他組件的子代。 例如,在 UsersList 內部,我們可以多次渲染另一個名為 User 的組件。

1
2
3
4
5
<UsersList>
<User />
<User />
<User />
</UsersList>
className

由於 class 是 JavaScript 中的保留字,因此使用 className 來定義 class 屬性。

1
<h1 className="fancy">Hello Scott!</h1>
JavaScript expressions

JavaScript 表達式用大括號 { } 括起來,指示變數將在何處被求值並返回其結果值。例如,如果要在元素中顯示 user 屬性的值,則可以使用 JavaScript 表達式插入該值。該變數 user 將被求值並返回其值。

1
<h1>{user}</h1>

除字符串以外的其他類型的值,也應顯示為 JavaScript 表達式:

1
<input type="checkbox" defaultChecked={false} />
Evaluation

大括號之間添加的 JavaScript 將被求值。 這意味著,可以執行字串串聯或加法之類的操作。這也意味著, JavaScript 將會調用在表達式中找到的函數:

1
2
3
4
5
<h1>{"Hello " + user}</h1>

<h1>{user.toLowerCase()}</h1>

<h1>{`Hello ${user.toLowerCase()}`}</h1>
Mapping Arrays with JSX

JSX 是 JavaScript,因此您可以將 JSX 直接合併到 JavaScript 函數中。例如,您可以將陣列映射到 JSX 元素:

1
2
3
4
5
<ul>
{ userData.map((user, i) => (
<li key={i}>{user}</li>
))}
</ul>

可以比對一下使用 React.createElement 與 使用 JSX 的差別:

const hello = React.createElement(
"ul",
null,
userData.map((user, i) =>
React.createElement("li", { key: i }, `Hello ${user}`)
)
);


const hello =
<ul>
{ userData.map((user, i) => (
<li key={i}>{user}</li>
))}
</ul>;

JSX 看起來很乾淨而且有較佳的可讀性,但是無法直接在瀏覽器解譯執行。所有 JSX 必須轉換為 React.createElement 調用。幸運的是,有一個出色的工具可以執行此任務:Babel。

整段由使用 React.createElement 改用 JSX 改寫。

  • 使用 React.createElement
1
2
3
4
5
6
7
8
9
10
11
12
13
14
15
16
17
18
19
20
21
22
<script type="text/babel">
const userData = [
"Scott",
"Emily",
"Amanda"
];

const UsersList = ({ users = [] }) => (
React.createElement(
"ul",
null,
users.map((user, i) =>
React.createElement("li", { key: i }, `Hello ${user}`)
)
)
);

ReactDOM.render(
React.createElement(UsersList, { users: userData }, null),
document.getElementById("react-root")
);
</script>
  • 使用 JSX
1
2
3
4
5
6
7
8
9
10
11
12
13
14
15
16
17
18
19
20
<script type="text/babel">
const userData = [
"Scott",
"Emily",
"Amanda"
];

const UsersList = ({ users = [] }) => (
<ul>
{ users.map((user, i) => (
<li key={i}>{user}</li>
))}
</ul>
);

ReactDOM.render(
<UsersList users={userData} />,
document.getElementById("react-root")
);
</script>
  • 第 8 行是一個函式組件,這裡改用 JSX。
  • 第 17 行我們使用 JSX 語法調用 UsersList 函式組件,透過 users 屬性傳遞函式引數。這裡的所有屬性將被包在一個物件 { users: “[…]”, others: “…” } 傳遞給函式組件。

有了基礎概念,現在來做一個比較實際的例子。

美味食譜

我們需要一些美味食譜的資料,我們將它放在 APEX Page Properties 的 JavaScript > Function and Global Variable Declaration 中。

recipesData
1
2
3
4
5
6
7
8
9
10
11
12
13
14
15
16
17
18
19
20
21
22
23
24
25
26
27
28
29
30
31
32
33
34
35
36
37
38
39
40
41
42
43
44
45
46
47
48
49
50
51
52
53
54
55
56
const recipesData = [
{
name: "烤鮭魚",
ingredients: [
{ name: "鮭魚", amount: 1, measurement: "磅" },
{ name: "松子", amount: 1, measurement: "杯" },
{ name: "生菜", amount: 2, measurement: "杯" },
{ name: "黃色的南瓜", amount: 1, measurement: "中" },
{ name: "橄欖油", amount: 0.5, measurement: "杯" },
{ name: "大蒜", amount: 3, measurement: "瓣" },
],
steps: [
"將烤箱預熱至350度。",
"將橄欖油撒在玻璃烤盤上。",
"加入南瓜,放入烤箱30分鐘。",
"將鮭魚,大蒜和松子添加到菜中.",
"烤15分鐘。",
"從烤箱中取出,加入生菜即可食用。"
]
},
{
name: "魚炸玉米餅",
ingredients: [
{ name: "白鲑", amount: 1, measurement: "磅" },
{ name: "乳酪", amount: 1, measurement: "杯" },
{ name: "捲心萵苣", amount: 2, measurement: "杯" },
{ name: "番茄", amount: 2, measurement: "大" },
{ name: "玉米饼", amount: 3, measurement: "中" }
],
steps: [
"將魚放在烤架上煮至熱。",
"將魚放在3個玉米餅上。",
"上放生菜,番茄和乳酪。"
]
},
{
name: "蕃茄炒蛋",
ingredients: [
{ name: "紅蕃茄", amount: 3, measurement: "個" },
{ name: "雞蛋", amount: 3, measurement: "個" },
{ name: "蕃茄醬", amount: 1, measurement: "大匙" },
{ name: "蔥花", amount: 2, measurement: "大匙" },
{ name: "蒜末", amount: 1, measurement: "小匙" },
{ name: "橄欖油", amount: 2.5, measurement: "大匙" },
{ name: "鹽", amount: 1, measurement: "小匙" }
],
steps: [
"蕃茄洗淨後切塊狀..(去皮否隨個人喜好即可)~蛋打散備用。",
"起油鍋(兩大匙油)~蛋先入鍋炒至5分熟後盛出備用。",
"原鍋再加入油1/2大匙爆香蔥白、蒜末後倒入蕃茄醬拌炒。",
"接著加入水適量(剛好淹蓋住食材即可)煮開後,加入調味料煮片刻。",
"湯汁略為濃縮後倒入5分熟的炒蛋混合拌勻再煮一下即可。",
"起鍋前淋下香油,灑入蔥花拌一下即可盛盤。"
]
},
];

Region Properties 的 Source > Text 的程式碼:

1
2
3
4
5
6
7
8
9
10
11
12
13
14
15
16
17
18
19
20
21
22
23
24
25
26
27
28
29
30
31
32
33
34
35
36
37
38
39
40
41
42
43
44
45
46
47
48
49
<div id="react-root"></div>

<script type="text/babel">
const { render } = ReactDOM;

const Ingredient = ({amount, measurement, name}) =>
<li>
{amount} {measurement} {name}
</li>;

const IngredientsList = ({list}) =>
<ul className="ingredients">
{list.map((ingredient, i) => (
<Ingredient key={i} {...ingredient} />
))}
</ul>;

const Instructions = ({title, steps}) =>
<section className="instructions" style={{paddingLeft: "1em"}}>
<h3>{title}</h3>
{steps.map((s, i) => (
<p key={i}>{s}</p>
))}
</section>;

const Recipe = ({name, ingredients, steps}) =>
<section id={name.toLowerCase().replace(/ /g, "-")} style={{marginBottom: "1em"}}>
<h2>{name}</h2>
<IngredientsList list={ingredients} />
<Instructions title="烹飪說明" steps={steps} />
</section>;

const Menu = ({title, recipes}) =>
<article>
<header>
<h1>{title}</h1>
</header>
<div className="recipes" >
{recipes.map((recipe, i) => (
<Recipe key={i} {...recipe} />
))}
</div>
</article>;

render(
<Menu recipes={recipesData} title="美味食譜" />,
document.getElementById('react-root')
);
</script>

這裡有 5 個 React 組件,組成一個組件樹。Menu 組件是根組件(root component),所有的資料從根組件的 recipes 屬性注入(第 46 行) ,往整個組件樹流動。此外還有一個 title 屬性。這兩個屬性組成了 Menu 函式所需的引數。Menu 參數用解構賦值的語法取得傳入的值。

第 39 ~ 41 行用 JavaScript 陣列的 map 方法加入多個 Recipe 組件,這裡使用了展開運算子 { …recipe } 賦予 recipe 的所有屬性 name、ingredients 與 steps。

這些組件是基於將應用程序的數據作為屬性傳遞給 Menu 組件而構造的。 如果我們更改 recipes 陣列並重新渲染 Menu 組件,整個樹狀組件也將引起連鎖反應,而 React 將盡可能有效地更改此 DOM。

數據使我們的 React 組件活起來。沒有 recipes 資料,我們構建的 recipes 的用戶界面是沒有用的。食譜和配料以及清晰的烹飪步驟說明使這樣的應用程序有價值。

我們構建了一個組件樹:數據能夠作為屬性流過組件樹的層次結構。 屬性(properties)是整體構圖的一半。另一半則是狀態(state)。 React 應用程序的狀態由具有更改能力的數據驅動。數據變動,驅動整個 React 應用程序的狀態的變動。

目前資料是死的,我們要讓資料活起來,帶動 React 應用程序的互動性。React State Management

React 是一個很小的程式庫,沒有提供構建應用程序需要的所有功能。在 React 中,您可以在 JavaScript 代碼中編寫類似於 HTML 的代碼。 這些標籤需要進行預處理才能在瀏覽器中運行。 為此,你可能需要像 webpack 這樣的構建工具。也需要安裝像 Node.js 這樣的運行環境,以便能建構整個應用程序。

學習這樣整個開發應用程序的架構,需要時間與決心,也常常是我們學習開源應用程序的障礙。React 在剛推出的時候就容許被逐步採用,你可以按自己所需,可多可少的採用 React。不管你是想初步嘗試 React、在簡單的 HTML 網頁上加入互動性,或是實作一個使用 React 驅動的複雜應用程式。

React 不強制要求你使用特定的架構,所以你可以在不同環境中重複使用開發的 React 功能,而不需要重寫原有的程式碼。甚至可以移轉到 React Native 建立行動裝置的原生應用程序。

這裡,我們就從我們熟悉的 Oracle APEX 平台開始。我們可以利用 APEX 伺服器與前端的開發工具加入 React 元件,增進 APEX application 的互動性,也可透過 API 攫取不同來源的網路資源,加強資料的整合性。我們不需要安裝 Node.js 與 webpack。

未來如果需要,這些在 APEX 中開發的 React 元件,也可以很快速地應用在其他架構。

但開始學習 React 之前,你仍必須有堅實的 JavaScript 技術。React 在最近幾年快速的發展,在最近的 2019 年 React 16.8 我們看到了 Hooks 的發布,這是一種在組件(components)之間添加和共享狀態(state)邏輯的新方法,它讓你不必寫 class 就能使用 state 以及其他 React 的功能,讓程式碼更加簡潔。這會大量的使用 JavaScript ES6 的最新語法。

你如果在網路上看到使用 class 的 React 組件,請不要再用。class component 將來可能會被棄用。Function components 與 Hooks 是 React 的未來。

身為一個專業的軟體工程師,不管你伺服端使用何種架構、何種資料庫,你還是都得精於 JavaScript。JavaScript 是目前軟體工程師最重要的技術。

APEX 平台

這裡使用的 APEX 版本是 5.1.4。如果你使用的環境低於 5.1.4,建議您盡快升級。它除了有較好的使用者介面,伺服端也提供 APEX_JSON Package 支援 JSON。JSON 是目前資料交換最重要的格式,你也須花點時間了解它。

要在 APEX 中能夠運作,我們必須 import 三個 JavaScript 程式庫。你可以將這三個程式庫加入 APEX Page Properties 的 JavaScript > File URLs 中。

我們會在開發 React 時用到 JavaScript ES6 與 React JSX 語法,並不是所有的瀏覽器都支援這些語法,Babel 就是負責這些預處理,將這些語法事先轉譯成瀏覽器看得懂的語法,這稱為 compiling。

React 如何運作的

使用 React 時,會用 JSX 創建應用程序。JSX 是基於標籤(tag-based)的 JavaScirpt 語法,看起來很像 HTML。使用 React 必須深入探討 JSX。 為了真正理解 React,我們就從其最原子的單元:React 元素(React elements)開始。但我們先不使用 JSX 語法,而先用 React.createElement 來探討 React 元素。

React Elements

我們將了解 React 元素,及如何與其他元素組成自定義的 React 組件(React components),從而了解 React 組件。

瀏覽器 DOM 由 DOM 元素(DOM elements)組成。 同樣,React DOM 由 React 元素組成。 DOM 元素和 React 元素看起來相同,但實際上卻完全不同。 React 元素是對實際 DOM 元素的外觀的描述。 換句話說,React 元素是有關如何創建瀏覽器 DOM 的指令。

我們可以使用 React.createElement 創建一個 React 元素來代表 h1。

在 APEX Page 建立一個 Region,在 Region Properties 的 Source > Text 加入程式碼:

Region Source Text
1
2
3
4
5
6
7
<div id="react-root"></div>

<script type="text/babel">
const hello = React.createElement("h1", { id: "hello" }, "Hello Scott!");

ReactDOM.render(hello, document.getElementById("react-root"));
</script>
  • 第 3 行的 script 標籤的 type 是 text/babel,Babel 將在運行客戶端之前在客戶端上事先編譯代碼。
  • 第 4 行使用 React.createElement 創建一個 React 元素
    • 第一個參數定義我們要創建的元素的類型。 在這裡,我們要創建一個 h1 元素。
    • 第二個參數表示元素的屬性(properties)。 創建的 h1 當前具有 id 為 hello 的屬性 。
    • 第三個參數表示元素的子元素:在開始和結束標記之間插入的任何節點,在這裡,僅是一些文本字串 “Hello Scott!”。
  • 第 6 行 ReactDOM.render 會將創建的 React 元素渲染(rendering)為實際的 DOM 元素。並掛載到實際的 DOM 目標節點 react-root。

渲染後實際的 DOM 元素如下:

1
<h1 id="hello">Hello Scott!</h1>

React 元素只是一個 JavaScript 描述,告訴 React 如何構造 DOM 元素。如果將它 log 到 Chrome 開發環境的 Console,則它會像:

1
2
3
4
5
6
7
8
9
{
$$typeof: Symbol(react.element),
key: null,
props: {id: "hello", children: "Hello Scott!"},
ref: null,
type: "h1",
_owner: null,
_store: {validated: false}
}

所看到的這些字段(fields) 對 React 都很重要,先讓我們仔細看看 type 和 props 字段。

React 元素的 type 屬性告訴 React 創建哪種類型的 HTML 或 SVG 元素。 props 屬性表示構造 DOM 元素所需的數據和子元素。 children,用於將其他嵌套元素顯示為文本。

ReactDOM

創建 React 元素後,我們希望在瀏覽器中看到它。 ReactDOM 包含了在瀏覽器中呈現 React 元素所需的工具。 在上端程式碼的第 6 行 ReactDOM.render 就是我們所需要的。 在 React 16 以後的版本 render 也可以接受陣列,這會使陣列中的元素都成為同級元素(siblings)。

Children

React 使用 props.children 渲染子元素。 我們也可以將其他 React 元素渲染為子元素,從而創建樹狀元素。

1
2
3
4
5
6
7
React.createElement(
"ul",
null,
React.createElement("li", null, "Hello Scott"),
React.createElement("li", null, "Hello Emily"),
React.createElement("li", null, "Hello Amanda")
);

渲染後實際的 DOM 元素如下:

1
2
3
4
5
<ul>
<li>Hello Scott</li>
<li>Hello Emily</li>
<li>Hello Amanda</li>
</ul>

我們可以改用陣列的 map 映射創建列表項:

1
2
3
4
5
6
7
8
9
10
11
12
13
const userData = [
"Scott",
"Emily",
"Amanda"
];

const hello = React.createElement(
"ul",
null,
userData.map((user, i) =>
React.createElement("li", { key: i }, `Hello ${user}`)
)
);

當我們透過迭代陣列來構建子元素列表時,React 需要每個元素都有一個 key 屬性。 React 使用 key 屬性來更有效率地更新 DOM。

React Components

無論其大小,內容或使用何種技術創建,使用者介面都是由部件(parts)組成的。 按鈕,列表,標題等等。所有這些部件放在一起構成一個使用者介面。有些介面所需的部件都相同,可以重複使用。

在 React 中,我們將每個部件描述為一個組件(component)。組件使我們可以重用相同的結構,然後可以使用不同的數據集填充這些結構。

我們將通過編寫函式來創建組件。該函式將返回使用者介面的可重用部件,也就是 React 組件。

讓我們創建一個返回無序列表的函式。我們將這函式取名為 UsersList。

UsersList
1
2
3
4
5
6
7
8
9
10
11
12
13
14
function UsersList() {
return React.createElement(
"ul",
null,
React.createElement("li", null, "Hello Scott"),
React.createElement("li", null, "Hello Emily"),
React.createElement("li", null, "Hello Amanda")
);
}

ReactDOM.render(
React.createElement(UsersList, null, null),
document.getElementById("react-root")
);

這個 UsersList 函式返回的就是一個組件,該組件的名稱就稱為 UsersList,該函數輸出如下所示的元素:

1
2
3
4
5
6
7
<UsersList>
<ul>
<li>Hello Scott</li>
<li>Hello Emily</li>
<li>Hello Amanda</li>
</ul>
</UsersList>

這很酷,但是我們目前將數據硬編碼到組件中。如果我們可以構建一個組件,然後將數據作為屬性傳遞給該組件,然後該組件可以動態呈現數據,這將會更棒。

1
2
3
4
5
6
7
8
9
10
11
12
13
14
15
16
17
18
19
20
const userData = [
"Scott",
"Emily",
"Amanda"
];

function UsersList(props) {
return React.createElement(
"ul",
null,
props.users.map((user, i) =>
React.createElement("li", { key: i }, `Hello ${user}`)
)
);
}

ReactDOM.render(
React.createElement(UsersList, { users: userData }, null),
document.getElementById("react-root")
);
  • 第 7 行在組件函式加一個參數,以便在調用時可以動態的傳入資料。這個參數習慣上都命名為 props,表示這是組件的屬性(properties)。
  • 第 18 行透過 React.createElement
    • 第一個參數調用 UsersList 函式,產生一個 UsersList 組件。
    • 第二個參數表示組件的屬性(properties)。 這裡有一個值是 userData 的 users 屬性。所有在這裡定義的屬性被包裝在一個物件中,做為 UsersList 函式的引數。這就是第 7 行 UsersList 函式的參數 props。第 11 行可從 props.users 取得 userData 的資料。

讓我們看一下DOM。

1
2
3
4
5
6
7
<UsersList users="[...]">
<ul>
<li key="0">Hello Scott</li>
<li key="1">Hello Emily</li>
<li key="2">Hello Amanda</li>
</ul>
</UsersList>

注意第 1 行的 users 屬性。

我們還可以通過解構賦值(Destructuring assignment) props 的數據來稍微簡潔代碼,users 預設值為 [ ],可以防止調用時沒有傳入 users 屬性:

1
2
3
4
5
6
7
8
9
function UsersList({ users = [] }) {
return React.createElement(
"ul",
null,
users.map((user, i) =>
React.createElement("li", { key: i }, `Hello ${user}`)
)
);
}

改用箭頭函式運算式(arrow function expression):

1
2
3
4
5
6
7
8
9
const UsersList = ({ users = [] }) => (
React.createElement(
"ul",
null,
users.map((user, i) =>
React.createElement("li", { key: i }, `Hello ${user}`)
)
)
);

使用 React.createElement 函式是了解 React 如何工作的好方法,但是作為 React 開發人員,這不是我們要做的。為了有效地使用 React,我們還需要做一件事:JSX。React with JSX

GROUP BY 在日常的 SQL 使用中佔了很大的比率,也很重要。但也常常有效能的問題。這裡就從 SELECT Clause 與 GROUP BY 的關聯來看看,與你理解的有何不同 ?

SQL
1
2
3
4
5
6
7
8
9
select 'Hello Tainan' as msg,
1 as num,
deptno,
get_dept_name(deptno) dname,
(select count(*) from emp) as total,
count(*) as cnt
from emp
group by deptno
/
Result
MSG            NUM  DEPTNO DNAME             TOTAL        CNT
------------ ----- ------- ------------ ---------- ----------
Hello Tainan 1 30 SALES 19 5
Hello Tainan 1 20 RESEARCH 19 5
Hello Tainan 1 70 資訊部 19 3
Hello Tainan 1 40 OPERATIONS 19 2
Hello Tainan 1 10 會計部 19 4

要記得,Oracle Database 10g 以後 GROUP BY 不會自動排序。

上面這段 SQL 你理解了多少? 或與你理解的有何不同 ?

除了 Aggregate function COUNT( ) 外,並不是所有 SELECT clause 上的項目都必須出現在 GROUP BY 裡。這是因為 SELECT clause 是在執行完 GROUP BY 後,才決定其值。 除了 deptno 外,其他欄位與在執行 GROUP BY 時都不相干。 也就是說 msg、num、dname、total 與資料集 emp 毫無關係,再如何變動 GROUP BY,這些值都不會變。

以下條列的都有這些特性。

1. Constants (msg 與 num)
2. Scalar values returned by user-defined functions (dname)
3. Analytic Functions (標準的 ISO SQL 稱為 Window Functions)
4. Non-correlated scalar subqueries (total)

了解了這些特性,來看看這段 SQL。

SQL
1
2
3
4
5
6
7
8
9
select deptno, count(*) cnt,
case when count(*) not between 4 and 8
then '<<<==='
else null
end as mark
from emp
group by deptno
order by deptno
/
Result
 DEPTNO        CNT MARK
------- ---------- ------
10 4
20 5
30 5
40 2 <<<===
70 3 <<<===

CASE 幾乎可出現在任何地方,也很有彈性,這裡與 GROUP BY 欄位無關,所以可出現在 SELECT 中。注意 CASE 的執行時間點是在 GROUP BY 之後

出現在 GROUP BY 的項目也不一定要出現在 SELECT Clause。

SQL
1
2
3
4
select count(*)
from emp
group by deptno
/
Result
  COUNT(*)
----------
5
5
3
...
SQL
1
2
3
4
select count(*)
from emp
group by deptno, job
/
Result
  COUNT(*)
----------
1
2
3
...

來看看常見的 GROUP BY 的應用,依前面所提的規則,還會有何不同寫法的可能性 ?

SQL
1
2
3
4
5
6
select e.deptno, d.dname, sum(sal) total
from emp e,
dept d
where e.deptno = d.deptno
group by e.deptno, d.dname
/
Query Execution Plan
----------------------------------------------------------------------------
| Id | Operation | Name | Rows | Bytes | Cost (%CPU)| Time |
----------------------------------------------------------------------------
| 0 | SELECT STATEMENT | | 19 | 380 | 7 (15)| 00:00:01 |
| 1 | HASH GROUP BY | | 19 | 380 | 7 (15)| 00:00:01 |
|* 2 | HASH JOIN | | 19 | 380 | 6 (0)| 00:00:01 |
| 3 | TABLE ACCESS FULL| DEPT | 6 | 78 | 3 (0)| 00:00:01 |
| 4 | TABLE ACCESS FULL| EMP | 19 | 133 | 3 (0)| 00:00:01 |
----------------------------------------------------------------------------

這是非常一般的應用,因為需要部門名稱,所以 Join 了 DEPT。Query Execution Plan 顯示 Rows 19,Cost 7。

這可以用 Scalar subquery 來改寫 dname 欄位。

SQL
1
2
3
4
5
6
select e.deptno,
(select dname from dept d where e.deptno = d.deptno) dname,
sum(sal) total
from emp e
group by e.deptno
/
Query Execution Plan
--------------------------------------------------------------------------------------------
| Id | Operation | Name | Rows | Bytes | Cost (%CPU)| Time |
--------------------------------------------------------------------------------------------
| 0 | SELECT STATEMENT | | 5 | 35 | 4 (25)| 00:00:01 |
| 1 | TABLE ACCESS BY INDEX ROWID| DEPT | 1 | 13 | 1 (0)| 00:00:01 |
|* 2 | INDEX UNIQUE SCAN | SYS_C0036617 | 1 | | 0 (0)| 00:00:01 |
| 3 | HASH GROUP BY | | 5 | 35 | 4 (25)| 00:00:01 |
| 4 | TABLE ACCESS FULL | EMP | 19 | 133 | 3 (0)| 00:00:01 |
--------------------------------------------------------------------------------------------

將 dname 改用 Scalar Subquery,這樣寫,如果 emp 有百萬筆,會不會有 Loop 的問題 ?

從 Query Execution Plan 中注意它的執行時間點(Id 1 與 2) 在 GROUP BY 之後(Id 3 與 4),就會比較清楚。也注意 Rows 與 Cost。

效能似乎變得較好,但要注意的是,上面兩段 SQL 並不完全相同,第二段有 OUTER JOIN 的結果。

使用 GROUP BY 一個常見的錯誤就是 HAVING 的誤用:

SQL
1
2
3
4
5
6
7
8
select deptno,
trunc(hiredate, 'Y') year,
sum(sal)
from emp
group by deptno, trunc(hiredate, 'Y')
having trunc(hiredate, 'Y') > to_date('1981', 'yyyy')
order by 1, 2
/
Query Execution Plan
-----------------------------------------------------------------------------
| Id | Operation | Name | Rows | Bytes | Cost (%CPU)| Time |
-----------------------------------------------------------------------------
| 0 | SELECT STATEMENT | | 1 | 15 | 5 (40)| 00:00:01 |
| 1 | SORT ORDER BY | | 1 | 15 | 5 (40)| 00:00:01 |
|* 2 | FILTER | | | | | |
| 3 | HASH GROUP BY | | 1 | 15 | 5 (40)| 00:00:01 |
| 4 | TABLE ACCESS FULL| EMP | 19 | 285 | 3 (0)| 00:00:01 |
-----------------------------------------------------------------------------

從 Query Execution Plan 中可以比較清楚的看出來,看它 FILTER(Id 2) 的位置。Filter 不應出現在 GROUP BY 後面。這裡可以將 having 的條件直接移到 where 語句中。不是 Aggregate Function 不應該出現在 HAVING 的地方。

SQL
1
2
3
4
5
6
7
8
select deptno,
trunc(hiredate, 'Y') year,
sum(sal)
from emp
where trunc(hiredate, 'Y') > to_date('1981', 'yyyy')
group by deptno, trunc(hiredate, 'Y')
order by 1, 2
/
Query Execution Plan
----------------------------------------------------------------------------
| Id | Operation | Name | Rows | Bytes | Cost (%CPU)| Time |
----------------------------------------------------------------------------
| 0 | SELECT STATEMENT | | 1 | 15 | 5 (40)| 00:00:01 |
| 1 | SORT ORDER BY | | 1 | 15 | 5 (40)| 00:00:01 |
| 2 | HASH GROUP BY | | 1 | 15 | 5 (40)| 00:00:01 |
|* 3 | TABLE ACCESS FULL| EMP | 1 | 15 | 3 (0)| 00:00:01 |
----------------------------------------------------------------------------

Filter(Id 3) 應該在 GROUP BY 之前,這種誤用幾乎很難發覺,但當資料越來越大時效能就有很大的不同。

再看最後一個類似的範例。

SQL
1
2
3
4
5
6
select deptno
from emp
where trunc(hiredate, 'Y') >= to_date('1981', 'yyyy')
group by deptno
having sum(coalesce(comm, 0)) > 0
/
Query Execution Plan
----------------------------------------------------------------------------
| Id | Operation | Name | Rows | Bytes | Cost (%CPU)| Time |
----------------------------------------------------------------------------
| 0 | SELECT STATEMENT | | 1 | 13 | 4 (25)| 00:00:01 |
|* 1 | FILTER | | | | | |
| 2 | HASH GROUP BY | | 1 | 13 | 4 (25)| 00:00:01 |
|* 3 | TABLE ACCESS FULL| EMP | 1 | 13 | 3 (0)| 00:00:01 |
----------------------------------------------------------------------------

乍看之下,這似乎很合理,但仔細看一下,sum( ) 只在判斷 comm 是否大於 0,直接就可用在 where。

SQL
1
2
3
4
5
6
select deptno
from emp
where trunc(hiredate, 'Y') >= to_date('1981', 'yyyy')
and coalesce(comm, 0) > 0
group by deptno
/
Query Execution Plan
---------------------------------------------------------------------------
| Id | Operation | Name | Rows | Bytes | Cost (%CPU)| Time |
---------------------------------------------------------------------------
| 0 | SELECT STATEMENT | | 1 | 13 | 4 (25)| 00:00:01 |
| 1 | HASH GROUP BY | | 1 | 13 | 4 (25)| 00:00:01 |
|* 2 | TABLE ACCESS FULL| EMP | 1 | 13 | 3 (0)| 00:00:01 |
---------------------------------------------------------------------------

comm 大於 0,直接就可用在 where。這也是 HAVING 常被誤用的地方。

上面的 SQL 與使用 DISTINCT 沒甚麼不同,但 Query Execution Plan (HASH UNIQUE)卻不太相同。

SQL
1
2
3
4
5
select distinct deptno
from emp
where trunc(hiredate, 'Y') >= to_date('1981', 'yyyy')
and coalesce(comm, 0) > 0
/
Query Execution Plan
---------------------------------------------------------------------------
| Id | Operation | Name | Rows | Bytes | Cost (%CPU)| Time |
---------------------------------------------------------------------------
| 0 | SELECT STATEMENT | | 1 | 13 | 4 (25)| 00:00:01 |
| 1 | HASH UNIQUE | | 1 | 13 | 4 (25)| 00:00:01 |
|* 2 | TABLE ACCESS FULL| EMP | 1 | 13 | 3 (0)| 00:00:01 |
---------------------------------------------------------------------------

遇到有 GROUP BY 的地方要謹慎地思考一下,效能會有很大的不同,最好養成查看 Query Execution Plan 的習慣。

一樣的結果,可以有不同的 SQL 解法,所以除了科學,SQL 也是一種藝術。現在就來思考幾段 SQL 的藝術。

就用我常用來展示的資料表 DEPT 與 EMP 來展示。當你實際碰到問題時可以回到這裡參閱,看看能不能激發你的思維。 這也是我日常常會參閱的幾段 SQL。

問題很簡單,我們要查詢沒有獎金(comm)的部門。往下看前先試試解解看。

Table DEPT
    DEPTNO DNAME          LOC
---------- -------------- -------------
10 會計部 紐約
20 RESEARCH DALLAS
30 SALES 台南
40 OPERATIONS BOSTON
70 資訊部 台南
60 開發部 台南
Table EMP
EMPNO ENAME      JOB              MGR HIREDATE            SAL       COMM DEPTNO
----- ---------- --------- ---------- ------------ ---------- ---------- ------
7839 KING PRESIDENT 17-NOV-81 5000 10
8907 牸祢 ANALYST 7566 09-DEC-82 9002 10
7782 楊建華 MANAGER 7902 09-JUN-81 2400 10
7934 楊喆 CLERK 7902 23-JAN-82 1500 10
7369 SMITH CLERK 7902 17-DEC-80 8001 20
7902 FORD ANALYST 7566 03-DEC-81 3000 20
7876 ADAMS CLERK 7788 12-JAN-83 1100 20
7566 吳煌珉 MANAGER 7839 02-APR-81 2975 20
7788 SCOTT ANALYST 7566 09-DEC-82 45300 20
7900 JAMES CLERK 7698 03-DEC-81 94998 30
7844 하찮고 SALESMAN 7698 08-SEP-81 1500 30
7654 葉習堃 SALESMAN 7698 28-SEP-81 1250 1400 30
7499 ALLEN SALESMAN 7698 20-FEB-81 1600 303 30
7698 BLAKE MANAGER1 7839 01-MAY-81 2850 101 30
9011 文英蔡 總鋪師 7788 28-AUG-18 77778 180 40
7608 馬小九 ANALYST 7788 28-JUN-10 1000 100 40
9006 林頂尚 ANALYST 7788 07-MAY-01 66666 70
7607 バック 分析師 7788 24-MAR-08 45000 100 70
7609 蔡大一 分析師 7788 28-JUN-10 60000 70

資料不多,直接目視就知道只有部門 30、40 與 70 有獎金,因此答案就是: 10(會計部)、20(RESEARCH) 與 60(開發部)。60 開發部雖然沒有員工,但是也應該包括在內。

這就來看看有哪些解法。在這裡的解法所得到的答案都是一樣,但並不表示將這些 SQL 套用到你的系統,所得到的答案都會一樣,因為這牽涉到你系統 Schema 的規劃,例如,欄位的 Contraints 等等。尤其要注意 Nulls 的問題。

Null 是所有資料庫中特有的一個值,不管資料庫是關聯式、或者是新興的非關聯式,都有 Null 值。因此所有的語言也都支援 Null 值的處理,包含 JSON。

  • 相關性子查詢 Correlated Subquery

Correlated Subquery
1
2
3
4
5
6
7
8
select dname
from dept d
where not exists (select null
from emp e
where e.deptno = d.deptno
and comm is not null
)
;

第 5 行 where 條件句中主查詢(MasterQuery)與子查詢(SubQuery)有了相關性,所以稱為 Correlated Subquery。碰到 NOT 這種反向邏輯總是會腦袋變殘,要好好思考。這種 Correlated Subquery 是最基礎與通常的寫法。結果如下。

Result
DNAME
--------------
開發部
RESEARCH
會計部
  • 不相關性子查詢 Uncorrelated Subquery

Uncorrelated Subquery
1
2
3
4
5
6
7
select dname
from dept
where deptno not in (select deptno
from emp
where comm is not null
)
;

主查詢與子查詢沒有直接的相關性,這稱為 Uncorrelated Subquery。

答案一樣這裡就不列出,不要直接複製貼上只看解答,瞄它一眼,然後自己寫寫看。

使用 NOT IN 時,小心 Null 值,我們先不要中斷這裡的思考,留待後面再來談這個 Nulls 的問題。

  • Outer Join

Outer Join
1
2
3
4
5
6
7
select dname
from dept d
left outer join emp e
on e.deptno = d.deptno
and e.comm is not null
where e.deptno is null
;
  • 集合函数 Aggregate functions

    Aggregate function,平常用的最多的就是 count( ), 你如果以為 Aggregate function 不外乎只有,SUM、AVG、MAX、MIN
    的功能,那可能就太小看它了。注意,這些集合函數總是與 Group by 同時出現。
  • SUM
Aggregate function SUM
1
2
3
4
5
6
7
8
9
10
11
12
select dname
from (select dname,
case when comm is null then 0
else 1
end as flag
from emp e,
dept d
where e.deptno (+) = d.deptno
) s
group by dname
having sum(flag) = 0
;

這與上段類似,但直接省掉 Inline View。

Aggregate function SUM without Inline View
1
2
3
4
5
6
7
8
9
select dname
from emp e,
dept d
where e.deptno (+) = d.deptno
group by dname
having sum(case when e.comm is null then 0
else 1
end) = 0
;
  • MAX
Aggregate function MAX
1
2
3
4
5
6
7
select dname
from emp e,
dept d
where e.deptno (+) = d.deptno
group by dname
having max(coalesce(e.comm,0)) = 0
;
  • 集合 Set Operation

Set Operation
1
2
3
4
5
6
7
8
9
select dname
from dept
MINUS
select dname
from dept d,
emp e
where d.deptno = e.deptno
and e.comm is not null
;
  • Subquery Factoring

Subquery Factoring
1
2
3
4
5
6
7
8
9
10
11
12
13
14
with x as (
select dname,
case when comm is null then 0
else 1
end as flag
from emp e,
dept d
where e.deptno (+) = d.deptno
)
select dname
from x
group by dname
having sum(flag) = 0
;
  • Analytic function

Analytic function
1
2
3
4
5
6
7
8
9
10
11
with x as (
select deptno,
sum(coalesce(comm, 0)) over(partition by deptno) dept_comm
from emp
)
select distinct dname
from x,
dept d
where x.deptno (+) = d.deptno
and coalesce(dept_comm, 0) = 0
;

每天都在 SQL 中打滾,應該都看得懂,希望你不是用複製貼上在驗證這些 SQL。現在就給個家庭作業,關掉這個網頁,寫出三個解答。

Nulls and NOT IN

Nulls 很討厭,它不知是甚麼東西的東西,你也無法把它當成是東西。但它無處不在。我們簡單的來看看。

SQL> select * from car_table;

CAR COLOR
-------------------- --------------------
Car1 RED
Car2 BLUE
Car3
Car4
SQL> select * from car_table where color != 'RED';

CAR COLOR
-------------------- --------------------
Car2 BLUE

這個答案是正確的嗎? 大部分的人可能不會這麼想!

SQL> select * from car_table where color != 'RED' or color IS NULL;

CAR COLOR
-------------------- --------------------
Car2 BLUE
Car3
Car4

為了正確的答案,你總必須把 NULL 加到你的每個 Query! 如果需要,可考慮加入 NOT NULL Constraint;NOT NULL Constraint 會影響 Optimizer 的 QUERY REWRITE。對 SQL 的效能也會有影響。尤其要注意,Unique Index 與 Unique Constraint 會有不同的 SQL 效能最佳化。

SQL> desc dual;
Name Null? Type
-------------------------- -------- -----------------
DUMMY VARCHAR2(1)

SQL> select * from dual;

D
-
X

SQL> select * from dual where dummy not in ('Y');

D
-
X

用最簡單的 DUAL Table 來看 NOT IN 的問題。這裡的 NOT IN 沒有問題。

SQL> select * from dual where dummy not in ('Y', NULL);

no rows selected

疑 ? no rows selected。使用 NOT IN 時,小心 Null 值。也許這是你要的結果;如果不是,要防止 NULL 值的出現。

colX not in (‘A’, ‘B’, ‘C’) 等於 (colX !=’A’ and colX !=’B’ and colX != ‘C’) 所以如果有 Null 值, colX != NULL 永遠不會是 true。 記得, colX != null 與 colX is not null 是不相同的。

colX in (‘A’, ‘B’, ‘C’) 等於 (colX =’A’ or colX =’B’ or colX = ‘C’) 所以沒有 Null 的問題。要注意,IN 與 NOT IN 並不是完全對立的指令

SQL> select empno, ename from emp where empno not in (select mgr from emp);

no rows selected

這裡想找出非主管人員,得到的答案是: 怎麼會都是主管 ?

SQL> select empno, ename from emp where mgr is null;

EMPNO ENAME
---------- ----------
7839 KING

總裁沒有上司。

SQL> select empno, ename
2 from emp
3 where empno not in (select mgr from emp where mgr is not null);

EMPNO ENAME
---------- ----------
7369 SMITH
7499 ALLEN
7607 バック
7608 馬小九
...

使用 NOT IN 要小心 Nulls。這裡在 Subquery 中要防止 mgr 出現 NULL 值。

在規劃 Schema 時,不該有 NULL 的 Column 就應該要設 NOT NULL Constraint。

相對的,使用 NOT EXISTS 會比較安全。

SQL> select empno, ename
2 from emp e
3 where not exists (select null from emp e2 where e.empno = e2.mgr);

EMPNO ENAME
---------- ----------
7369 SMITH
7499 ALLEN
7607 バック
7608 馬小九
...

祝,健康快樂。

上星期有同事問到 Oracle PIVOT 語法的問題,問題如下:

Pivot
1
2
3
4
5
6
7
8
9
10
11
12
13
14
15
with t
as
(select dname, job, count(*) cnt
from emp e, dept d
where e.deptno = d.deptno
group by dname, job
)
select *
from t
pivot (
sum(cnt)
for (job) in ('ANALYST', 'CLERK', 'SALESMAN')
)
order by dname
;

這得到的結果 :

Result
DNAME           'ANALYST'    'CLERK' 'SALESMAN'
-------------- ---------- ---------- ----------
OPERATIONS 1
RESEARCH 2 2
SALES 1 3
會計部 1 1
資訊部 1

這裡的資料標頭 ‘ANALYST’ 多了 ‘ ‘ 單引號,同事問如何將它去除。

以下就是設定這些標頭的範例。

Pivot
1
2
3
4
5
6
7
8
9
10
11
12
13
14
15
with t
as
(select dname, job, count(*) cnt
from emp e, dept d
where e.deptno = d.deptno
group by dname, job
)
select *
from t
pivot (
sum(cnt)
for (job) in ('ANALYST' as Analyst, 'CLERK' as Clerk, 'SALESMAN' as Salesman)
)
order by dname
;

我只修改了第 12 行加入了 AS 語法,就像在 SELECT 語法中一樣。

Result
DNAME             ANALYST      CLERK   SALESMAN
-------------- ---------- ---------- ----------
OPERATIONS 1
RESEARCH 2 2
SALES 1 3
會計部 1 1
資訊部 1

如果想區分大小寫或加入中文,則可以用雙引號 “Analyst “。

Pivot
1
2
3
4
5
6
7
8
9
10
11
12
13
14
15
with t
as
(select dname, job, count(*) cnt
from emp e, dept d
where e.deptno = d.deptno
group by dname, job
)
select *
from t
pivot (
sum(cnt)
for (job) in ('ANALYST' as "分析員", 'CLERK' as "營業員", 'SALESMAN' as "推銷員")
)
order by dname
;
Result
DNAME              分析員     營業員     推銷員
-------------- ---------- ---------- ----------
OPERATIONS 1
RESEARCH 2 2
SALES 1 3
會計部 1 1
資訊部 1

也可以字串合併。

Pivot
1
2
3
4
5
6
7
8
9
10
11
12
13
14
15
16
with t
as
(select dname, job, sal
from emp e, dept d
where e.deptno = d.deptno
)
select *
from t
pivot (
min(sal) as "最低薪",
max(sal) as "最高薪",
sum(sal) as "合計"
for (job) in ('CLERK' as "營業員", 'SALESMAN' as "推銷員")
)
order by dname
;
Result
DNAME           營業員_最低薪   營業員_最高薪   營業員_合計   推銷員_最低薪   推銷員_最高薪   推銷員_合計
-------------- ------------- ------------- ----------- ------------- ------------- -----------
OPERATIONS
RESEARCH 1100 8001 9101
SALES 94998 94998 94998 1250 1600 4350
會計部 1500 1500 1500
資訊部

Hexo 是一個快速,簡單且功能強大的 Blog 框架。 用 Markdown (或其他標記語言) 編寫文章,然後 Hexo 會快速的生成帶有精美主題的靜態文件。

其實除了編寫部落格,也可以利用它來編寫:

  • 應用系統的使用者操作手冊
  • 應用系統文件
  • 公佈欄

你也可以開啟一個家庭部落格,讓家裡的成員一起來創作。

這裡有一篇快速的參考,撰寫 Hexo 文章 - Markdown 語法大全。除了標準的 Markdown 語法,Hexo 也提供了標籤外掛(Tag Plugins)

我們就來快速啟動一個部落格專案,最後則將它部署到雲端。這裡將部署到 GitHub,你也可以選擇其他的雲。

Installation

安裝 Hexo 伺服器非常簡單,只需要幾分鐘你就可以開始撰寫文章。

但首先你必須先安裝

在軟體開發專案中你不能不知道 Git。Node.js 則是最近幾年來最熱門的軟體語言。身為專業的軟體開發人員,建議你一定要花點時間學習。

編寫軟體代碼,則建議你使用 Visual Studio Code

安裝所有要求後,您可以使用 npm 安裝 Hexo:

$ npm install -g hexo-cli
$ hexo --version
hexo: 3.9.0
hexo-cli: 3.1.0
os: Windows_NT 10.0.18363 win32 x64
...

接下來我要用 Yarn 來取代 npm 管理 JavaScript 套件。 Yarn 是 Facebook 與 Exponent、 Google、Tilde 所合作開發的套件管理工具,其功能與 npm 相同,但 npm 最為人詬病的是安裝速度很慢、安裝相依套件沒有順序性,而 Yarn 不但解決了這些問題,還加入了方便的 Cache 機制使套件均只要下載一次,多個專案若使用相同套件時不必重新下載。 官方也表示 Yarn 是快速、安全、可靠的,且能支援多系統。

Setup

一旦安裝了 Hexo,可以執行以下命令以在目標 <文件夾> 中初始化 Hexo。

$ hexo init hello-tainan
INFO Cloning hexo-starter https://github.com/hexojs/hexo-starter.git
Cloning into 'I:\u01\hexo\hello-tainan'...
...
success Saved lockfile.
Done in 54.22s.
INFO Start blogging with Hexo!

這樣我們就初始化了一個 Hexo 部落格專案了。切換到專案目錄,開始安裝套件。

$ cd hello-tainan

$ yarn install

你如果不想使用 yarn 則可以改用 npm install。 可以啟動伺服器了:

$ yarn server
yarn run v1.22.4
hexo server
INFO Start processing
INFO Hexo is running at http://localhost:4000 . Press Ctrl+C to stop.

這就開始了!

Configuration

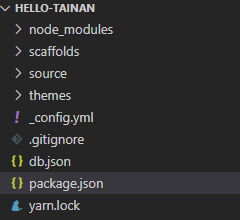
初始化後,您的專案文件夾將如下所示:

package.json

應用程序數據。 預設情況下會安裝 EJS,Stylus 和 Markdown 渲染器。 如果需要,可以稍後將其卸載。

package.json
1
2
3
4
5
6
7
8
9
10
11
12
13
14
15
16
17
18
19
20
21
22
23
24
25
26
{
"name": "hexo-site",
"version": "0.0.0",
"private": true,
"scripts": {
"start": "hexo server --port 8484",
"build": "hexo generate",
"clean": "hexo clean",
"deploy": "hexo deploy",
"server": "hexo server"
},
"hexo": {
"version": "4.2.1"
},
"dependencies": {
"hexo": "^4.2.1",
"hexo-generator-archive": "^1.0.0",
"hexo-generator-category": "^1.0.0",
"hexo-generator-index": "^1.0.0",
"hexo-generator-tag": "^1.0.0",
"hexo-renderer-ejs": "^1.0.0",
"hexo-renderer-stylus": "^1.1.0",
"hexo-renderer-marked": "^2.0.0",
"hexo-server": "^1.0.0"
}
}

第 6 行是我加入的,可以更改啟動預設的 port。現在可以用 yarn start 啟動。

$ yarn start
yarn run v1.22.4
hexo server --port 8484
INFO Start processing
INFO Hexo is running at http://localhost:8484 . Press Ctrl+C to stop.

_config.yml

站點(Site)配置文件。 您可以在此處配置大多數設置。

在加入新的部落格文章前,這裡先做一些修改 _config.yml 站點配置文件。

_config.yml
# Site
title: Hello Tainan
subtitle: ''
description: ''
keywords:
author: Your name
language: zh-TW
timezone: Asia/Taipei
...
post_asset_folder: true
...

post_asset_folder 設為 true,這會在我們創建一個新的部落格文章時也會同時建立一個同名的目錄,這目錄可用來存放與同名部落格文章有關的檔案,例如,圖片、照片等。

建立新文章

接下來,我們要在部落格中建立第一篇新文章,你可以直接從現有的範例文章「Hello World」改寫,但我們要使用 new 指令來創建新的文章。

$ hexo new "Hello Tainan"
INFO Created: I:\u01\hexo\hello-tainan\source\_posts\Hello-Tainan.md

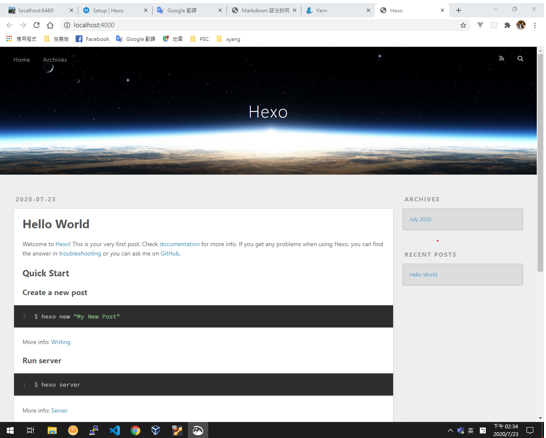
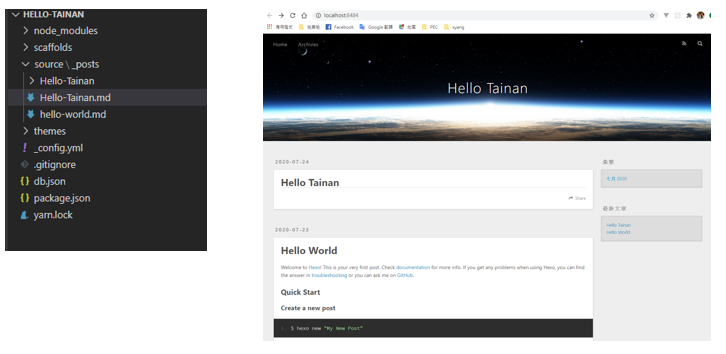
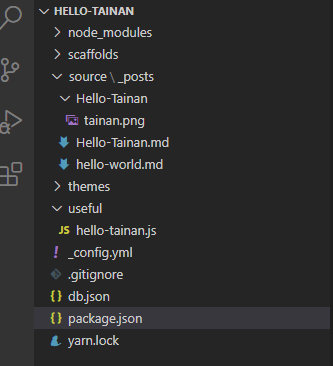
網站馬上發生了變動,左邊的圖示是專案目錄的目前的樣子 source\_posts 目錄下多了 Hello-Tainan 目錄與 Hello-Tainan.md 檔案。右邊圖示則是目前網站的樣子,多了ㄧ篇空白的部落格文章。

開始編輯 Hello-Tainan.md 檔案:

Hello-Tainan.md
1
2
3
4
5
6
7
8
9
10
11
12
13
14
15
16
17
18
19
20
21
22
23
24
25
26
27
28
29
30
31
32
33
34
35
---
title: Hello Tainan
date: 2020-07-24 09:41:25
tags:
categories:
- [Hello]
- [Hexo]
- [JavaScript]
---
## Hello Tainan, 就從這裡開始!

{% asset_img tainan.png "Hello Tainan" %}

##### Hello Tainan 程式碼

```javascript hello-tainan.js
const Hello = (name) => console.log(`Hello ${name}!`);

Hello('Tainan');
```

使用 Hexo [標籤外掛(Tag Plugins)](https://hexo.io/zh-tw/docs/tag-plugins)語法。

{% codeblock hello-tainan.js lang:javascript %}
const Hello = (name) => console.log(`Hello ${name}!`);

Hello('Tainan');
{% endcodeblock %}

{% codeblock line_number:false lang:bash %}
$ node hello-tainan
Hello Tainan!
{% endcodeblock %}

**Ok! 保持下去!**

檔案附屬名是 .md 表示這是一個 markdown 檔案,檔案中使用的都是 markdown 語法。

  • 第 5 行加入了 categories 分類,Hexo 會自動分類並在網頁上顯示連結。
  • 第 12 行可以顯示圖檔,圖檔則放在 Hello-Tainan 目錄下。
  • 程式碼可以用 markdown 標準語法,也可以使用 Hexo 標籤外掛語法。
  • 第 22 行可以對外連結。

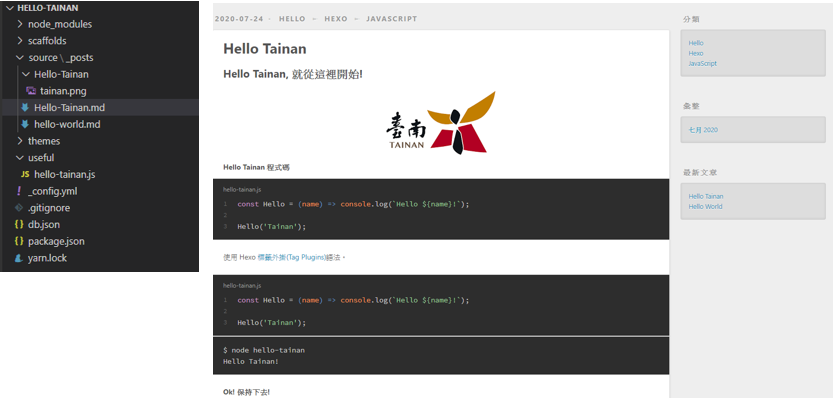
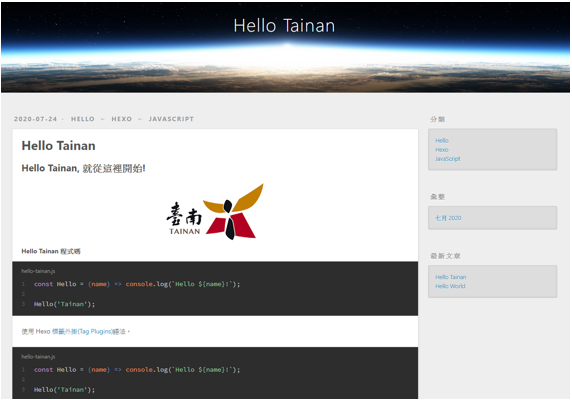
結果應該會如下面的圖示。

OK! 這就可以開始經營你的部落格了。再來我們就要將部落格發佈出去供大家閱讀。

首先我們要先加入 Git 版本控制,然後部署到 GitHub。

Git 與 GitHub

Git

Git 是一個版本控制系統。版本控制系統是設計用於跟踪文件隨時間變化狀態的一種軟體。更具體的說,Git 是一個分布式的版本控制系統。在 Git 中參與項目的每個程式員不僅能擁有文件的當前狀態,還能擁有項目完整的歷史紀錄。

GitHub

GitHub 是一個網站,你可以向該網站上傳一個 Git 儲存庫(git repository)。使用 GitHub 使你與他人合作一個項目變得更容易,而這歸功於 GitHub 提供的一些機制:

  • 一個用以共享儲存庫的集中位置。
  • 一個基於 Web 介面以及分叉(forking)、拉請求(pull request)、提出問題(issue)、維基(WiKi)。

這些功能使你和你的團隊能更有效的對所做的修改進行說明、討論和評估。

GitHub 改變了軟體編寫的方式。它最初的構想是為開發者提供一種更容易開發源代碼項目的途徑。目前,GitHub 迅速成為預設的軟體開發平台。GitHub 不僅用於儲存源代碼,還可以對軟體提供詳細說明、討論和評估軟體。

2018 年六月初,在開發者社群中最震撼的新聞事件莫過於微軟以 75 億美元收購軟體原始碼代管服務 GitHub。 2019 年,GitHub 就在官方部落格宣布了兩項更新,首先是將過去按照空間大小收費的私人儲存庫(private repositories)功能提供給免費版用戶使用。並整併「GitHub Enterprise」企業版,企業用戶可以利用 GitHub Connect 安全的在產品間連結,並混合選擇產品功能。

使用 Git 版本控制

現在我們要將 hello-tainan 專案導入 Git 版本控制,目前專案目錄內容如下:

使用 Git 查閱目前專案的 Git 儲存庫(git repository)狀態。

$ git status
fatal: not a git repository (or any of the parent directories): .git

報告反映錯誤,專案目前不是一個 Git 儲存庫,我們必須先初始化 Git 儲存庫。初始化 Git 儲存庫之前,先看一下專案目錄下有一個檔案 .gitignore,這個檔案是在初始化 Hexo 專案時自動產生的。如果專案目錄下這個檔案不存在,則可手動將它加入。它必須位於專案的根目錄下。

1
2
3
4
5
6
7
.DS_Store
Thumbs.db
db.json
*.log
node_modules/
public/
.deploy*/

在專案中並不是所有資料都必須做版本控制,例如,暫存檔、日誌資料與一些開源的軟體套件, .gitignore 就是在記載這些可以排除的目錄或檔案。例如,node_modules/ 目錄都是存放一些套件,有些套件會佔據非常大的空間,我們也不會去修改它,所以不必將它納入專案的 Git 儲存庫。

初始化專案

現在可以初始化專案。

$ git init
Initialized empty Git repository in I:/u01/hexo/hello-tainan/.git/

可以再用 git status 查看目前專案的 Git 儲存庫狀態:

$ git status
On branch master

No commits yet

Untracked files:
(use "git add <file>..." to include in what will be committed)
.gitignore
_config.yml
package.json
scaffolds/
source/
themes/
useful/
yarn.lock

nothing added to commit but untracked files present (use "git add" to track)
第一次提交

目前還沒有任何的提交(commits), 我們要做第一次提交,將目前專案的檔案存入 Git 儲存庫。

$ git add .

$ git commit -m "Begin Project Hello Tainan"

$ git log --oneline
fa0c917 (HEAD -> master) Begin Project Hello Tainan
Git 中央儲存庫

目前專案的 Git 儲存庫只存在本地端的電腦中,如果要與人共享或團隊開發,必須把 Git 儲存庫存入一個中央儲存區。這個中央儲存區可以在公司內部,也可以在雲端。這裡就要使用 GitHub 當中央儲存區與人共享、或協同合作共同開發這個專案。

  • 首先到 GitHub 註冊一個帳號。
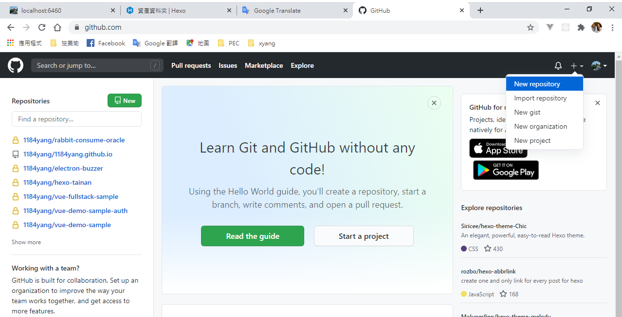
  • 登入後,在右上角選擇 New repository。

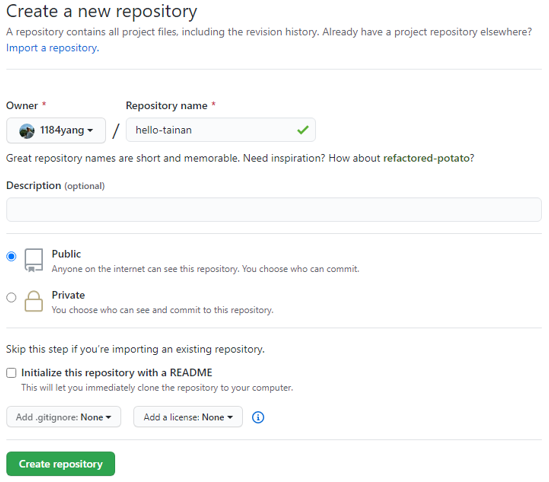
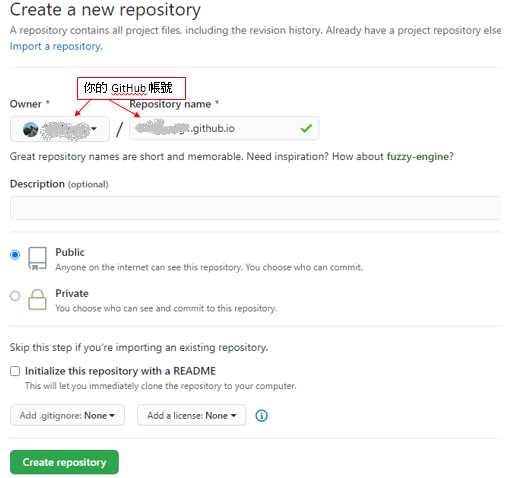
輸入儲存庫名稱,並選擇 Public 分享給所有人。在微軟併購 GitHub 之前 Private 儲存庫是要收費的,現在則已開放。目前我使用的是免費的方案,這裡可以查到收費標準。GitHub 也有提供企業方案。

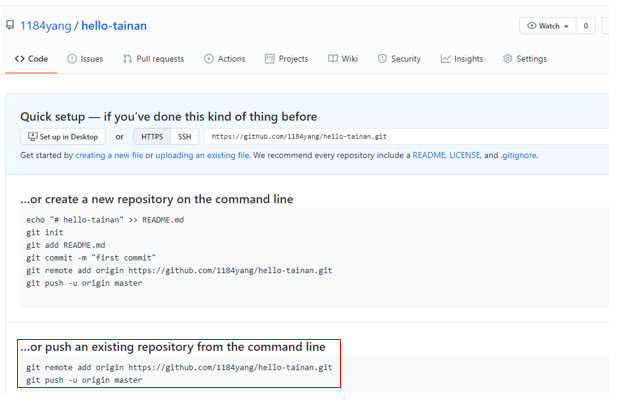
在新產生的 Public 儲存庫網址下,會有一些快速的指引你如何結合本地端的 Git 儲存庫。

我們在本地端已經有一個存在的 Git 儲存庫,但這個本地端 Git 儲存庫並不是一開始就從中央儲存庫複製(clone)下來的,所以它沒有遠端(remote)容器參照,我們必須手動建立本地端的儲存庫對 GitHub 儲存庫的遠端參照。這個參照名子通常會命名為 origin

回到專案目錄下。新增遠端參照,然後將本地端儲存庫推入(push)遠端儲存庫。

$ git remote add origin https://github.com/1184yang/hello-tainan.git

$ git push -u origin master
Enumerating objects: 119, done.
Counting objects: 100% (119/119), done.
Delta compression using up to 4 threads
Compressing objects: 100% (108/108), done.
Writing objects: 100% (119/119), 554.83 KiB | 3.30 MiB/s, done.
Total 119 (delta 0), reused 0 (delta 0)
To https://github.com/1184yang/hello-tainan.git
* [new branch] master -> master
Branch 'master' set up to track remote branch 'master' from 'origin'.

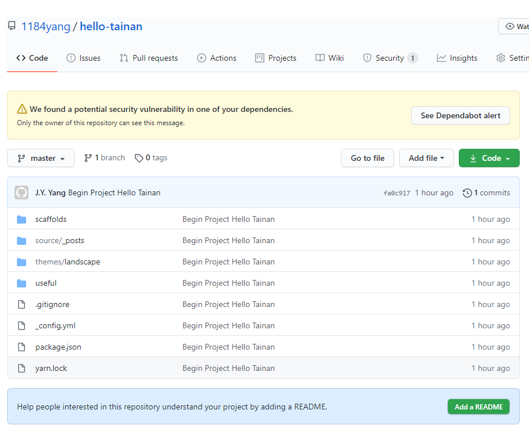
重新載入 https://github.com/1184yang/hello-tainan 網頁。

本地端的 Git 儲存庫已經上傳到 GitHub 的儲存庫。 右下角有一個按鈕可以新增 README 專案自述文件。

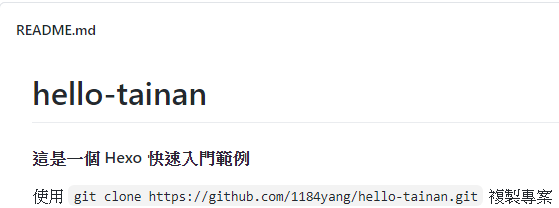
撰寫 README 使用的是 markdown 語法,下端會有提交按鈕。提交以後 README 內容會出現在網頁下端,這就是專案的自述文件。

現在在本地端的專案目錄下可以用 git pull 將 GitHub 儲存庫的異動抓到本地端 Git 儲存庫。

$ git pull
remote: Enumerating objects: 4, done.
remote: Counting objects: 100% (4/4), done.
remote: Compressing objects: 100% (3/3), done.
remote: Total 3 (delta 1), reused 0 (delta 0), pack-reused 0
Unpacking objects: 100% (3/3), done.
From https://github.com/1184yang/hello-tainan
fa0c917..660d744 master -> origin/master
Updating fa0c917..660d744
Fast-forward
README.md | 5 +++++
1 file changed, 5 insertions(+)
create mode 100644 README.md

現在可以在本地端修改 README.md,提交本地端儲存庫,然後 push 到 GitHub 儲存庫。

$ git add .

$ git commit -m "修改 README.md"
[master 36da9c2] 修改 README.md
1 file changed, 2 insertions(+)

$ git push origin master
Enumerating objects: 5, done.
Counting objects: 100% (5/5), done.
Delta compression using up to 4 threads
Compressing objects: 100% (3/3), done.
Writing objects: 100% (3/3), 386 bytes | 193.00 KiB/s, done.
Total 3 (delta 2), reused 0 (delta 0)
remote: Resolving deltas: 100% (2/2), completed with 2 local objects.
remote:
remote: GitHub found 1 vulnerability on 1184yang/hello-tainan's default branch (1 moderate). To find out more, visit:
remote: https://github.com/1184yang/hello-tainan/network/alert/yarn.lock/minimist/open
remote:
To https://github.com/1184yang/hello-tainan.git
660d744..36da9c2 master -> master

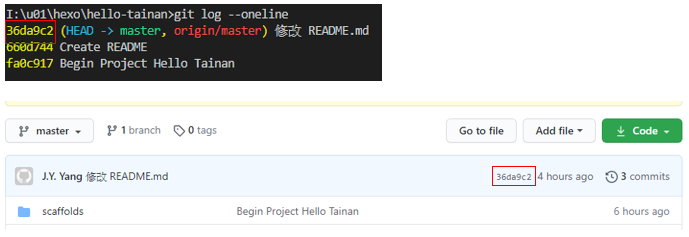
更新 https://github.com/1184yang/hello-tainan 專案網頁可以看到被更新後的 README 內容。

你可以比對本地端與 GitHub 儲存庫的提交編號。

到這裡所描述的,都還沒有談到如何部屬 Hexo 部落格網頁,我們只將專案使用 Git 做版本控制,然後使用一個中央儲存區來共享、並可協同合作一個專案。

接下來就要用這個 Git 儲存庫來部署網頁。

使用 GitHub Pages 部署網頁

我們要使用 GitHub Pages 來部署我們的部落格網誌。

GitHub Pages 是 GitHub 提供的一個網頁寄存服務,於2008年推出。可以用於存放靜態網頁,包括部落格、項目文檔、甚至整本書。

  • 登入 GitHub,新增一個 Repository。

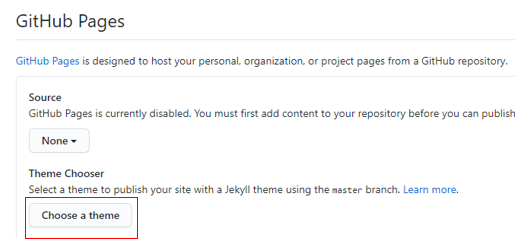
我們需要修改這個新增的 Repository 的設定。

拉到網頁的底部,選擇一個主題(theme)。可以隨便選擇一個,因為最後會被 Hexo 的主題覆蓋掉。

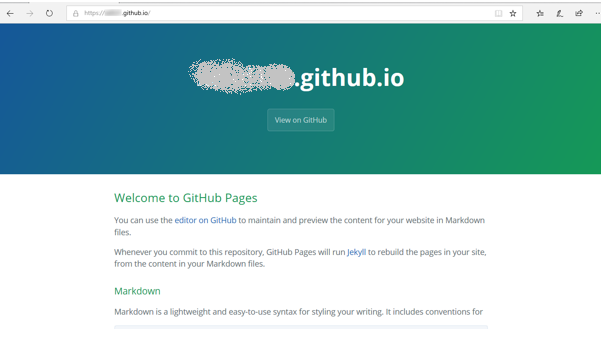
在瀏覽器網址列輸入 https://username.github.io/ (username 是你的 GitHub 帳號),就能看到剛架好的 GitHub Pages 了。

部署
  • 首先安裝 Hexo git 部署套件
$ yarn add hexo-deployer-git
  • 接著修改 Hexo 站點(Site)配置文件 _config.yml。用你的 GitHub 帳戶名稱取代文中的 username。
_config.yml
# URL
## If your site is put in a subdirectory, set url as 'http://yoursite.com/child' and root as '/child/'
url: https://username.github.io/
root: /

...

# Deployment
## Docs: https://hexo.io/docs/deployment.html
deploy:
type: git
repo: https://github.com/username/username.github.io.git
branch: master

...
  • 部署 Hexo
$ hexo clean
$ hexo generate
$ hexo deploy
  • hexo clean       清除之前建立的靜態檔案。
  • hexo generate 建立靜態檔案。
  • hexo deploy     部署至 Github Pages。

瀏覽器網址列輸入 https://username.github.io/ (username 是你的 GitHub 帳號),這就可以開始經營你的部落格了。

透過 GitHub,現在我到哪裡都可以撰寫、發佈部落格。

使用 RabbitMQ 時有時會碰到一個問題,例如從 RabbitMQ 即時接收到 50,000 筆資料要寫到 Oracle 資料庫,RabbitMQ 的消費模式速度非常快,如果沒有限制 Oracle 的 Connection 數量,他會需要 50,000 個 Oracle Connection,通常的結果會是資料庫崩溃,這種大量資料,你不能一筆一筆寫到資料庫,而要用批次處裡的方式,一個 connection 一次寫入 50,000 筆資料。Node.js 的 oracledb 程式庫就有提供 execute 與 executeMany 的方法。

但是 RabbitMQ 的 Playload 有大小的限制,不適合用來一次接收大數據的資料,因此你無法使用 executeMany 方法。通常會是即時的小數據資料,一個繁忙的系統,短時間幾萬筆資料也不是不可能。因此我們必須控制,當收到資料時控制可同時寫到資料庫的平行處理數量,這在 Oracle 的 oracledb 程式庫可以用 Connection Pool 來達成,在 Pool 設定最多 10 Connection,同時間大量的寫入就只能輪流使用這 10 個 Connection,其他的就必須等待,Oracle Connection Pool 內部有自己的 queue 機制。但太多的 queue,等待太久仍然會有 Timeout 的問題。

除了資料庫有這種問題外,只要牽涉到 I/O 都有可能遇到這個問題,例如網路。REST API 就是我們常會碰到的。

這個解決方案的概念就是來自於李玉華所碰到的問題。她會即時從 Oracle 一次送出多筆需求到 RabbitMQ,RabbitMQ 消費後經過一番複雜的處理然後會調用外界的 REST API。單筆處裡都不會有問題,但如果一次處理多筆,對方伺服器就會來不及反應,通常只會有一筆成功,其餘的都會失敗。所以我們要將從 RabbitMQ 接收到的資料,每筆送到 REST API 都可以有一些延遲的設定,避免對方伺服器來不及回應。

Task Queue

taskQueue.js
1
2
3
4
5
6
7
8
9
10
11
12
13
14
15
16
17
18
19
20
21
22
23
24
25
26
27
class TaskQueue {
constructor(concurrency=1) {
this.concurrency = concurrency;
this.running = 0;
this.queue = [];
this.pushTask = this.pushTask.bind(this);
this.next = this.next.bind(this);
}

pushTask(task) {
this.queue.push(task);
this.next();
}

next() {
while(this.running < this.concurrency && this.queue.length) {
const task = this.queue.shift();
task(() => {
this.running--;
this.next();
});
this.running++;
}
}
}

module.exports = TaskQueue;

這讓人很驚訝,短短的 27 行的程式碼,功能卻很強大。不限於用在這個例子,你可用在你需要的地方,包含 APEX 上。

這裡用了幾個 JavaScript 幾個重要的基本概念:

  • 函式是第一等公民(First class)
  • 延續傳遞風格(Continuation-passing style),簡稱 CPS
  • 閉包(Closure)

使用的方式很簡單,就是把你要處裡的工作依一定的簽章推入 Queue 中,Queue 會依照先進先出的方式逐一執行。

其中的 concurrency 則可以控制並行的數量,預設值是 1,就是一次處理一個工作,會依照先進先出的方式逐一執行,所以如果 concurrency 設為 1,則不管是同步還是非同步的工作,完成的時間也會依序。

concurrency 設為 2,則可以一次同時平行處理 2 筆。雖然也是依照先進先出的方式逐一執行,但如果是非同步的工作,完成的時間就比較難掌控了,因為它一次可以同時處理兩個工作,也許一個平行作業處理比較久,但另一個平行作業已經處理完好幾個工作了。

應用測試

先用一個簡單的例子來看看如何應用:

run.js
1
2
3
4
5
6
7
8
9
10
11
12
13
14
15
16
17
18
19
20
const TaskQueue = require('./taskQueue');
const runQueue = new TaskQueue();
const series = [1000, 800, 600, 400, 200, 900, 700, 500, 300, 100];

const doSomething = (data, done) => {
setTimeout(() => {
if ( Math.random() < 0.2) {
console.log(`Data: ${data} ERROR!`);
} else {
console.log(`Data: ${data} successfully completed`);
}
done();
}, data)
}

series.forEach(value => {
runQueue.pushTask((done) => {
doSomething(value, done);
});
});

doSomething 是你要處裡的工作,使用 setTimeout 來模擬非同步的工作,函式參數除了你自己的資料參數外,另外需要有一個強迫性的參數,在這個例子中我們取名為 done,你可以取任和的名子。done 將會是個函式,當你的工作完成後需要調用它(第 12 行),Queue 才會往下執行下一個工作。

這裡我們用 series 陣列模擬從 RabbitMQ 消費的資料,然後經過 doSomething 處理。第 17 行我們將 doSomething 及資料包裹在閉包中,然後將閉包 push 到 Queue 中。所以現在存在 Task Queue 中的其實是一個閉包,所以 queue 中應該會像:

Task Queue
1
2
3
4
5
6
[
(done) => { doSomething(value, done) }, // value => 1000
(done) => { doSomething(value, done) }, // value => 800
(done) => { doSomething(value, done) }, // value => 600
...
]

執行了 runQueue.pushTask( ) 後,taskQueue 會自動執行 Queue 中我們所推入的工作(Task),taskQueue.js 中的第 17 行從 Queue 中取出先前 push 進去的 task,隨即執行 task,執行時會帶入一個引數(argument):

done
1
2
3
4
() => {
this.running--;
this.next();
};

這個引數是一個函式,也就是 done !!! 要記得,函式是第一等公民,與一般的資料型態沒有甚麼不同,可以是函式的引數,也可以從函式 return 出來。

Run
$ node run
Data: 1000 successfully completed
Data: 800 successfully completed
Data: 600 ERROR!
Data: 400 successfully completed
Data: 200 successfully completed
Data: 900 successfully completed
Data: 700 successfully completed
Data: 500 successfully completed
Data: 300 successfully completed
Data: 100 successfully completed

目前 concurrency 是預設的 1, 雖然推入的工作都是非同步的,但完成的時間也都按照推入的順序。

將 concurrency 改為 2 看看結果如何:

Task Queue
1
2
3
const TaskQueue = require('./taskQueue');
const runQueue = new TaskQueue(2);
.....
Task Queue
$ node run
Data: 800 successfully completed
Data: 1000 successfully completed
Data: 400 ERROR!
Data: 600 successfully completed
Data: 200 ERROR!
Data: 700 successfully completed
Data: 900 successfully completed
Data: 300 successfully completed
Data: 100 successfully completed
Data: 500 ERROR!

因為同時可以平行處理兩筆工作,雖然是先進先出取出處理,但因工作都是非同步的關係,完成的順序就比較不能掌控了。

到現在的測試都還未延遲兩個工作間的間距,我們想讓前一個工作完成後,延遲一些時間再執行下一個工作。這只需要修改 doSomething 函式中調用 done( ) 的時間。

run.js
1
2
3
4
5
6
7
8
9
10
11
12
const doSomething = (data, done) => {
const next = () => setTimeout(() => done(), 1000);

setTimeout(() => {
if ( Math.random() < 0.2) {
console.log(`Data: ${data} ERROR!`);
} else {
console.log(`Data: ${data} successfully completed`);
}
next();
}, data)
}

第 2 行使用 setTimeout 延遲調用 done( ) 的時間,延遲多久由你自己控制。就這樣解決了李玉華的問題。

RabbitMQ 與 Oracle Database 範例

了解了基本運作,現在將它實際應用到 RabbitMQ 與 Oracle 資料庫上。RabbitMQ 與 Oracle 的抽象層在文章後端的原始碼中。

從基本的開始,先不用 taskQueue。

receiveToOracle.js
1
2
3
4
5
6
7
8
9
10
11
12
13
14
15
16
17
18
19
20
21
22
23
24
25
26
27
28
29
const rabbit = require('./rabbitmq');
const oradb = require('./database');

rabbit.on('ready', async ({ receive }) => {
await oradb.initialize();
console.log('rabbit and db initilized.');

receive('demo-example', '', (err, data, ack) => {
if (err) {
return console.log(err);
}
doSomething(data, ack)
});
});

function doSomething(data, ack=f=>f) {
const empno = JSON.parse(data).empno;
const statement = "insert into demo_example select empno ||' '|| ename from emp where empno = :empno";

oradb.doExecute(statement, [empno]).then(
result => {
console.log(`Result: ${JSON.stringify(result)} at: ${new Date()}`);
ack();
},
error => {
console.log(`Result: ${error.message} at: ${new Date()}`);
}
);
}

從 RabbitMQ 消費取的資料,依據資料從 EMP 資料表取得資料,然後新增到 DEMO_EXAMPLE 資料表。

Receive to oracle
$ node receiveToOracle
rabbit and db initilized.

啟動以後就開始等待 RabbitMQ queue demo-example 的消費。現在送一些資料到 RabbitMQ 的 queue demo-example。

sendToQueue.js
1
2
3
4
5
6
7
8
9
10
11
12
13
14
15
16
17
const rabbit = require('./rabbitmq');

const data = [{ empno: 7369 }, { empno: 7566 }, { empno: 7900 }, { empno: 7654 }, { empno: 7698 }];

rabbit.on('ready', ({ sendToQueue }) => {
const send = () => {
for (let i = 0; i < 10; i++) {
data.forEach(value => {
sendToQueue('demo-example', JSON.stringify(value));
})
}
};

send();
setTimeout(() => send(), 2000);
setTimeout(() => send(), 3000);
});

這裡每隔一秒送出一次,連續送出 3 次,一次 50 筆資料。

Send to RabbitMQ queue
$ node sendToQueue

回到消費者的終端畫面,很快的在約 3 秒內就消費完畢,寫入 Oracle 資料庫中了。

Receive to oracle
$ node receiveToOracle
rabbit and db initilized.
Result: {"lastRowid":"AAC8uRACgAAAJTuAAu","rowsAffected":1} at: Tue Jul 14 2020 08:20:46 GMT+0800 (GMT+08:00)
Result: {"lastRowid":"AAC8uRACgAAAJTvAAd","rowsAffected":1} at: Tue Jul 14 2020 08:20:46 GMT+0800 (GMT+08:00)
Result: {"lastRowid":"AAC8uRACgAAAJTwAAA","rowsAffected":1} at: Tue Jul 14 2020 08:20:46 GMT+0800 (GMT+08:00)
Result: {"lastRowid":"AAC8uRACgAAAJTsAAe","rowsAffected":1} at: Tue Jul 14 2020 08:20:46 GMT+0800 (GMT+08:00)
.....

因為這裡 Oracle 的 Connection Pool 最大值設為 10, Oracle 火力全開,使用了全部的 10 個 Connection。記得一定要用 Oracle Connection Pool,如果沒有用 Oracle Connection Pool,而直接使用 Oracle Connection,因為 RabbitMQ 非常的快,有可能 Oracle 會嘗試一次開 150 connections,如果是 10,000筆資料,Oracle Database 就崩潰了。

如果你打算使用 Oracle ORDS REST API,千萬千萬不要一次送太多資料,它會每個 Request 嘗試打開一個 connection,資料庫會崩潰!!! 不要試,因為我做過!

Oracle Database connections
DEMO     40   10 XXX\7x0x0x4xP3  10857    INACTIVE    3583 node.exe             node.exe
48 11 XXX\7x0x0x4xP3 10869 INACTIVE 2521 node.exe node.exe
41 40 XXX\7x0x0x4xP3 10859 INACTIVE 29317 node.exe node.exe
42 68 XXX\7x0x0x4xP3 10861 INACTIVE 42469 node.exe node.exe
45 163 XXX\7x0x0x4xP3 10863 INACTIVE 49803 node.exe node.exe
37 166 XXX\7x0x0x4xP3 10851 INACTIVE 11951 node.exe node.exe
38 191 XXX\7x0x0x4xP3 10853 INACTIVE 53789 node.exe node.exe
46 194 XXX\7x0x0x4xP3 10865 INACTIVE 35991 node.exe node.exe
47 225 XXX\7x0x0x4xP3 10867 INACTIVE 3537 node.exe node.exe
39 230 XXX\7x0x0x4xP3 10855 INACTIVE 3133 node.exe node.exe

Oracle 會用輪流使用這 10 個 Connection Pool 中的 Connection,等待處裡的則會放入 Oracle Connection 的 queue 中。Connection queue 的預設等待時間 Timeout 是 60 秒,因此如果資料太多,有些就會出現 timeout 錯誤。

timeout error
error: Error: NJS-040: connection request timeout. Request exceeded queueTimeout of 60000
at Timeout._onTimeout (I:\RabbitMQ\gittemp\rabbit-consume-delay\node_modules\oracledb\lib\pool.js:127:18)

現在加入 taskQueue 來控制延遲。

receiveToOracle.js
1
2
3
4
5
6
7
8
9
10
11
12
13
14
15
16
17
18
19
20
21
22
23
24
25
26
27
28
29
30
31
32
33
34
35
36
37
const rabbit = require('./rabbitmq');
const oradb = require('./database');
const TaskQueue = require('./src/taskQueue');
const runQueue = new TaskQueue();

rabbit.on('ready', async ({ receive }) => {
await oradb.initialize();
console.log('rabbit and db initilized.');

receive('demo-example', '', (err, data, ack) => {
if (err) {
return console.log(err);
}
runQueue.pushTask((done) => {
doSomething(data, ack, done);
});
});
});

function doSomething(data, ack=f=>f, done=f=>f) {
const empno = JSON.parse(data).empno;
const statement = "insert into demo_example select empno ||' '|| ename from emp where empno = :empno";
const next = () => setTimeout(() => done(), 100);

oradb.doExecute(statement, [empno]).then(
result => {
console.log(`Result: ${JSON.stringify(result)} at: ${new Date()}`);
ack();
next();
},
error => {
console.log(`Result: ${error.message} at: ${new Date()}`);
console.log(error);
next();
}
);
}

第 14 行將工作推入 Task Queue 中,在第 29 與 34 行延遲調用 done( )。

Receive to oracle
$ node receiveToOracle
rabbit and db initilized.
Result: {"lastRowid":"AAC8vmACgAAAJTvAAA","rowsAffected":1} at: Tue Jul 14 2020 09:28:12 GMT+0800 (GMT+08:00)
Result: {"lastRowid":"AAC8vmACgAAAJTvAAB","rowsAffected":1} at: Tue Jul 14 2020 09:28:12 GMT+0800 (GMT+08:00)
Result: {"lastRowid":"AAC8vmACgAAAJTvAAC","rowsAffected":1} at: Tue Jul 14 2020 09:28:12 GMT+0800 (GMT+08:00)
.....
Result: {"lastRowid":"AAC8vmACgAAAJTvACT","rowsAffected":1} at: Tue Jul 14 2020 09:28:27 GMT+0800 (GMT+08:00)
Result: {"lastRowid":"AAC8vmACgAAAJTvACU","rowsAffected":1} at: Tue Jul 14 2020 09:28:27 GMT+0800 (GMT+08:00)
Result: {"lastRowid":"AAC8vmACgAAAJTvACV","rowsAffected":1} at: Tue Jul 14 2020 09:28:27 GMT+0800 (GMT+08:00)

在延遲 0.1 秒下,150 筆資料費了約 15 秒。顯然慢了許多。

現在測試一下大量資料,一次送入 50,000 筆,但是將 concurrency 將設為 5。

receiveToOracle.js
1
2
3
...
const runQueue = new TaskQueue(5);
...
Oracle Database connections
DEMO     34   67 XXX\7x0x0x4xP3  26301    INACTIVE   48553 node.exe             node.exe
36 131 XXX\7x0x0x4xP3 27394 INACTIVE 21051 node.exe node.exe
37 163 XXX\7x0x0x4xP3 27396 INACTIVE 57175 node.exe node.exe
39 225 XXX\7x0x0x4xP3 25052 INACTIVE 3575 node.exe node.exe

這次沒有 Timeout Error,觀察 Oracle Connection Pool 一直都只開 3 ~ 4 個 Connection,延遲 0.1 秒對 Oracle 資料庫是綽綽有餘。

微服務少不了消息代理伺服器, RabbitMQ 與 Apache Kafka 不只提供了資料的一致性整合外,也可以當成系統的緩存區。假如有一個系統同時湧入幾萬個使用者,資料庫反應不及,可以利用 RabbitMQ 或 Apache Kafka 延遲資料的寫入,或者可以透過多個消費者作分流,分散系統的負載。熟悉它,就會有無限的功能應用。

RabbitMQ 與 Oracle 資料庫抽象層

database.js
1
2
3
4
5
6
7
8
9
10
11
12
13
14
15
16
17
18
19
20
21
22
23
24
25
26
27
28
29
30
31
32
33
34
35
36
37
38
39
40
41
42
43
44
45
46
47
48
49
50
51
52
53
54
55
56
57
58
59
60
61
62
63
64
65
66
67
68
69
70
71
72
73
74
75
76
77
78
79
80
81
82
83
84
85
const oracledb = require('oracledb');

const dbconfig = {
user: "xxxx",
password: ""xxxxxxxx,
connectString: "10.11.xx.xxx:1521/xxxx.xxx.com.tw",
poolMin: 0,
poolMax: 10,
poolIncrement: 1,
queueMax: -1,
};

async function initialize() {
try {
const pool = await oracledb.createPool(dbconfig);

process.once('SIGINT', () => {
console.log('oracledb connection pool close.');
close();
});
}
catch (err) {
console.log(err);
}
}

async function close() {
try {
await oracledb.getPool().close();
}
catch (err) {
console.log(err);
}
}

function doExecute(statement, binds = [], opts = {}) {
return new Promise(
async (resolve, reject) => {
let conn;
opts.outFormat = oracledb.OBJECT;
opts.autoCommit = true;
try {
conn = await oracledb.getConnection();
const result = await conn.execute(statement, binds, opts);
resolve(result);
}
catch (err) { reject({ error: err }); }
finally {
if (conn) {
try {
await conn.close();
//console.log('ok');
}
catch (err) { console.log(err); }
}
}
}
);
}

function doExecuteMany(statement, binds = [], opts = {}) {
return new Promise(async (resolve, reject) => {
let conn;
opts.outFormat = oracledb.OBJECT;
opts.autoCommit = true;
opts.batchErrors = true;
try {
conn = await oracledb.getConnection();
const result = await conn.executeMany(statement, binds, opts);
resolve(result);
}
catch (err) { reject(err); }
finally {
if (conn) {
try { await conn.close(); }
catch (err) { console.log(err); }
}
}
});
}

module.exports.initialize = initialize;
module.exports.close = close;
module.exports.doExecute = doExecute;
module.exports.doExecuteMany = doExecuteMany;
rabbitmq.js
1
2
3
4
5
6
7
8
9
10
11
12
13
14
15
16
17
18
19
20
21
22
23
24
25
26
27
28
29
30
31
32
33
34
35
36
37
38
39
40
41
42
43
44
45
46
47
48
49
50
51
52
53
54
55
56
57
58
59
60
61
62
63
64
65
66
67
68
69
70
71
72
73
74
75
76
77
78
79
80
81
82
83
84
85
86
87
88
89
90
91
92
93
94
95
96
97
98
const EventEmitter = require('events').EventEmitter;
const amqp = require("amqplib");
const uuid = require('node-uuid');

class RabbitMQ extends EventEmitter {
constructor() {
super();
this.url = "xxxxx:xxxxx@10.11.xx.xxx";
this.channel = null;
this.exchange = "dummy.exchange";

this.sendToQueue = this.sendToQueue.bind(this);
this.publish = this.publish.bind(this);
this.receive = this.receive.bind(this);
this.initialize = this.initialize.bind(this);

this.initialize().then(() => this.emit('ready', {
publish: this.publish,
sendToQueue: this.sendToQueue,
receive: this.receive
}));
}

initialize() {
return amqp
.connect(`amqp://${this.url}`)
.then(conn => {
process.once('SIGINT', function () {
console.log('amqp connection close.');
conn.close();
});

return conn.createChannel()
})
.then(channel => {
this.channel = channel;
})
.catch(console.warn)
};

sendToQueue(queue, content) {
return this.channel.sendToQueue(
queue,
new Buffer.from(content),
{
persistent: true,
headers: {
messageId: uuid.v4(),
api: "Demo-sendToQueue-v1",
firstPublish: Date.now()
}
}
);
}

publish(exchange, routingKey, content, delay=0) {
return this.channel.publish(
exchange,
routingKey,
new Buffer.from(content),
{
persistent: true,
headers: {
messageId: uuid(),
api: "Demo-publish-v1",
firstPublish: Date.now()
}
}
);
}

receive(queue, routingKey, callback) {
return this.channel.assertQueue(queue)
.then(q => {
return this.channel.bindQueue(queue, this.exchange, routingKey)
})
.then(() => {
return this.channel.consume(queue, msg => {
let data;

if (msg) {
// console.log(msg.properties.headers);
try {
data = msg.content.toString();
callback(null, data, () => this.channel.ack(msg));
} catch (err) {
callback(err);
}
} else {
callback(new Error('amqp consume error.'));
}
}, { noAck: false });
})
.catch(console.warn);
}
}

module.exports = new RabbitMQ();

上次用 C# Entity Framework Core 2.0 與 Oracle Provider 連結至 Oracle 資料庫。這次改用 PostgreSQL 開放式資料庫。所需要做的就是把 Oracle Provider 改用 PostgreSQL Provider。程式碼幾乎都不需要修改。

開始之前,稍微來了解一下 PostgreSQL。

PostgreSQL

PostgreSQL 自稱是世界上最先進的開源資料庫。 它是一種企業級的關連式資料庫管理系統,與最佳非開源的專有資料庫系統 Oracle,Microsoft SQL Server 和 IBM DB2 相當。 PostgreSQL 的特殊之處在於它不只是資料庫,它也是一個應用程序平台。

PostgreSQL 很快。在基準測試中,PostgreSQL 可以超過或匹配許多其他開放式和專有資料庫的性能。 PostgreSQL 允許使用多種編程語言編寫存儲過程(Stored Procedure)與涵式。 除了 C,SQL 和 PL/pgSQL 的預設包裝語言外,還可以簡單的啟用對其他語言的支援,例如 PL/Perl、PL/Python、PL/V8 (PL/JavaScript)、PL/Ruby 和 PL/R。對多種語言的支援使您可以選擇能夠最好地解決當前問題的結構的語言。

例如,使用 R 進行統計和製圖,使用 Python 調用 Web Services,使用 Python SciPY 程式庫進行科學計算,使用 PL/V8 進行數據驗證,處理字符串和處理 JSON 數據。 更簡單的是,找到所需的開源自由可用的函數,找出其編寫的語言,在 PostgreSQL 中啟用該特定語言,然後復制代碼。

近年來,我們見證了 NoSQL 資料庫的興起(儘管其中很多可能都被炒作了)。儘管 PostgreSQL 從根本上來說是關係型的,但您會發現很多處理非關係型數據的工具。 PostgreSQL 的 ltree 擴展自遠古時代就已經存在並提供圖形支援。hstore 擴展允許您存儲鍵值對 (Key/Value pairs)。JSON 和 JSONB 類型允許存儲類似於 MongoDB 的文檔。在許多方面,PostgreSQL 甚至在該術語誕生之前就已採用 NoSQL!

這裡就從 Oracle 的資料映對,來快速了解 PostgreSQL,將 Oracle 的 DEPT 與 EMP 資料表轉到 PostgreSQL。

cr_dept.sql
1
2
3
4
5
6
7
create table dept
(
deptno numeric(4,0),
dname varchar(32),
loc varchar(32),
constraint dept_pk primary key(deptno)
);
cr_emp.sql
1
2
3
4
5
6
7
8
9
10
11
12
13
14
15
16
create table emp
(
empno numeric(4,0),
ename varchar(32),
job varchar(32),
mgr numeric(4,0),
hiredate date,
sal numeric(10,2),
comm numeric(10,2),
deptno numeric(4,0),
constraint emp_pk primary key(empno),
constraint emp_dept_fk foreign key (deptno) references dept(deptno),
constraint emp_manager_fk foreign key (mgr) references emp(empno)
);

create index emp_deptno_ix on emp(deptno);

DDL 語法與 Oracle 幾乎一樣,只有資料型態不同,PostgreSQL 的 date 型態只存到日期,要匹配 Oracle 的 date 型態可改用 timestamp 資料型態。

# psql 類似 Oracle Sqlplus
$ psql -V
psql (PostgreSQL) 12.3 (Ubuntu 12.3-1.pgdg20.04+1)

# 登入 PostgreSQL
$ psql -U demo -W -d db01
Password:
psql (12.3 (Ubuntu 12.3-1.pgdg20.04+1))
Type "help" for help.

db01=> \i cr_dept.sql
CREATE TABLE
db01=> \i cr_emp.sql
CREATE TABLE
CREATE INDEX
db01=> \d emp
Table "demo.emp"
Column | Type | Collation | Nullable | Default
----------+-----------------------+-----------+----------+---------
empno | numeric(4,0) | | not null |
ename | character varying(32) | | |
job | character varying(32) | | |
mgr | numeric(4,0) | | |
hiredate | date | | |
sal | numeric(10,2) | | |
comm | numeric(10,2) | | |
deptno | numeric(4,0) | | |
Indexes:
"emp_pk" PRIMARY KEY, btree (empno)
"emp_deptno_ix" btree (deptno)
Foreign-key constraints:
"emp_dept_fk" FOREIGN KEY (deptno) REFERENCES dept(deptno)
"emp_manager_fk" FOREIGN KEY (mgr) REFERENCES emp(empno)
Referenced by:
TABLE "emp" CONSTRAINT "emp_manager_fk" FOREIGN KEY (mgr) REFERENCES emp(empno)

db01=>

以下的 CSV 格式資料可以用 SQL Developer 從 Oracle 資料庫 export 出來。

dept.csv
10,"會計部","紐約"
20,"RESEARCH","DALLAS"
30,"SALES","CHICAGO"
40,"OPERATIONS","BOSTON"
70,"資訊部","台南 B4"
emp.csv
7839,"KING","PRESIDENT",,1981-11-17,5000,,10
7698,"BLAKE","MANAGER1",7839,1981-05-01,2850,101,30
7782,"陳瑞","MANAGER",7902,1981-06-09,2400,,10
7566,"陳賜珉","MANAGER",7839,1981-04-02,2975,,20
7788,"SCOTT","ANALYST",7566,1982-12-09,45300,,20
7902,"FORD","ANALYST",7566,1981-12-03,3000,,20
7369,"SMITH","CLERK",7902,1980-12-17,8001,,20
7499,"ALLEN","SALESMAN",7698,1981-02-20,1600,303,30
7608,"馬小九","ANALYST",7788,2010-06-28,1000,100,40
7654,"葉習堃","SALESMAN",7698,1981-09-28,1250,1400,30
7844,"하찮고","SALESMAN",7698,1981-09-08,1500,,30
7876,"ADAMS","CLERK",7788,1983-01-12,1100,,20
7900,"JAMES","CLERK",7698,1981-12-03,94998,,30
7934,"楊喆","CLERK",7902,1982-01-23,1500,,10
9006,"李逸君","ANALYST",7788,2001-05-07,66666,,70
7607,"バック","分析師",7788,2008-03-24,45000,100,70
7609,"蔡大一","分析師",7788,2010-06-28,60000,,70
9011,"文英蔡","總鋪師",7788,2018-08-28,77778,180,40
8907,"牸祢","ANALYST",7566,1982-12-09,9002,,10

將它 import 到 PostgreSQL。

import data
db01=> \copy dept from 'dept.csv' with csv;
COPY 5
db01=> \copy emp from 'emp.csv' with csv;
COPY 19
db01=> select * from emp;
empno | ename | job | mgr | hiredate | sal | comm | deptno
-------+--------+-----------+------+------------+----------+---------+--------
7839 | KING | PRESIDENT | | 1981-11-17 | 5000.00 | | 10
7698 | BLAKE | MANAGER1 | 7839 | 1981-05-01 | 2850.00 | 101.00 | 30
7782 | 陳瑞 | MANAGER | 7902 | 1981-06-09 | 2400.00 | | 10
7566 | 陳賜珉 | MANAGER | 7839 | 1981-04-02 | 2975.00 | | 20
7788 | SCOTT | ANALYST | 7566 | 1982-12-09 | 45300.00 | | 20
7902 | FORD | ANALYST | 7566 | 1981-12-03 | 3000.00 | | 20
7369 | SMITH | CLERK | 7902 | 1980-12-17 | 8001.00 | | 20
7499 | ALLEN | SALESMAN | 7698 | 1981-02-20 | 1600.00 | 303.00 | 30
7608 | 馬小九 | ANALYST | 7788 | 2010-06-28 | 1000.00 | 100.00 | 40
7654 | 葉習堃 | SALESMAN | 7698 | 1981-09-28 | 1250.00 | 1400.00 | 30
7844 | 하찮고 | SALESMAN | 7698 | 1981-09-08 | 1500.00 | | 30
7876 | ADAMS | CLERK | 7788 | 1983-01-12 | 1100.00 | | 20
7900 | JAMES | CLERK | 7698 | 1981-12-03 | 94998.00 | | 30
7934 | 楊喆 | CLERK | 7902 | 1982-01-23 | 1500.00 | | 10
9006 | 李逸君 | ANALYST | 7788 | 2001-05-07 | 66666.00 | | 70
7607 | バック | 分析師 | 7788 | 2008-03-24 | 45000.00 | 100.00 | 70
7609 | 蔡大一 | 分析師 | 7788 | 2010-06-28 | 60000.00 | | 70
9011 | 文英蔡 | 總鋪師 | 7788 | 2018-08-28 | 77778.00 | 180.00 | 40
8907 | 牸祢 | ANALYST | 7566 | 1982-12-09 | 9002.00 | | 10
(19 rows)

db01=>

PostgreSQL 提供 JSON 和許多支援的功能。JSON 已成為 Web 應用程序中最流行的數據交換格式。也支援 JSONB 資料型態。

row_to_json
db01=> select row_to_json(emp) as employee from emp;

employee
-----------------------------------------------------------------------------------------------------------------------------
{"empno":7839,"ename":"KING","job":"PRESIDENT","mgr":null,"hiredate":"1981-11-17","sal":5000.00,"comm":null,"deptno":10}
{"empno":7698,"ename":"BLAKE","job":"MANAGER1","mgr":7839,"hiredate":"1981-05-01","sal":2850.00,"comm":101.00,"deptno":30}
{"empno":7782,"ename":"陳瑞","job":"MANAGER","mgr":7902,"hiredate":"1981-06-09","sal":2400.00,"comm":null,"deptno":10}
{"empno":7566,"ename":"陳賜珉","job":"MANAGER","mgr":7839,"hiredate":"1981-04-02","sal":2975.00,"comm":null,"deptno":20}
{"empno":7788,"ename":"SCOTT","job":"ANALYST","mgr":7566,"hiredate":"1982-12-09","sal":45300.00,"comm":null,"deptno":20}
{"empno":7902,"ename":"FORD","job":"ANALYST","mgr":7566,"hiredate":"1981-12-03","sal":3000.00,"comm":null,"deptno":20}
{"empno":7369,"ename":"SMITH","job":"CLERK","mgr":7902,"hiredate":"1980-12-17","sal":8001.00,"comm":null,"deptno":20}
{"empno":7499,"ename":"ALLEN","job":"SALESMAN","mgr":7698,"hiredate":"1981-02-20","sal":1600.00,"comm":303.00,"deptno":30}
{"empno":7608,"ename":"馬小九","job":"ANALYST","mgr":7788,"hiredate":"2010-06-28","sal":1000.00,"comm":100.00,"deptno":40}
{"empno":7654,"ename":"葉習堃","job":"SALESMAN","mgr":7698,"hiredate":"1981-09-28","sal":1250.00,"comm":1400.00,"deptno":30}
{"empno":7844,"ename":"하찮고","job":"SALESMAN","mgr":7698,"hiredate":"1981-09-08","sal":1500.00,"comm":null,"deptno":30}
{"empno":7876,"ename":"ADAMS","job":"CLERK","mgr":7788,"hiredate":"1983-01-12","sal":1100.00,"comm":null,"deptno":20}
{"empno":7900,"ename":"JAMES","job":"CLERK","mgr":7698,"hiredate":"1981-12-03","sal":94998.00,"comm":null,"deptno":30}
{"empno":7934,"ename":"楊喆","job":"CLERK","mgr":7902,"hiredate":"1982-01-23","sal":1500.00,"comm":null,"deptno":10}
{"empno":9006,"ename":"李逸君","job":"ANALYST","mgr":7788,"hiredate":"2001-05-07","sal":66666.00,"comm":null,"deptno":70}
{"empno":7607,"ename":"バック","job":"分析師","mgr":7788,"hiredate":"2008-03-24","sal":45000.00,"comm":100.00,"deptno":70}
{"empno":7609,"ename":"蔡大一","job":"分析師","mgr":7788,"hiredate":"2010-06-28","sal":60000.00,"comm":null,"deptno":70}
{"empno":9011,"ename":"文英蔡","job":"總鋪師","mgr":7788,"hiredate":"2018-08-28","sal":77778.00,"comm":180.00,"deptno":40}
{"empno":8907,"ename":"牸祢","job":"ANALYST","mgr":7566,"hiredate":"1982-12-09","sal":9002.00,"comm":null,"deptno":10}
(19 rows)

PostgreSQL 資料準備好了,回到 C#。

C# EFCore 2.0 and PostgreSQL Provider

開啟 VS Code 建立一個專案。

$ > dotnet new console --name PgEFCoreSample

$ > cd PgEFCoreSample

$ PgEFCoreSample> dotnet run
Hello World!

首先要安裝專案需要的 NuGet Packages,這裡只需要將 Oracle Provider 換成 PostgreSQL Provider。這裡因用的 PostgreSQL Provider Npgsql.EntityFrameworkCore.PostgreSQL 版本比較新,所以也將 Microsoft EntityFramework Core 的版本更新。

$ PgEFCoreSample> dotnet add package Npgsql.EntityFrameworkCore.PostgreSQL --version 3.1.4 

$ PgEFCoreSample> dotnet add package Microsoft.EntityFrameworkCore.Design --version 3.1.4

$ PgEFCoreSample> dotnet add package Microsoft.EntityFrameworkCore.Relational --version 3.1.4

$ PgEFCoreSample> dotnet add package Microsoft.Extensions.Configuration.Json --version 3.1.4

現在專案目錄下的 PgEFCoreSample.csproj 檔案應該如下:

PgEFCoreSample.csproj
1
2
3
4
5
6
7
8
9
10
11
12
13
14
15
16
17
18
<Project Sdk="Microsoft.NET.Sdk">

<PropertyGroup>
<OutputType>Exe</OutputType>
<TargetFramework>netcoreapp3.1</TargetFramework>
</PropertyGroup>

<ItemGroup>
<PackageReference Include="Microsoft.EntityFrameworkCore.Design" Version="3.1.4">
<IncludeAssets>runtime; build; native; contentfiles; analyzers; buildtransitive</IncludeAssets>
<PrivateAssets>all</PrivateAssets>
</PackageReference>
<PackageReference Include="Microsoft.EntityFrameworkCore.Relational" Version="3.1.4" />
<PackageReference Include="Microsoft.Extensions.Configuration.Json" Version="3.1.4" />
<PackageReference Include="Npgsql.EntityFrameworkCore.PostgreSQL" Version="3.1.4" />
</ItemGroup>

</Project>

這裡也將 PostgreSQL 資料庫的連結資料放在 appsettings.json

appsettings.json
1
2
3
4
5
6
7
{
"Data": {
"DefaultConnection": {
"ConnectionString": "Host=10.11.xx.xxx;Database=db01;Username=xxx;Password=xxxxxxxxxx"
}
}
}

PostgreSQL 資料庫位在我的 PC 虛擬機 Ubuntu Linux 上,只開放在上班時間。

反向工程 (Reverse Engineering)

直接使用反向工程產生資料模型。

$ PgEFCoreSample> dotnet ef dbcontext scaffold "Host=10.11.xx.xxx;Database=db01;Username=xxxx;Password=xxxxxxxx" Npgsql.EntityFrameworkCore.PostgreSQL --table emp --table dept -o Models -f 

它會在專案目錄下產生子目錄 Models 與 Dept.cs、Emp.cs 與 db01Context.cs。 這裡只要修改 db01Context.cs 的資料庫連結資料,讀取 appsettings.json 的設定。其他都不用動。

Models/db01Context.cs
using System;
using System.IO;
using Microsoft.EntityFrameworkCore;
using Microsoft.EntityFrameworkCore.Metadata;
using Microsoft.Extensions.Configuration;
using Microsoft.Extensions.Configuration.Json;
.....
optionsBuilder.UseNpgsql(GetConnectionString());
.....
private static string GetConnectionString()
{
var configurationBuilder = new ConfigurationBuilder()
.SetBasePath(Directory.GetCurrentDirectory())
.AddJsonFile("appsettings.json");
IConfiguration config = configurationBuilder.Build();
string connectionString = config["Data:DefaultConnection:ConnectionString"];
return connectionString;
}
.....

資料讀取

program.cs
1
2
3
4
5
6
7
8
9
10
11
12
13
14
15
16
17
18
19
20
21
22
23
24
25
26
27
28
29
using System;
using System.Linq;
using PgEFCoreSample.Models;

namespace PgEFCoreSample
{
class Program
{
static void Main(string[] args)
{
Console.WriteLine("Hello Tainan! 台南! PostgreSQL!");

using (var db = new db01Context())
{
Console.WriteLine("===== Departments ==========");
foreach (var dept in db.Dept)
{
Console.WriteLine($"{dept.Deptno} {dept.Dname} {dept.Loc}");
}

Console.WriteLine("===== Employees ==========");
foreach (var emp in db.Emp)
{
Console.WriteLine($"{emp.Empno} {emp.Ename} {emp.Job} {emp.Mgr} {emp.Hiredate?.ToString("yyyy-MM-ddTHH:mm:ss")} {emp.Sal} {emp.Comm} {emp.Deptno}");
}
}
}
}
}
$ PgEFCoreSample> dotnet run
Hello Tainan! 台南! PostgreSQL!
===== Departments ==========
10 會計部 紐約
20 RESEARCH DALLAS
30 SALES CHICAGO
40 OPERATIONS BOSTON
70 資訊部 台南 B4
===== Employees ==========
7839 KING PRESIDENT 1981-11-17T00:00:00 5000.00 10
.....

這與使用 Oracle Provider 的程式碼,只有 db01Context 名稱不一樣,其他都一樣。你可以複製新增、修改、刪除與其它程式碼來試試看。更換資料庫,只要抽換掉資料庫的 Provider。

PostgreSQL Schema 範例

這裡提供一個比較實用的 PostgreSQL Schema 範例,這原來是 Oracle 的 Schema。其實 DDL 都一樣,需要改的是資料型態。

這裡是 DDL 範例與範例資料 demo_ot_data.sql

demo_ot_schema.sql
1
2
3
4
5
6
7
8
9
10
11
12
13
14
15
16
17
18
19
20
21
22
23
24
25
26
27
28
29
30
31
32
33
34
35
36
37
38
39
40
41
42
43
44
45
46
47
48
49
50
51
52
53
54
55
56
57
58
59
60
61
62
63
64
65
66
67
68
69
70
71
72
73
74
75
76
77
78
79
80
81
82
83
84
85
86
87
88
89
90
91
92
93
94
95
96
97
98
99
100
101
102
103
104
105
106
107
108
109
110
111
112
113
114
115
116
117
118
119
120
121
122
123
124
125
126
127
128
129
130
131
132
133
134
135
136
137
138
139
140
141
142
143
144
145
146
147
148
149
150
151
CREATE TABLE regions
(
region_id INTEGER GENERATED BY DEFAULT AS IDENTITY (START WITH 5) PRIMARY KEY,
region_name VARCHAR(50) NOT NULL
);

CREATE TABLE countries
(
country_id CHAR(2) PRIMARY KEY,
country_name VARCHAR(40) NOT NULL,
region_id INTEGER,
CONSTRAINT fk_countries_regions FOREIGN KEY (region_id)
REFERENCES regions(region_id)
ON DELETE CASCADE
);

CREATE TABLE locations
(
location_id INTEGER GENERATED BY DEFAULT AS IDENTITY (START WITH 24) PRIMARY KEY,
address VARCHAR(255) NOT NULL,
postal_code VARCHAR(20),
city VARCHAR(50),
state VARCHAR(50),
country_id CHAR(2),
CONSTRAINT fk_locations_countries FOREIGN KEY (country_id)
REFERENCES countries(country_id)
ON DELETE CASCADE
);

CREATE TABLE warehouses
(
warehouse_id INTEGER GENERATED BY DEFAULT AS IDENTITY (START WITH 10) PRIMARY KEY,
warehouse_name VARCHAR(255),
location_id INTEGER,
CONSTRAINT fk_warehouses_locations
FOREIGN KEY (location_id)
REFERENCES locations(location_id)
ON DELETE CASCADE
);

CREATE TABLE employees
(
employee_id INTEGER GENERATED BY DEFAULT AS IDENTITY (START WITH 108) PRIMARY KEY,
first_name VARCHAR(255) NOT NULL,
last_name VARCHAR(255) NOT NULL,
email VARCHAR(255) NOT NULL,
phone VARCHAR(50) NOT NULL ,
hire_date TIMESTAMP NOT NULL ,
manager_id INTEGER ,
job_title VARCHAR(255) NOT NULL,
CONSTRAINT fk_employees_manager
FOREIGN KEY (manager_id)
REFERENCES employees(employee_id)
ON DELETE CASCADE
);

CREATE TABLE product_categories
(
category_id INTEGER GENERATED BY DEFAULT AS IDENTITY (START WITH 6) PRIMARY KEY,
category_name VARCHAR(255) NOT NULL
);

CREATE TABLE products
(
product_id INTEGER GENERATED BY DEFAULT AS IDENTITY (START WITH 289) PRIMARY KEY,
product_name VARCHAR(255) NOT NULL,
description VARCHAR(2000),
standard_cost NUMERIC(9, 2),
list_price NUMERIC(9, 2),
category_id INTEGER NOT NULL ,
CONSTRAINT fk_products_categories
FOREIGN KEY (category_id)
REFERENCES product_categories(category_id)
ON DELETE CASCADE
);

CREATE TABLE customers
(
customer_id INTEGER GENERATED BY DEFAULT AS IDENTITY (START WITH 320) PRIMARY KEY,
name VARCHAR(255) NOT NULL,
address VARCHAR(255),
website VARCHAR(255),
credit_limit NUMERIC(8, 2)
);

CREATE TABLE contacts
(
contact_id INTEGER GENERATED BY DEFAULT AS IDENTITY (START WITH 320) PRIMARY KEY,
first_name VARCHAR(255) NOT NULL,
last_name VARCHAR(255) NOT NULL,
email VARCHAR(255) NOT NULL,
phone VARCHAR(20),
customer_id INTEGER,
CONSTRAINT fk_contacts_customers
FOREIGN KEY (customer_id)
REFERENCES customers(customer_id)
ON DELETE CASCADE
);

CREATE TABLE orders
(
order_id INTEGER GENERATED BY DEFAULT AS IDENTITY (START WITH 106) PRIMARY KEY,
customer_id INTEGER NOT NULL,
status VARCHAR(20) NOT NULL,
salesman_id INTEGER,
order_date TIMESTAMP NOT NULL,
CONSTRAINT fk_orders_customers
FOREIGN KEY (customer_id)
REFERENCES customers(customer_id)
ON DELETE CASCADE,
CONSTRAINT fk_orders_employees
FOREIGN KEY (salesman_id)
REFERENCES employees(employee_id)
ON DELETE SET NULL
);

CREATE TABLE order_items
(
order_id INTEGER,
item_id INTEGER,
product_id INTEGER NOT NULL,
quantity NUMERIC(8, 2) NOT NULL,
unit_price NUMERIC(8, 2) NOT NULL,
CONSTRAINT pk_order_items
PRIMARY KEY (order_id, item_id),
CONSTRAINT fk_order_items_products
FOREIGN KEY (product_id)
REFERENCES products(product_id)
ON DELETE CASCADE,
CONSTRAINT fk_order_items_orders
FOREIGN KEY (order_id)
REFERENCES orders(order_id)
ON DELETE CASCADE
);

CREATE TABLE inventories
(
product_id INTEGER,
warehouse_id INTEGER,
quantity NUMERIC(8, 0) NOT NULL,
CONSTRAINT pk_inventories
PRIMARY KEY (product_id, warehouse_id),
CONSTRAINT fk_inventories_products
FOREIGN KEY (product_id)
REFERENCES products(product_id)
ON DELETE CASCADE,
CONSTRAINT fk_inventories_warehouses
FOREIGN KEY (warehouse_id)
REFERENCES warehouses(warehouse_id)
ON DELETE CASCADE
);